

Frame seals
Frame seals are the seals between two mullions joining together. They are best applied in two steps:
- Sealant should be applied to the surfaces contacting each other. The amount of bond surface is limited by the thickness of the extrusion.
- After the two members are fastened together, additional sealant should be tooled over the face of the two members coming in contact.
Once the glass is in place, frame seals cannot be reliably installed. Verifying the frame seals are in place before the glazing is installed will prevent a lot of headaches.
Cleaning before sealing
Substrates need to be clean and free of moisture, oils, dirt, and debris before applying sealants. Countless times, we have witnessed an installer in the field apply a big dollop of sealant over metal shavings, stone or brick dust, and/or sawdust from drilling pilot holes. Moisture, oils, and debris contaminate the sealant bond surface, making it difficult to achieve continuous adhesion.
Since the integrity of the seals within a glazing system are critical to the system’s performance, incorporating debris within the sealant is counterproductive to that end goal. Also, the majority of these seals cannot be accessed once the glazing is installed.
Extrusion orientation
The shape of the extrusion can be used to direct water back out of the system. These extrusions have an intended orientation. We investigated a glazing installation where the contractor submitted shop drawings showing the correct orientation of an intermediate horizontal. The shape of the extrusion when installed with the correct orientation required the contractor to install the glazing from the exterior. Since the contractor did not want to install the glazing from the exterior, he instead flipped the intermediate mullion to allow for the system to be glazed from the interior.
This seemingly small deviation from the shop drawings resulted in water being directed to the interior instead of being drained back out of the system. The contractor offered to add additional seals, but these would not yield the same service life or performance as a properly oriented extrusion. For this reason, it is very important to verify proper orientation of the members during installation.
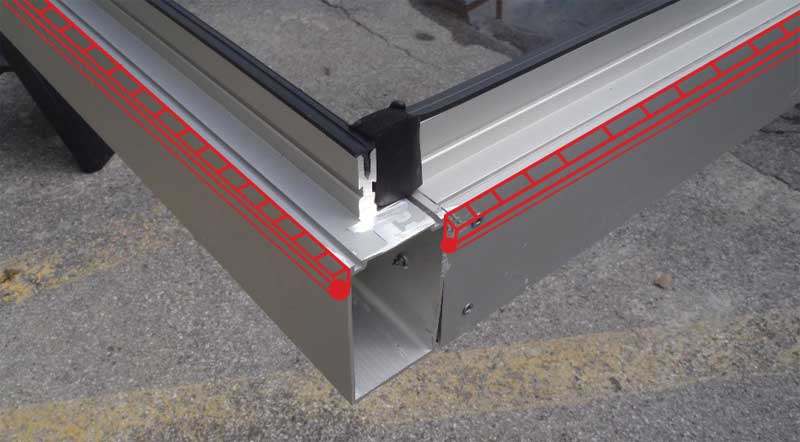
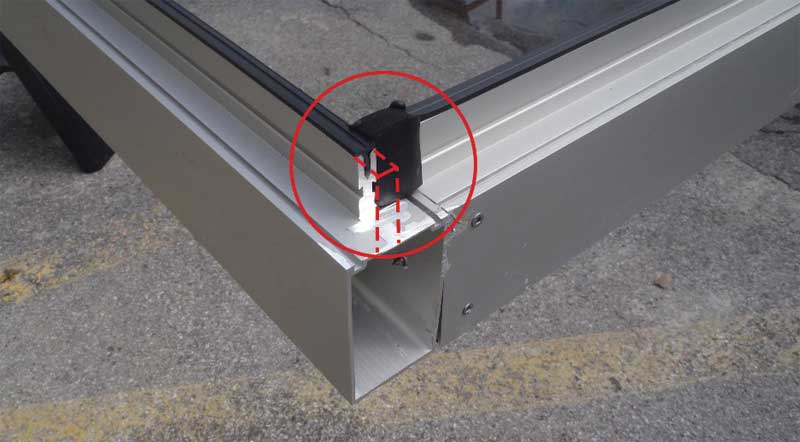
Reliable perimeter weatherseals
Installation instructions often show a bead of sealant as the perimeter weatherseal. With the section cut through the axis of the extrusion, all appears to be well. However, at the top and bottom of the vertical extrusions, the bond area for the perimeter weatherseal is reduced to the thickness of the extrusion.
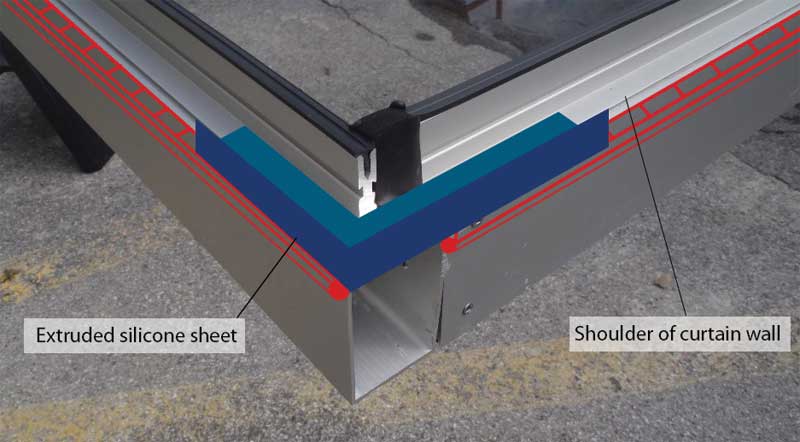
The sealant joint needs to be adequately bonded to its substrate to perform and flex as intended. Virtually all sealant manufacturers agree less than 6.4 mm (¼ in.) of bond area is insufficient for maintaining a reliable weatherseal. The reduction in bond surface is an inherent weakness in the perimeter weatherseal. This issue is further complicated by the stem or neck of the vertical extrusion. During the design phase, we often recommend the perimeter weatherseal be made with a silicone tape. This ‘transition membrane’ is applied to the face of the mullion, often referred to as the shoulder. The vertical mullion stem needs to be coped to allow for the transition membrane to extend onto the face and create a reliable corner detail.
A value engineering phase often eliminates the transition membrane along with the stem coping and the perimeter weatherseals are back to being sealant. This is not a prudent design decision. If a leak is discovered after installation, it becomes increasingly difficult and costly to cope the stems of the vertical mullions and install isolated transition membranes at the vertical mullions after the glazing system has been installed.
Allowing for slab deflection
A glazing system is not designed for, or intended to bear, the load of a floor slab above. The contractor is responsible for taking field measurements to replace the measurements provided in the design drawings. In several instances, we have seen glazing systems that do not allow for slab deflection despite having shop drawings to the contrary.
Often, the unit being installed is too large and does not allow for slab deflection. More likely, however, the units were based on a fixed dimension on paper and the building was not constructed to those dimensions or the notion of building tolerances were not taken into consideration. In these cases, to avoid placing the glazing system in a potentially hazardous condition, either the structure or the glazing system needs to be modified. Since modifying building structural elements is not cost-feasible, modifying the glazing system is generally the least disruptive approach to pursue. However, modifying a system in the field does not come without substantial cost to the installer. Many litigation proceedings play out in this fashion to no one’s benefit.

