

by Richard P. Kadlubowski, AIA
Waterproofing failures are more easily overlooked than roofing problems, so design professionals tend to hear less about them. When compared with a reroofing project, however, a below-grade or interior rehabilitation can be far more disruptive and expensive.
Whereas a roof leak can generally be identified with simple test probes, waterproofing breaches can be challenging to diagnose. Even a seemingly superficial leak can be symptomatic of hidden moisture-related deterioration. For basements, vaults, tunnels, and water features, excavation of overburden is often necessary; in commercial kitchens or lobbies, removal and replacement of fixtures and finishes is frequent.
In most commercial and institutional applications, a complete reroofing project can usually be anticipated every 20 years or so. Waterproofing, because it is so difficult to access, should have a design life as long as that of the building—unfortunately, with so many opportunities for damage, incorrect design, or poor execution, it can fail well before its time. When this happens, architectural investigation is needed to determine the location and cause of the leak, the extent of the damage, and the appropriate remedy.
While it can be a major undertaking to properly identify and correct faulty waterproofing, it is far worse to adopt a patch-it-and-hope-for-the-best attitude. All too often, even well-meaning attempts at treating the symptoms of waterproofing failure serve only to trap or redirect moisture, compounding the problem. While prevention is the obvious first choice for waterproofing success, there are many occasions for error: in design, during construction, and throughout operation. Until the waterproofing deficiency is resolved, the problem will only get worse.
Waterproofing basics
Various components contribute to a waterproofing system, such as drainage composites that direct water away from the structure, tie-ins between façade and foundation membranes, and watertight plumbing in food service areas.
Impervious membranes are one critical component of waterproofing, both for below-grade applications (e.g. foundation walls, basements, tunnels, and vaults) and areas subject to high moisture levels (e.g. fountains, lobbies, kitchens, and mechanical rooms). Waterproofing membranes may be applied on the ‘positive’ or ‘negative’ side.
Waterproofing on a building is typically an impervious material that will prevent water entry; building cladding materials may or may not be actual waterproofing. Most building cladding materials (e.g. brick masonry in a cavity wall assembly or rainscreen systems) are not waterproofing—they are only weather barriers. Similarly, although Tyvek-type materials shed water, they are not true waterproofing.
There is a distinction between waterproofing and roofing that has to be understood. Plaza decks over occupied spaces are waterproofed; the deck is technically not a roof. The manufacturers will make this distinction, because also typically waterproofing applications do not come with as complete a warranty coverage as do some roofing systems.
Positive-side waterproofing
By creating a waterproof barrier on the side of applied hydrostatic pressure, positive-side waterproofing prevents water from entering the wall. For a foundation, this would be the outside surface, closest to the soil; for a fountain, it would be the inside (i.e. where the water is).
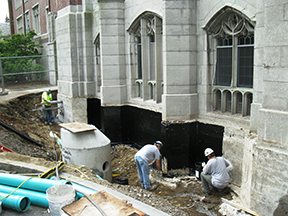
For below-grade applications, the earth can be banked back such that a positive-side membrane is installed after the foundation is set. In urban areas, this may not be an option. Blind-side waterproofing incorporates the waterproof membrane on the face of the shoring before the foundation is cast. Concrete is then poured, and the waterproofing fuses to the foundation wall as it cures.
Options for positive side systems include:
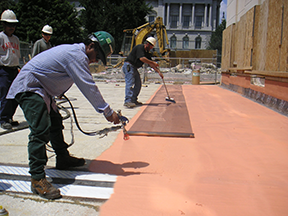
- fluid-applied membranes—similar to those used in roofing applications, they roll or brush on as a liquid and cure to form a monolithic, seamless membrane;
- sheet systems—also similar to those used on roofs, including single-ply thermoplastics and rubberized asphalts;
- hybrid systems—combining a fluid-applied membrane with embedded fabric reinforcing to create a stronger, more resilient waterproof barrier; and
- bentonite clay—a natural mineral derived from volcanic ash and applied as a sheet, mat, panel, or spray to swell in the presence of moisture to create
a solid clay barrier.
Positive-side systems, used both above and below-grade, are generally preferred over negative-side applications for their effectiveness. The structural barrier is completely protected from corrosive chemicals in groundwater, as well as freeze-thaw cycle damage.
The shortcoming to positive-side systems lies in leak detection and remediation. Once backfill is in place, the actual condition of the waterproofing cannot be inspected without excavation. If the system fails, rehabilitation can involve major excavation and reconstruction of paving, landscaping, and wall systems.
Blind-side waterproofing is similar to positive-side methodologies, but once the concrete is poured, the waterproofing is buried and cannot be inspected. Even for membranes installed after concrete is cast, it is too late to correct for sloppy installation once the waterproofing is buried.
Negative-side waterproofing
Negative-side waterproofing protects the surface opposite the side of applied hydrostatic pressure (e.g. the inside of a basement wall), such that water is redirected after it enters the substrate. Negative-side waterproofing materials include:
- cementitious systems—a combination of chemical waterproofing additives or acrylics with cement and sand to achieve an impervious surface;
- acrylic, latex, or crystalline additives—products that penetrate into the surface to provide water protection.
Since the negative side is more accessible, it is easier to identify leak locations than with positive-side systems. Negative-side coatings or injections also can be applied as a retrofit measure.
On the downside, with negative-side waterproofing, moisture still enters the wall assembly, which can cause components to degrade over time. The constant presence of moisture can also lead to mold growth, corrosion, concrete deterioration, or damage to interrelated building elements like floors or windows.
Combination systems
For sensitive spaces below-grade, more sophisticated systems have been used. As an example, a rare book vault built below the water table employed a wall-within-a-wall arrangement, with a pump system in the channel between the inner and outer walls to augment the positive side membrane.
Dampproofing vs. waterproofing
Even some seasoned design/construction professionals mistakenly use the terms dampproofing and waterproofing interchangeably, but they are not the same. Dampproofing is a bitumen-based or cementitious treatment applied to the positive side of foundation walls. The quick, inexpensive coating aims to discourage moisture from wicking up into below-grade walls through capillary action. Named for the tiny, thin apertures, or capillaries, in porous materials like masonry and concrete, capillary action moves water from damp to dry areas, sometimes against gravity.
Waterproofing represents a much broader class of moisture protection. Unlike dampproofing, which cannot bridge cracks, a waterproof membrane can stretch to accommodate some degree of differential movement, settlement, and shrinkage. Even when subjected to the hydrostatic pressure of a high concentration of water, waterproofing is designed to be flexible and durable.
Dampproofing is not a substitute for waterproofing. While sometimes used because they are far less expensive than a waterproof membrane, dampproofing products are of a lesser grade and are applied as a sparse coat with little attention to detail. Waterproofing membranes demand precise application and detailing, and they can be reinforced with integral fabrics for increased stability. Dampproof coatings may be cheaper at the outset, but the long-term durability and effectiveness of properly selected and installed waterproofing are well worth the extra up-front cost.
Waterproofing failures
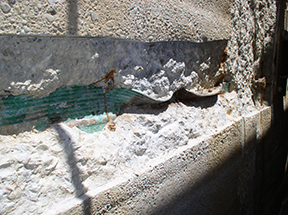
Even seemingly minor evidence of moisture may presage waterproofing distress. Examples include:
- blisters or peeling paint;
- mold, mildew, and vegetative growth;
- dampness or dribbles of water;
- stains and rust;
- odors;
- efflorescence, or white powdery deposits;
- cracked walls; and
- wood rot.
Moisture-related deterioration becomes more costly to repair the longer it is allowed to progress. Keeping a record of water infiltration symptoms is important to establishing how, where, and when moisture is penetrating the waterproofing system. An action plan for signs of water entry can involve six steps.
1. Review the leak history.
It is important to note how the building responds to weather events, such as high humidity, rain, or snow. Temperature fluctuations affect building materials, so any correlations with moisture observations should be recorded.
If the leak is worse after it rains, surface runoff is the likely cause. The joints between walls and slabs, as well as conduits, must be checked. However, when the leak is constant (i.e. uncorrelated with rain), it may be caused by a water line—either potable or sanitary sewer. Even an adjacent excavation or infill construction can indirectly lead to leakage by causing differential settlement cracks or changing water flow.
When the leak occurs after using certain equipment in a kitchen or mechanical room, one should perform usage tests to identify the faulty component. If water bubbles up between the foundation wall and the slab-on-grade, rising groundwater levels may be the issue, or a combination of groundwater and surface runoff. Flash storms can overflow combined sanitary and storm sewers, raising the water table. Clogged or inadequate perimeter/footing drains can also contribute to the problem.
2. Identify the water source.
A water test can determine which type of water is leaking. If the water contains chlorine, it is potable (drinking) water, and the source is likely a plumbing leak. If the water has a high coliform count (e.g. e.coli bacteria), a sewage waste line is the problem. If the water tests negative for both of the above, it is most likely groundwater or stormwater.
3. Rule out ambient moisture.
After a few days, if the sheet is wet on the side facing the wall, water intrusion through the wall surface is most likely the problem. If moisture appears on the side facing the room interior, condensation may be the cause of observed moisture, which can be addressed by adjusting HVAC equipment or improving ventilation.
4. Determine the leak location.
Water is deceptively migratory—the spot where stains or cracks are observed can be quite remote from the site of water entry. Recording when, where, and under what conditions signs of moisture are present can help determine the water access pathway. Original as-built drawings and construction specifications provide clues as to potential weak spots in the waterproofing system.
Non-destructive testing may be useful in identifying leak locations. Flood tests saturate an area, such as the backfill at a foundation wall, to generate conditions conducive to moisture penetration. Waterproofing failures can then be noted and addressed. Additives, such as dyes or scents, incorporated into the flood test water can help identify leaks that are otherwise difficult to detect.
Once the investigation determines a probable location, exploratory openings and test probes can verify the source of the leak.
5. Resolve the leak.
A course of corrective action may include drainage improvements, injections at interior surfaces, and water barriers at penetrations.
Drainage improvements
Stormwater leaks can often be resolved by redirecting water away from the foundation. Repair areas include:
- improperly connected leaders and gutters;
- downspout extensions too close to foundation walls;
- clogged roof drains and gutters;
- flashing failures in pools or planters;
- expansion joint failure at plazas and pedestrian tunnels;
- leaking underground oil storage tanks causing membrane disintegration;
- backfill settlement directing surface water to footings;
- improper drainage and seals at stairways, window wells, and openings; and
- inadequate subsurface drainage.
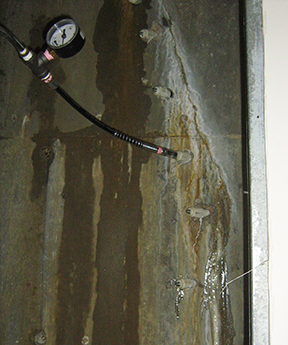
Injections at interior surfaces
Resolving cracks through injection with epoxy, hydrophobic, or hydrophilic resins can be an economical way to solve minor waterproofing problems without excavation and reconstruction. However, this approach relies on trial-and-error, as it is nearly impossible to know what conditions are on the other side of the wall without seeing firsthand.
In one anecdote from a waterproofing contractor, injections were used to resolve failures in an aquarium tank. The job went over budget as more and more material was required to fill cracks. When the team finally finished and tried to refill the tank, nothing happened. The sealer had penetrated directly into the water system, filling conduits and clogging the pump. Repair costs far exceeded the initial project budget. The lesson—where injected materials have the potential to penetrate subsurface systems, it is probably best to take the known cost of investigation, excavation, and repair over the unknown cost of blind injection.
Water barriers at penetrations
Appropriate moisture protection, including sealants, should be installed at penetrations. However, unless moisture problems are stopped at their source, such barriers may only serve to re-direct water to another weak point. Good sealant integrity is important, but it is really a secondary waterproofing provision. The primary measure is to control moisture levels.
6. Repair the damage
Once the leak has been resolved and deterioration arrested, water damage to walls, fixtures, and finishes may be required. In concrete structures where water infiltration has led to reinforcement corrosion, steel should be repaired and sealed, followed by application of a compatible concrete patching mortar. Migrating corrosion-inhibitors, either integrated into the patching compound or applied as a surface sealer, can provide additional protection to the structure.
For outdoor areas, including plazas, sidewalks, and landscaping, some rehabilitation may be necessary following waterproofing remediation. If repair work involved excavation, or if leaks have damaged fixtures or dislodged pavers, then outdoor finishes and plantings may need to be reconstructed. Portions of the façade may also require rehabilitation.
Where leaks migrate into occupied space or originate at an indoor area, water-damaged drywall, trim, paint, ceiling tiles, flooring, and fixtures may need to be replaced once the new waterproofing system is installed. Moisture also can lead to mold growth—
a health hazard that may require professional removal and cleaning.
The longer a leak is allowed to progress unchecked, the more extensive the underlying deterioration can become. Stopping a minor leak is far easier than rehabilitating the damage resulting from a major one.
Causes of waterproofing failure
There are a variety of potential causes for the wide array of many possible waterproofing issues.
Design omission
In cases where unusual intersections, multiple penetrations, or differential pressures demand elaborate detailing, designers are sometimes guilty of leaving these vital junctions to the contractor’s discretion. Where a waterproofing construction team has had success with similar configurations in the past, this may not cause a problem. In the more likely event the general contractor is facing an unusual arrangement demanding sophisticated design, relying on standard details is probably insufficient. It is the designer’s responsibility to detail any situations in which waterproofing might be compromised.
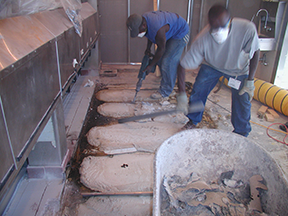
Installation error
Even the most rigorous and exacting drawings and specifications are of little use when workers fail to take care with materials and installation. Careless backfilling is a primary source of waterproofing failure, as is damage from heavy equipment. For example, the contractor at a below-grade book vault rushed to pour concrete walls without regard for delicate water stops, crumpling them in the process and rendering them useless. The resultant water infiltration required extensive excavation, concrete repair, and waterproofing rehabilitation to resolve.
Deficient quality assurance
Oversight and review during construction by an owner’s representative is an essential part of the quality control process. Should site conditions differ unexpectedly from design documents, or unforeseen circumstances present themselves, an onsite architect or engineer can respond to last-minute changes without delaying the construction schedule. The design professional can direct the general contractor to protect the work of the waterproofing installer from damage during construction.
Having a site representative present during construction is important to see installation proceeds according to design intent. Eliminating this important part of the design process is often justified by owners with claims of guarantees or, failing that, litigation. Although field reports and photographs can serve as evidence at trial, the real benefit to onsite quality assurance lies in avoiding waterproofing failure in the first place. Submittal review and formalized inspection can make the difference between a successful waterproofing project and catastrophic failure.
Conclusion
For even the best-performing systems, it is prudent to remain vigilant for signs of trouble, so burgeoning problems can be stopped before they get out of hand. In new construction situations, owners can avoid costly waterproofing rehabilitation through appropriate design, correct application, and due diligence during construction. Owners and managers of older buildings have to deal with what they have got—and, often, that means addressing inexpertly designed or incorrectly installed moisture protection systems.
With thoughtful investigative work and creative water management strategies, even the most demanding waterproofing problems can be successfully addressed. The best approach is to waterproof basements, tunnels, mechanical rooms, below-grade levels, kitchens, vaults, water features, and sensitive spaces diligently and correctly from the outset.
| Glossary of Waterproofing Terms |
| Blind-side waterproofing: Installation of waterproofing membranes and drainage before the concrete foundation is poured.Capillary action: Movement of liquid in porous materials or thin tubes (capillaries), due to attraction between the molecules of the liquid and those of the solid.
Condensation: The change in phase from a gas to a liquid, as when water vapor cools to liquid water. Dampproofing: A coating that has been designed to limit soil moisture penetration. Efflorescence: A white crystalline or powdery crust, made up of dissolved salts deposited by water seepage after evaporation. Hydrostatic pressure: The force exerted by a fluid, such as water, due to gravity. Negative-side waterproofing: A barrier opposite the side of applied hydrostatic pressure (e.g. the interior of a foundation wall), whereby water can enter the wall but not pass through it. Positive-side waterproofing: A barrier on the side of applied hydrostatic pressure (e.g. the exterior of a foundation wall), such that water is blocked from entering the surface. Waterproofing: A system designed to prevent and manage water infiltration that may include coatings, membranes, drainage media, perimeter drainage, interior channels, sump pumps, or other elements. |
Richard P. Kadlubowski, AIA, is senior vice president and director of architecture with Hoffmann Architects, an architecture and engineering firm specializing in the rehabilitation of the building envelope. As manager of the Washington, D.C., office, Kadlubowski resolves complex waterproofing situations for existing buildings and new construction, including fountains, kitchens, lobbies, below-grade structures, terraces, and plazas. He may be reached
at r.kadlubowski@hoffarch.com.


I didn’t know there were so many options to waterproof something. For some reason, I just thought you have to line everything with plastic and call it good. I’m glad to know I’m wrong, because that never seemed like a reliable way to do it anyway. I should get my house waterproofed in some leaky places.
I think maintaining the roof is really important. If it’s not properly repaired and waterproofed it can get water damaged, and water does a surprisingly good amount of damage in a small amount of time. It would be good to take care of that before it’s a big problem.
Thanks for sharing this information on waterproofing your home. In my opinion, I think preventing the water damage is one of the most important aspects of protecting your home. Using things like excavation and landscaping to prevent water from moving towards your home could end up saving you from a lot of trouble. In fact, this makes me wonder if I should have my home inspected to see if I need to change the direction of runoff.
I wish my house was more waterproof. We have a few floods every year, and it always wreaks havoc on our house. Maybe we should get a professional to come and take a look at it. Maybe I can find someone before the next flood.
I really appreciate you posting about this. Just the other day, a bad storm came rolling through my neighborhood, and it turned out that I had a leak in my basement walls. Because of this, my whole basement got flooded. I like that part where you talked about repairing the damage. This is definitely something that I needed to learn about. So thank you so much for all of this!
I didn’t know so much went into waterproofing a basement. It makes sense that the ground should be sloping away from the house and drain pipes installed. I’ll have to look at my house to see if needs work.
Depending on where you live, you may or may not need basement waterproofing. If you live at or near sea-level, then it is probably a worthwhile investment. To do it right, you need to do more than just add drains for the water. You need to take into consideration where the main source of water will be coming from and how you would go about preventing the leaks.
Thank you so much for sharing
Per leaky basements, other than basement back-ups, most leaky basements are due-to 1+ cracks in the foundation wall (or other openings in the wall such as rod holes or where a gas line etc goes through a wall, there are often gaps/crevices around these service lines), or on block and brick foundation walls there often will be cracked-parging on the outside of the wall that was applied when the home was built or, some homes/basement walls were not parged when they were built.
Other possible exterior entryways for water to enter a house and wind up in the basement are openings/gaps along the grade, often where the first course of bricks sit on top of a basement wall and openings/crevices around and just under any basement window or around any doors. Water can also first enter through cracked-deteriorated mortar joints, bricks and where any service line enters the house (if not completely sealed on the outside).
Some basements can take on water if the lateral-line becomes clogged or deteriorates/breaks/settles.
All of these above have nothing to do with a supposed-need for any interior basement system and sump pump, nope.
Every interior system company/contractor I have seen/met or read their websites are crooks. Interior systems are the only thing they do and again these systems do not stop the water from where it actually enters most homeowners basements. Hence, they’ll also not stop-prevent mold or efflorescence etc on interior basement walls which is why most of these companies will place/attach some sort of membrane/plastic etc against the interior wall, to HIDE/CONCEAL the wall, to hide any cracks from widening, to hide water, mold, efflorescence etc.
Further, interior basement system companies almost always do not determine, do not find/locate/identify WHERE the water is actually first entering and again, they don’t repair/waterproof it.
They almost always will lie, be deceptive, misrepresent a homeowners actual problem and true solution so they can install the one thing they do! And others simply do NOT know, do not understand how to go about determining/identifying a homeowners actual problem = negligent, incompetent.
Many cracks in basement walls are due to the SOIL that is against the exterior of the wall. Upon that soil shrinking or getting saturated, cracks, leaks occur in the basemen and if your basement is finished (drywall, paneling etc) then you will NOT see a crack in the wall or, water stains UP HIGH on the basement wall (exterior openings above grade level) and so these interior companies lie to many homeowners because they only see water at the very bottom of the basement wall, where the bottom of the wall and the basement FLOOR, meet.
They’ll often tell homeowners that water they see along the floor-wall is due to a supposed hydrostatic pressure problem UNDER the basement floor that only their interior basement system and sump pump can resolve.
This, the above, is 99% total nonsense!
1% or so of the time, water can accumulate under a basement floor and then, say, rise up through floor cracks but most of those are DUE TO a possible lateral line blockage or, a problem/blockage/pumping station etc, it’s can be a CITY problem!
Then there will be a handful of homeowners who get water accumulating under the basement floor because they may have a problem with an existing sump pump or, a blockage in the drain tiles that are down in the sump-pit. need a plumber to snake. Some homeowners get water accumulating under their floor if they/somebody cemented over and then often carpet-over a floor drain that is backing up, needs to be snaked.
Not to discredit the general points Mark Anderson makes, but here is an example of that 1%: My basement is dug into a hill of very dense “hardpan” soil which percolates very slowly. After several days of hard rain (I’m in Oregon), water rises in the gravel below the basement slab. Water collects in the bathtub formed by the excavation into this soil. Twice in 20 years, it has risen above the level of the basement floor, and flooded the basement to a ±1.5″ depth. There are a few holes out in the middle of the basement floor slab which become little artesian wells.
The house is nearly 70 years old, so I cannot claim that roof drainage is perfect. Since the first flood I have put most of the roof drainage on the downhill side of the house into pipes below grade and beyond the fill around the perimeter of the house. But on the uphill side, there is inadequate fall to drain anything by gravity. A sump pump is the only practical solution in my case, and I have installed one. Flooding appears to be a thing of the past – until the power goes out and the generator won’t start.
For me, an important part of this process is identifying the water source. I had a pipe leaking, and it took me forever to find out where the water was coming from. I wish I would’ve known your advice and done a water test. I’ll make sure to use that the next time a problem comes up with me or my neighbor.
Thanks for the great explanation of how different waterproofing techniques work. Lately our basement has had water running down the walls from outside, so I know I have to fix the problem. Would bentonite clay be a good option for basement walls? I want something that will last a long time.
I appreciate your tip on checking the leak location before waterproofing your house. It would seem that if you determine the area most needing waterproofing you would be able to more carefully treat your house. My wife and i are renovating our home and considering waterproofing our basement, we should identify the source of any leaks before we do though.
You have written a great post and of course, if we don’t look for home maintenance then we will definitely get into water damage problems. Water damage is a big problem for all homeowners as it creates a big damage to home and it’s foundation.
I had no idea that when you are waterproofing that they review the leak history of the building. My aunt had to have her basement waterproofed, because of a leak in the walls. I will have to ask her how it went, and if her house had ever had leaks before.
I like the fourth tip you gave about determining the leak location. A really good way to start waterproofing your basement is to take care of current leaks so that you don’t have to worry about it later on. It’s interesting, too, that water leaks are migratory, like you said. I didn’t know that they could move around! I’ll have to check if the basement of my new home is sufficiently waterproofed.
Nice job to put this article, very intense and well explained. Nice tips and recommendations.
Thank you
Great article. An even more precise and scientific method of locating a leak, as opposed to traditional flood testing, would be electronic leak detection. Both the low voltage/wet method (electronic field vector mapping) for flat surfaces as well as the high voltage/dry method (for flat, sloped and vertical surfaces) can accurately locate a breach in any waterproof membrane with the exception of EPDM (due to it’s conductive carbon filler). While it may be a more expensive test method, it is a far more accurate way to determine if a leak exists and more importantly, where it is originating.
Thanks for bringing to my attention that waterproofing breaches can be really hard to figure out. If that’s the case, it sounds like hiring a professional would be the more effective solution. I’ve been having some problems with leaking in my basement. I don’t want to have to deal with water damage, so I want to get my basement waterproofed. It seems like it would be best to hire a professional so they can figure out where the leaking problems are and fix them.
It’s great that you’ve discussed about positive-side waterproofing, which is used to prevent water from entering the wall. I’ve noticed that our basement was flooded the last time that it rained, and it appeared that the leak came from its walls. I guess it’s best to get in touch with an expert on this matter so that they can see if this is the right solution for that problem.
Hi,
I’m looking to have an idea on how much does it cost to redone a waterproofing for a building facade.
15 floors concrete / aluminium.
Appreciate your help.
Thanks.
What about integrated crystalline waterproofing such as Xypex? Have you had a poor experience with it, is this why it is excluded?
Helpful post, I think hire best roofing contractor that specialize in just roofs and provide best quality service.
your blog is very interesting. You share a lot of information through your blog. You have a great knowledge of everything. I also remember a blog that is related to waterproofing in construction. You must visit the site once.