Aesthetics versus function: Resolving issues with exposed drip-edge flashing on masonry walls
by Katie Daniel | April 6, 2016 2:00 pm
by Richard Filloramo, B.S. Arch, A.S. CT
Designers are creating new and exciting contemporary masonry designs that demand clean, smooth wall plane elevations. One challenge that can interfere with unobstructed aesthetics is the visual effects of masonry drip-edge flashing. This potential obstacle has also carried through to traditional masonry design. Designers and specifiers can find it difficult to balance design and functional water management requirements.
An exposed metal drip edge diverts water and snowmelt away from the wall below, and prevents it from re-entering the wall. At relieving angles and lintels, a drip edge will direct water away from sealants joints, which can be a source of water infiltration if not maintained over time. Drip edges also:
- protect steel lintels from corrosion;
- help minimize stains on the masonry (especially below louvers);
- provide assurance that flashing has been installed; and
- prevent capillary action of moisture moving up through the masonry (also referred to as ‘rising damp’) when it is in contact with grade.
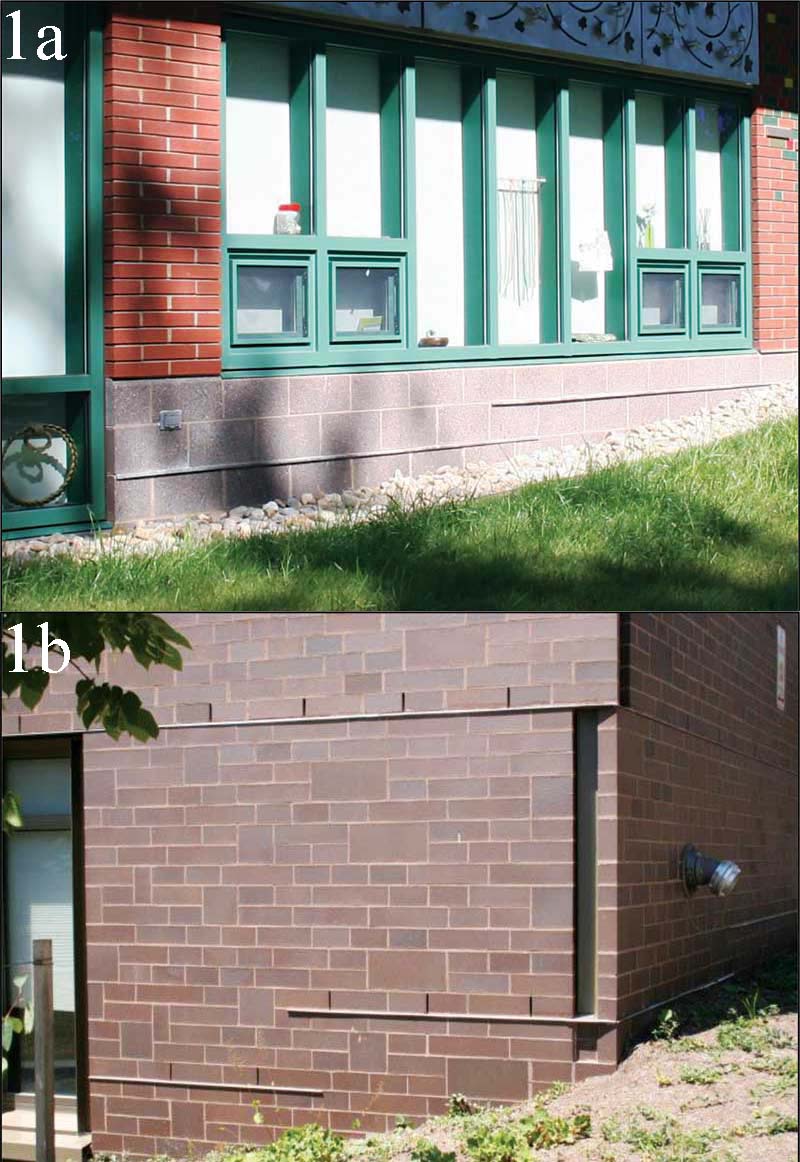
However, drip-edge flashing at highly visible building locations can create aesthetic concerns, as shown in Figure 1.
New masonry flashing details, materials, and moisture control systems have enabled designers to provide water management solutions without sacrificing aesthetics. This article will provide details, specifications, and explanations for a variety of flashing details that can enable code-compliant water management flashing systems without aesthetic interference.
Understanding the codes
Chapter 14 of the 2012 International Building Code (IBC) provides requirements for exterior walls. Section 1403.2−Weather Protection requires exterior walls provide:
- a weather-resistant exterior envelope;
- flashing, as described in Section 1405.4;
- a design preventing water accumulation;
- a water-resistive barrier (WRB);
- a means for draining water that enters the assembly to the exterior; and
- protection against condensation.
Photos courtesy Rick Filloramo
While the code lists exceptions, the basic compliance to these provisions is still required. For example, one exception notes a weather-resistant wall envelope shall not be required over masonry walls designed in accordance with Chapter 21−Masonry. However, this does not relieve the designer from complying with the weather protection requirements, as Chapter 21 established prescriptive and engineering design of masonry and does not address weather resistance. Chapter 21 also requires compliance with Building Code Requirements for Masonry Structures (i.e. The Masonry Society [TMS] 402-11/American Concrete Institute [ACI] 530-11/American Society of Civil Engineers [ASCE] 5-11) and Specifications for Masonry Structures (TMS 602-11/ACI 530.1-11/ASCE 6-11). Chapter 6–Veneer, Section 6.16 of that first document requires the design of masonry veneers to resist water penetration.
Air, moisture, and vapor control requirements are also included in Chapter 14 and in the International Energy Conservation Code (IECC) and American Society of Heating, Refrigeration, and Air-conditioning Engineers (ASHRAE) energy codes.
Flashing requirements
It is important to review IBC section 1405.4:
1405.4−Flashing. Flashing shall be installed in such a manner so as to prevent moisture from entering the wall or to redirect it to the exterior. Flashing shall be installed at the perimeters of exterior door and window assemblies, penetrations, and terminations of exterior wall assemblies, exterior wall intersections with roofs, chimneys, porches, decks, balconies and similar projections, and at built-in gutters and similar locations where moisture could enter the wall. Flashing with projecting flanges shall be installed on both sides and the ends of copings, under sills, and continuously above projecting trim.
1405.4.1−Exterior wall pockets. In exterior walls of buildings or structures, wall pockets or crevices in which moisture can accumulate shall be avoided or protected with caps or drips, or other approved means shall be provided to prevent water damage.
1405.4.2−Masonry. Flashing and weep holes in anchored veneer shall be located in the first course of masonry above finished ground level above the foundation wall or slab, and other points of support, including structural floors, shelf angles, and lintels where anchored veneers are designed in accordance with Section 1405.6.


Exposed flashing is generally metal, and installed to prevent moisture from entering the wall are predominantly found at roof/wall interfaces or at other locations adjacent to another exterior façade material or element. Flashings are installed to re-direct water to the exterior and are attached to the vertical masonry backup, preferably along with a termination bar and sealant (Figure 2). The flashing is then installed along the horizontal plane where water exits through weep vents.
The next code requirement—flashing at perimeters of exterior openings or locations where water could enter the wall—is sometimes misinterpreted or confused with air/moisture/vapor barrier requirements. Generally, through-wall flashing is installed at vertical windows and doors (perimeter jambs), as these locations are not typically considered spots where water can enter and flashing can be detailed and connected to effectively “drain water.” However, window and door jambs, and other similar type openings, often require a moisture management transition membrane integral with the air/moisture/vapor barrier.
There is only one location in the code where a ‘drip’ is code-required, as defined in 1405.4:
Flashing with projecting flanges shall be installed on both sides of and the ends of ends of copings, under sills, and continuously at projecting trim.
This definition applies to metal exposed copings and exposed flashings over wood or other exterior trim elements.
In 1405.4, the 2012 IBC Code Commentary notes exposed flashing drips prevent the re-entry of moisture below the flashing. Figure 1405.4(5) illustrates this concept, but the details do not indicate the industry requirement that flashing be sealed to the surface below. This assists at preventing moisture from reentering the wall system and flashings that extend to the face of masonry have performed successfully for years. The code and commentary also indicate other acceptable practices.
Base of wall: Masonry above grade
Flashing at the base of walls, near grade and with exposed flashing drip edges, are highly visible and noticeable, especially at building entrances, exterior patios, sloping grades, and at prominent elevations. Normal tolerance in the concrete shelf and foundation can further cause aesthetic detraction by creating inconsistent drip-edge overhangs.
Figure 2 illustrates a typical wall section in which the exterior masonry veneer begins 100 to 150 mm (4 to 6 in.) above grade on the foundation or brick shelf (as shown in 2b and 2c). These details offer the most protection for the masonry veneer as it is not in contact with soils or landscaped material, and is less susceptible to staining (i.e. the aforementioned ‘rising damp’). Masonry materials that are elevated, as shown in these details and illustrated in Figure 3, are also protected from snow removal and general maintenance at walks, paved areas, and lawn and landscaped areas.
While Figure 2 shows a typical exposed metal drip edge, flush hemmed-edge metal flashing (which terminates at the exterior face of the veneer) has recently been used to eliminate the aesthetic exposure of the drip edge (Figure 4).
The critical requirements for using hemmed-edge flashing are:
- The metal flashing must have a hemmed edge—approximately 12 to 20 mm (½ to ¾ in.) to provide rigidity of the metal flashing and protect the installers and public from sharp edges.
- The hemmed-edge flashing must be sealed and adhered to concrete or the surface below to prevent water from entering under the flashing system. This detail is made possible and durable thanks to new butyl and hybrid butyl-silicones that remain flexible, are less likely to dry out over time, and do not ‘drool.’
- The hemmed edge must be flush with the exterior face of the veneer.
- The continuation wall flashing (either membrane or metal if two-piece) must be sealed and adhered to the top of metal flashing with two or three beads of sealant as shown in Figure 4. This is critical, even with drip flashing, to prevent water from migrating under the flashing.
- A brick shelf 100 to 200 mm (4 to 8 in.) lower than the top of foundation and floor slab is recommended, but not required. This acts as redundancy protection—should water enter the system, it will not enter the building at the floor level.
- Installing the horizontal flashing leg, drip edge, or flush edge at a slight bevel to the exterior assists in directing moisture to the outside of the wall assembly. This is accomplished by mortar wash or other acceptable methods. Sloping the flashing may not be necessary if the horizontal leg is secured and adhered to the surface below to prevent water reentry. The designer has options based on each type of detail.
Figure 5 depicts successful results with flush, hemmed- edge flashing.
Stainless steel membrane flashings consisting of a thin layer of stainless steel bonded to an adhesive layer are fairly new to the market. They can be cut after installation to follow the contour of the veneer, which is especially useful with split-face stone products (Figure 6). The aesthetics of this detail and care of installation should be agreed on with a mockup panel.
Base of wall: Masonry below grade
Many designers prefer the masonry to start below grade to achieve a more uniform appearance and offer continuity in the elevation. This is especially true at elevations where the grade changes or slopes and can leave uneven areas of exposed concrete foundations. While this detail provides more challenges, a base-of-wall flashing system can still be achieved with or without an exposed metal flashing drip edge. Figure 7 illustrates this detail with exposed drip-edge flashing (7a) and a flush hemmed edge (7b). In either scenario, it is critical to include a 300 to 400-mm (12 to 16-in.) wide mowing strip or drainage bed filled with landscape stone to allow moisture to drain away from the masonry veneer. Figure 8, in addition to the photo on this issue’s cover, show installations with various landscape stones.
The water should be directed to the exterior wall drainage system below grade. When a drip edge is used, there is protection from staining migrating up the wall. It is important to consider the density and durability of any material used below grade. Some bricks that are hard, dense, low-absorptive, and have a smooth face are more durable and suitable than a soft, highly absorptive or textured brick in this application. Some designers often use a base of hard dense stone, which also provides an accent relief band.
Figure 9 is an example of a successful installation with a mowing strip and flashing cut flush with the wall. This installation, which has endured well, is more than 30 years old. Figure 10 is an installation with no mowing strip and perhaps a more absorptive brick. Other issues may be a lack of maintenance and irrigation spray hitting the wall. Moisture stains and moss have infiltrated the wall.
Top of walls
Another aesthetic concern has escalated with the advent of contemporary design—the transition detail at the top of walls at masonry copings. This is true at site walls and tops of buildings at roofs and parapets. The traditional detail with a coping stone or precast coping has the components shown in Figure 11.
- The coping will overhang the top of wall 40 mm (1 ½ in.) and include a drip cut in the underside of the stone.
- Metal flashing with a drip edge is securely installed under the stone coping.
Designers that desire a clean, smooth elevation are eliminating the stone overhang. This is acceptable as long as a drip-edge flashing is utilized, as shown in Figure 12. Some designers have gone a step further and eliminated the drip-edge flashing to use the flush hemmed-edge flashing only (Figure 13).
While this detail has been used, it is critical the hemmed-edge flashing extend to the face of the masonry and be sealed and adhered to the masonry below. This can sometimes be challenging when accounting for normal tolerances in construction and materials. It should be noted these details with flush caps are not as effective at deterring water as caps with overhangs and drip-edge flashing.
Other locations
Flush hemmed-edge flashing has been used at other locations such as lintels and shelf angles, but does not provide as much protection as its traditional exposed drip-edge counterpart. Drip-edge flashing at lintels above windows, curtain walls, and other openings assists at diverting water away from the sealant joint between the window and steel lintel above (Figure 14).
Conclusion
With proper care in detailing and installation, flush-hemmed-edge metal flashing can successfully provide moisture management and not interfere with building aesthetics. It must be sealed and adhered to the surface below to prevent water from entering under the flashing system, and extending to the exterior face of the masonry veneer. Drainage or mowing strips should be used at all locations where masonry is below grade.
Exposed metal-drip-edge flashing provides superior protection at lintels and shelf angles where long-term protection of the adjacent sealant joint will reduce the possibility of water infiltration. In all applications, it is critical to detail and specify materials correctly and accurately and provide quality assurance (QA) language that provides solely for trained installers.


Richard Filloramo, B.S. Arch, A.S. CT is area director of market development and technical services for the International Masonry Institute (IMI) New England Region’s Connecticut/Rhode Island Office. He holds a bachelor’s of science in architecture from Ohio State University and an associate’s degree in construction technology from Wentworth Institute of Technology. Filloramo has more than 40 years of experience in the masonry industry, and has been involved with the design, construction, or inspection of more than 5000 projects. He served as the national IMI liaison for building codes and standards and is a member of the Masonry Standards Joint Committee (MSJC)—the code-writing body responsible for the Masonry 530 Code. Filloramo can be reached at rfilloramo@imiweb.org[1].
- rfilloramo@imiweb.org: mailto:rfilloramo@imiweb.org
Source URL: https://www.constructionspecifier.com/aesthetics-versus-function-resolving-issues-with-exposed-drip-edge-flashing-on-masonry-walls/