Ensuring Balcony Durability: Waterproofing details that stand the test of time
by Molly Doyle | November 30, 2013 3:51 pm
 [1]
[1]by David H. Nicastro, PE, and Marie Horan, PE
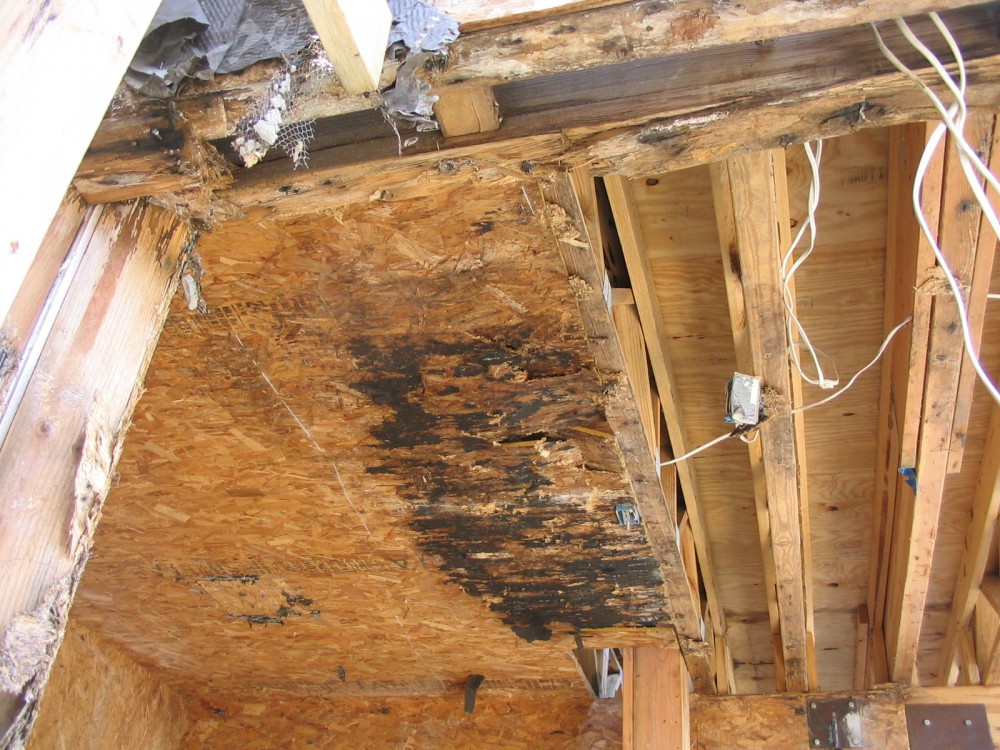
Wood-framed balconies experience a high rate of failure: leaks, visible damage on the finishes below, and, worst of all, concealed structural damage from continued water migration. By the time structural distress becomes evident, it may be too late to implement waterproofing remedies alone—countless wood-framed balconies have required replacement because of severe rot.
The durability of wood-framed balconies widely varies. There are subtle but important differences between the construction of balconies that function for the building’s design life and those that prematurely fail.
Balconies have many of the same details as other portions of the exterior building envelope, but there are also challenging details specific to this type of construction—topping slab edges, column penetrations, door sills, and handrail connections. They are vulnerable to decay because they catch rainfall and direct it to myriad intersecting planes.
 [2]
[2]Conventional balcony construction, consisting of a concrete topping slab over a waterproofing membrane over wood framing, is prevalent in multi-family residential construction, and it is also used in houses and some commercial properties. Wood rot of balcony framing is a well-known risk, but it is even more widespread than recognized. The authors made excavations into more than 200 balcony soffits in apartments built over a 10-year span, and found undetected water damage in more than 40 percent of them. Additionally, the visible detailing was reviewed on over a thousand balconies, and destructive evaluation and water testing were performed on selected ones.
The survey showed improper perimeter flashing details were the dominant cause of water infiltration. In addition to waterproofing details, distress was found to correlate with structural design, as discussed in this article. The accompanying photos show well-built new balconies, as well as failed conditions found during investigations.
Start with the structure
There are a few types of waterproofing membranes that can be used underwater, but most work best when they are well drained. Even a small imperfection or nail hole becomes a leak when the membrane has standing water on it. Therefore, sloping the wood structure to promote drainage is recommended.
 [3]
[3]The Residential Sheet Metal Guidelines by the Sheet Metal and Air-conditioning Contractors’ National Association (SMACNA) suggests 20 mm per 1 m (1/4 in. per foot) minimum slope. This is also about equal to the maximum slope (two percent) allowed for landings outside accessible doors, which will govern for many residential balconies.
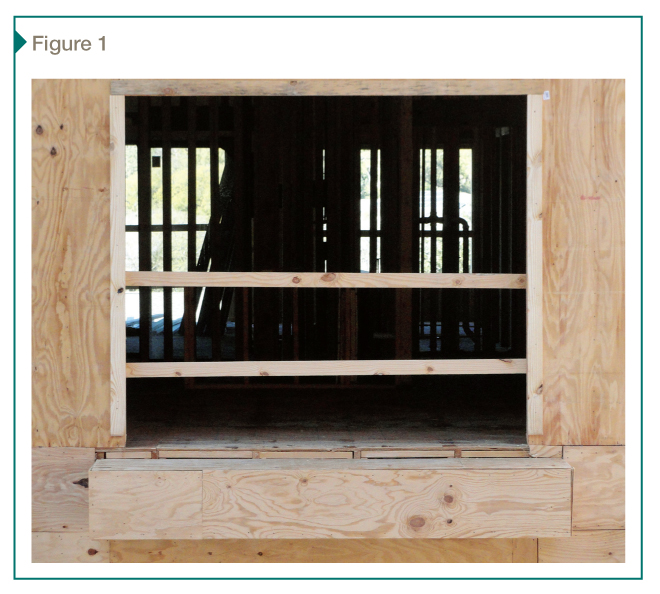
Regardless of codes and standards, most people do not want their balcony surface sloped more than two percent because patio furniture would have a noticeable tilt. It would be difficult to build less slope on the topping’s top surface than at the bottom—for these combined reasons a nominal two percent slope of the structure is practical (Figure 1).
The balcony structure should also be stepped down to permit the topping slab at its highest point to be lower than the interior floor level. This is especially important to prevent water infiltration at door thresholds.1[4] For the majority of multi-family construction, this step will be limited to 13 mm (½ in.)—including the threshold height—because the Fair Housing Act and other codes and standards require balconies to be accessible with few exceptions.
The authors found much less distress in covered balconies than in those fully exposed. Clearly, the amount of impinging rain on a balcony impacts its durability—even after accounting for materials, design, and construction. Therefore, the authors recommend protecting balconies with roofs or stacked construction when possible.
 [5]
[5]It is important to note the survey involved balconies framed with non-treated wood. Preservative-treated wood can enhance durability at additional cost—for the wood deck, columns, dimensional lumber, and specially coated fasteners to resist corrosion induced by the preservative. However, treated wood trusses are not commonly used because of load reductions and corrosion protection required for the connection plates. The best strategy is to keep water away from the wood rather than trying to accommodate it.
Flash the openings
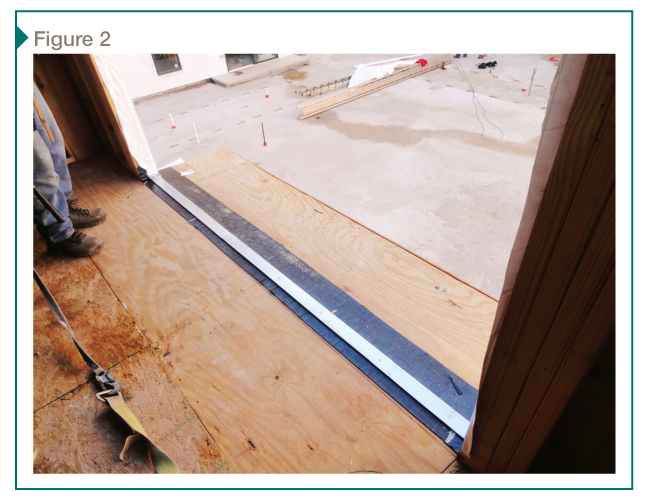
After the wood framing is constructed, the waterproofing installation begins with flashing the door openings (Figure 2). One of the most common locations the authors found wood rot was directly below doors. The three-dimensional door pocket presents many intersecting planes that need to have integrated waterproofing.2[6] Pocket flashing should run past the door jamb and tie into the wall flashing behind the cladding.
In the survey, the observed construction defects that caused leaks at doors included:
- thresholds not bedded in sealant;
- exposed top edges of flashing (not captured under counter-flashing);
- door flashing not integrated with wall flashing (i.e. ‘back-laps’ and gaps); and
- open flashing seams.
 [7]
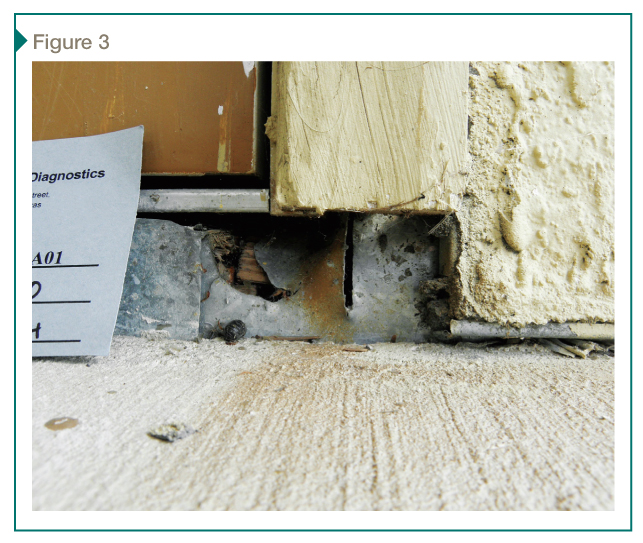
[7]Damaged flashing was also observed, probably from construction traffic; doorways are used by many workers before the thresholds are installed (Figure 3).
Flash the perimeter
The next construction step is to install flashing at the balcony perimeter, and the perimeter of any columns framing into the balcony. Ideally, sheet metal should be installed first for robustness, but may be omitted where little wetting is expected. Seams should be well-lapped and fully bedded, with sealant exuding from the seams.
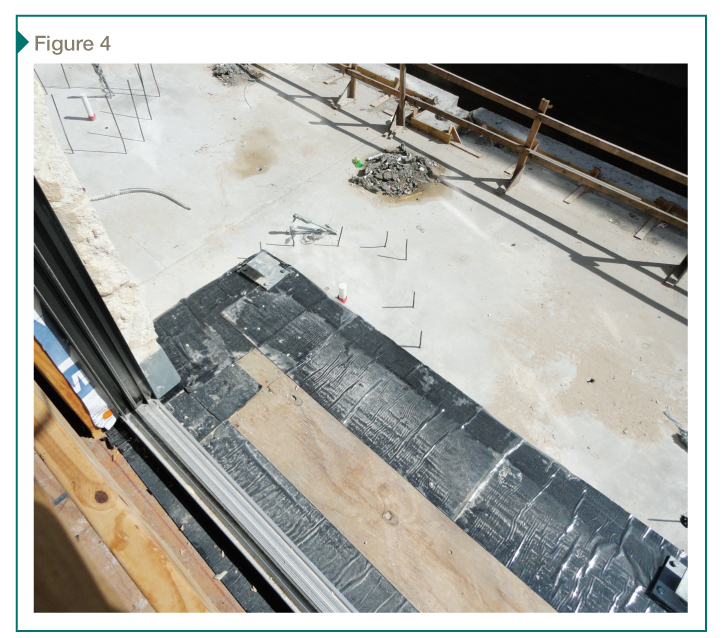
The sheet metal should be covered with self-adhered flashing (SAF) or liquid-applied membrane (LAM). For maximum durability, the authors recommend detailing all edges and seams of SAF with LAM so water, heat, and age do not overcome the initial adhesion (Figure 4).
The perimeter flashings must be installed before the water-resistive barrier (WRB) on the walls, so the WRB will be shingled over the flashings. Flashings (and subsequently the membrane) should be installed in the largest pieces manageable to minimize laps, seams, and edges.
In the survey, the most common perimeter flashing defects encountered were related to out-of-sequence construction—water could flow off the topping slab surface into the open top edges of flashings that were back-lapped on top of the wall’s WRB. Also common were metal flashing seams that were not adequately sealed and shingled in the direction of water flow, allowing water to run into the seams. The materials should be installed from the low point upward, always lapping to promote drainage out of or away from the seams.
 [8]
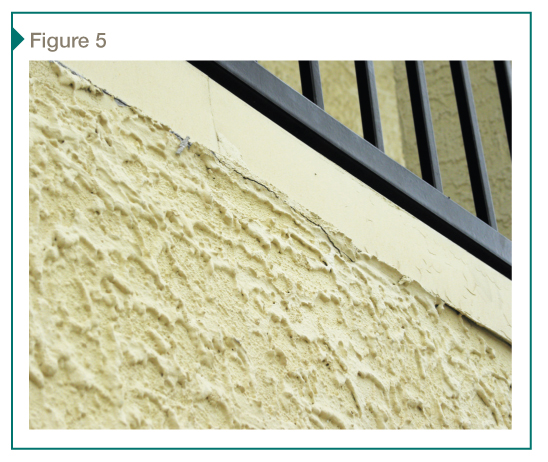
[8]Another common location for wood rot was at drip edges, installed at the outer perimeter of the balconies before the perimeter flashing. In some cases, the drip edge did not cantilever far enough off the balcony edge; where not corrected before installing the wall cladding below, this condition allowed water to drain into the top of the cladding (Figure 5). More commonly, wood rot was found at the ends of the drip edges, where water could migrate through the discontinuity.
The designer should provide a detail cut through each transition between horizontal and vertical substrates, and an isometric view of each three-dimensional corner. Even better is to show the assembly of these critical details with step-by-step instructions, and provide an extra layer of waterproofing at these complex intersections. Simply requiring the materials be installed per the manufacturer’s recommendations is not enough instruction given the numerous intersections occurring on even the simplest balconies. Unfortunately, the authors have investigated failures on projects with excellent drawings that were ignored—construction monitoring is also essential.
Install deck membrane
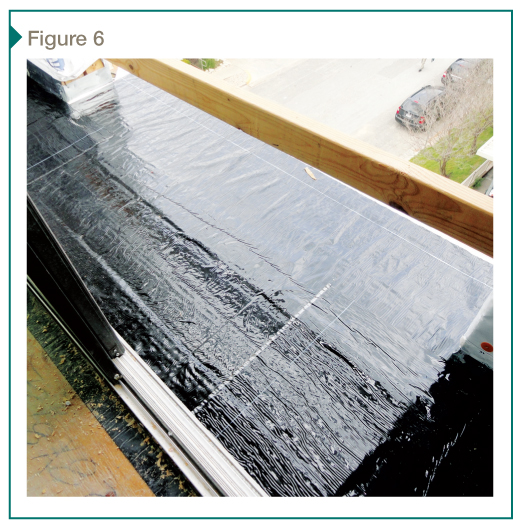
If flashings and surface preparation are done properly, installing the membrane across the field of the deck is probably the easiest part (Figure 6). In the survey of completed balconies, some back-laps were found, but a more common condition was punctures. Placing the concrete topping soon after installing the membrane should limit damage from construction traffic.
 [9]
[9]Install T-bars
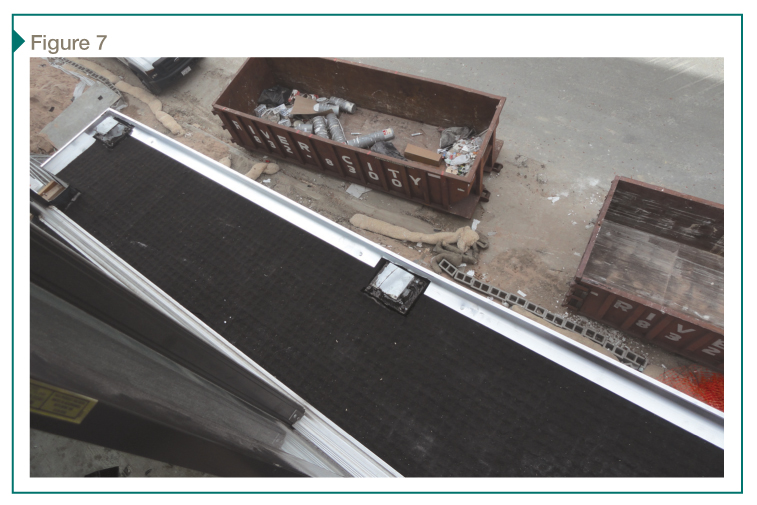
Before placing the concrete topping, metal T-bars are installed along the outside balcony edges to serve as screeds and as permanent forms (Figure 7). T-bars generally come in two styles:
- those with weep holes, which must be stripped into the edge flashing so water is directed into the T-bar and its weeps; and
- more commonly, those spaced above the flashing so water can drain out below them.
Placing a folded piece of SAF under each T-bar fastener location provides an adequate drainage gap and helps to seal the fastener holes (Figure 8). In the survey, the absence of this critical gap correlated with wood rot at the outside edge of balconies—water built up on the membrane until it found a weak point to leak through to the wood structure.
Install railing anchors
In the survey, railing posts were common locations of wood rot. Failures correlated with simplistic connections consisting of steel plates bearing on the topping slab fastened through (and damaging) the membrane. A better design is to secure railing anchors to the deck, stripped into the waterproofing, with an embed plate for welding a railing post, or with a stub extending above the concrete to mate with a hollow railing post (Figure 7).
 [10]
[10]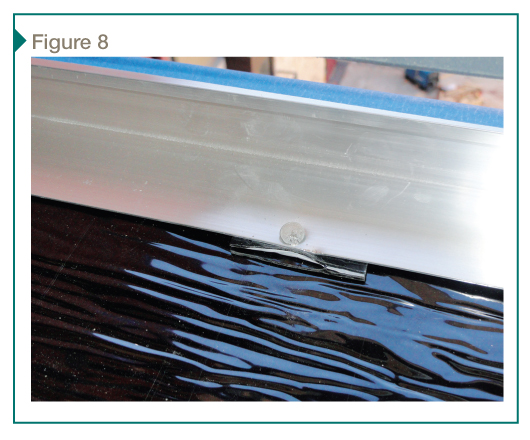 [11]
[11]Place concrete topping
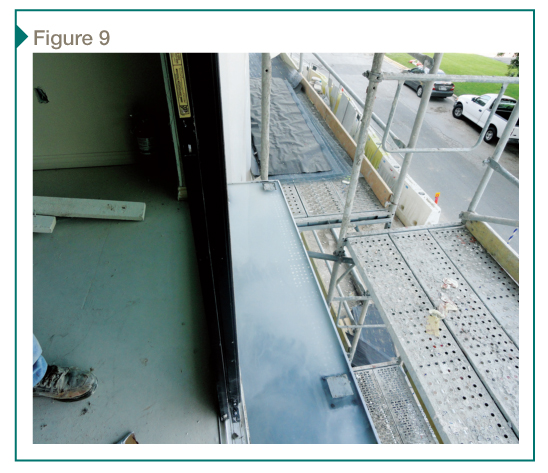
A best practice is to perform a pre-covering inspection of the membrane, and seal any discovered holes just before placing the concrete. As a quality assurance (QA) measure, a water flood test can also be performed at this stage (Figure 9, ).
The concrete topping might not be considered part of the balcony waterproofing system, but it serves an important role in shedding water off the surface to protect the membrane and flashings—but only if it is properly sloped. Unfortunately, the topping subcontractor has little control over the slope. The lowest point is determined by the T-bar, and the highest point is set by the door threshold (with whatever step is permitted). Still, the contractor should use reasonable care in concrete finishing to ensure water sheds off the entire surface without ponding (Figure 10).
Conventional concrete quality control (QC) measures should also be used to minimize cracks, which allow excess water to reach the waterproofing layer. If patterned correctly and formed early, control joints limit cracking in the field of the concrete, which can be both an aesthetic and durability issue.
 [12]
[12]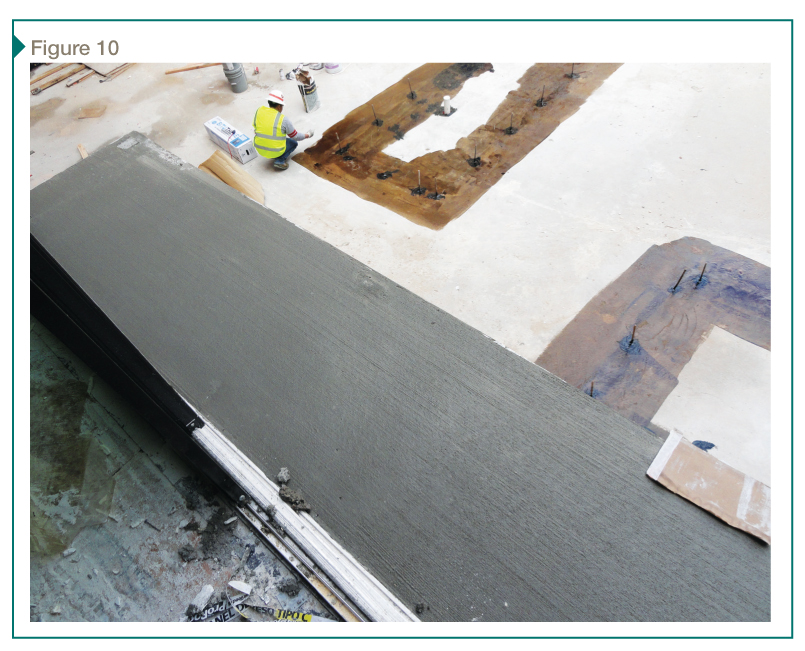 [13]
[13]Conclusion
To avoid concealed decay later, it is important to construct each layer of wood-framed balconies in accordance with best practices. These include:
- slope the substrate;
- flash all transitions;
- protect corners with additional waterproofing;
- provide drainage from the membrane; and
- slope the concrete topping and limit cracking.
With attention to detail, the durability of wood-framed balconies can match the design life of the building.
Notes
1 See the article, “Understanding Why Doors Leak[14],” in the May 2013 issue of The Construction Specifier. (back to top[15])
2 See the article, “Waterproofing Balconies[16],” in the August 2012 issue of The Construction Specifier. (back to top[17])
David H. Nicastro, PE, F.ASTM, is the founder of Building Diagnostics Inc., specializing in the investigation of problems with existing buildings, designing remedies for those problems, and resolving disputes arising from them. He is a licensed professional engineer, and leads the research being performed at Building Diagnostics’ testing center, The Durability Lab, at The University of Texas at Austin. He can be reached by e-mail at dnicastro@buildingdx.com[18].
Marie Horan, PE, was formerly a senior engineer at Building Diagnostics, specializing in the investigation of problems with existing buildings and designing remedies for those problems. She can be reached by e-mail at mhoran@buildingdx.com[19].
- [Image]: http://www.constructionspecifier.com/wp-content/uploads/2014/04/File-Opener.jpg
- [Image]: http://www.constructionspecifier.com/wp-content/uploads/2014/04/CS_November2013_HR-79.jpg
- [Image]: http://www.constructionspecifier.com/wp-content/uploads/2014/04/CS_November2013_HR-80.jpg
- 1: #note1
- [Image]: http://www.constructionspecifier.com/wp-content/uploads/2014/04/CS_November2013_HR-80-2.jpg
- 2: #note2
- [Image]: http://www.constructionspecifier.com/wp-content/uploads/2014/04/CS_November2013_HR-82.jpg
- [Image]: http://www.constructionspecifier.com/wp-content/uploads/2014/04/CS_November2013_HR-83.jpg
- [Image]: http://www.constructionspecifier.com/wp-content/uploads/2014/04/CS_November2013_HR-83-2.jpg
- [Image]: http://www.constructionspecifier.com/wp-content/uploads/2014/04/CS_November2013_HR-84.jpg
- [Image]: http://www.constructionspecifier.com/wp-content/uploads/2014/04/CS_November2013_HR-86.jpg
- [Image]: http://www.constructionspecifier.com/wp-content/uploads/2014/04/CS_November2013_HR-86-2.jpg
- [Image]: http://www.constructionspecifier.com/wp-content/uploads/2014/04/CS_November2013_HR-87.jpg
- Understanding Why Doors Leak: http://www.kenilworth.com/publications/cs/de/201305/files/52.html
- top: #note3
- Waterproofing Balconies: http://www.kenilworth.com/publications/cs/de/201208/files/10.html
- top: #note4
- dnicastro@buildingdx.com: mailto:%20dnicastro@buildingdx.com
- mhoran@buildingdx.com: mailto:%20mhoran@buildingdx.com
Source URL: https://www.constructionspecifier.com/ensuring-balcony-durability-waterproofing-details-that-stand-the-test-of-time/