Ensuring the quality of thin brick veneer installations
by sadia_badhon | April 25, 2019 10:48 am
by Donato Pompo, CTC, CSI, CDT, MBA, ITS
 [1]
[1]Located in the Los Angeles community of Playa Vista, the Brickyard Campus comprises two, five-story buildings of 27,870 m2 (300,000 sf) and 9290 m2 (100,000 sf) each. Completed in 2017, the two structures are clad with 10,219 m2 (110,000 sf) of thin brick with a white engobe coating. Quality assurance (QA) testing was performed on mockups and during the installation. A quality control (QC) Program was also implemented during the installation. These helped the project team avoid delays and installation problems.
Building details
Designed by Michael Maltzan Architecture and Gensler, the Brickyard Campus was developed by Tishman Speyer. Hathaway Dinwiddle was the general contractor (GC). Premier Tile & Marble carried out the installation and this author was the thin brick veneer consultant. Simpson Gumpertz & Heger was the building material engineer consultant.
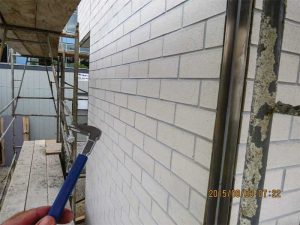
The Brickyard project was unique in many ways. It had the stark, white thin brick façade, several window sizes and shapes, and a contemporary design (Figure 1).
 [2]
[2]Images courtesy Ceramic Tile and Stone Consultants
Bricks sized 92 x 297 x 20 mm (3 5/8 x 11 5/8 x 3/4 in.) were installed with an adhered application over steel studs, sheathing, moisture barrier, lath, scratch, and brown plaster assembly. A liquid-applied waterproof/crack isolation membrane meeting the American National Standards Institute (ANSI) A118.10, American National Standard Specifications for Load Bearing, Bonded, Waterproof Membranes for Thin-set Ceramic Tile and Dimension Stone Installation/A118.12, American National Standard Specifications for Crack Isolation Membranes for Thin-Set Ceramic Tile and Dimension Stone Installation, was sprayed over the plaster base. The thin bricks were adhered with a thin-set mortar adhesive compliant with ANSI A118.15, American National Standard Specifications for Improved Modified Dry-Set Cement Mortar, and grouted with a high-performance cementitious grout as per ANSI A118.7, American National Standard Specifications for High Performance Cement Grouts for Tile Installation. Movement joints were installed extensively over closed-cell polyethylene (PE) foam backup strips using a silicone sealant compliant with ASTM C920, Standard Specification for Elastomeric Joint Sealants (Figure 2).
In this author’s experience, the key to a successful specification and installation is to follow MasterFormat and industry standards. MasterFormat offers a structure to provide installers and the responsible oversight parties complete, concise, correct, and clear instructions for a successful installation of the product or system for the intended application. Of course, this depends on the specifier fully utilizing this format and vetting the respective methods, products, and standards. This author has often seen incomplete specifications, as a result of cutting and pasting from other specifications rather than performing the due diligence, thereby causing confusion, potential problems, and misuse of products.
Further, members of the construction team often do not know all the standards and are therefore unequipped to avoid the potential problems that could be encountered in their scope of work. An expert consultant could offer the knowledge, experience, and insight needed to ensure a successful installation.
In this author’s experience, a critical part of MasterFormat often overlooked or not budgeted for are the QA and QC sections. QA can be used to verify:
- suitability of products and methods for the intended use;
- installers have the necessary experience and qualifications; and
- products perform as specified.
 [3]
[3]QC could be employed to verify the specified products are stored and used correctly and the work is being performed according to the specification, manufacturers’ directions, and industry standards.
Undoubtedly, it costs more to do diligent QA testing and to implement a meaningful QC plan. In this author’s experience, QA and QC could add approximately two percent to the total cost of the application in projects similar in scale to the Brickyard Campus. Consultants are often brought into projects only after ill-informed decisions have been taken and QA testing cannot be done without causing delays. In the case of the Brickyard Campus, the developer was committed and willing to pay the price to ensure the building was constructed correctly. Per their directions, this author was hired through the GC about two years prior to the completion of the project.
This author began by reviewing existing project plans and specifications for the installation of the thin brick tiles and then performed the following work:
- evaluated the specified thin brick to verify its suitability for the project;
- prepared installation guidelines as well as a MasterFormat specification for the installation
of the thin brick over the plaster substrate; - assisted in selecting the installation company;
- performed QA testing of the thin brick before and during installations, including the mockups;
- reviewed shop drawings and submittals by the installer; and
- implemented the specified QC plan.
Installation system
 [4]
[4]In this author’s experience, it is best to specify a single source installation system as they ensure compatibility between the products and usually come with extended warranties. For instance, the installation system employed in the Brickyard Campus project qualified for a 15-year labor and material warranty. It is advisable to specify ‘or equal’ performance as long as manufacturers can provide the required performance and warranty.
Architects often provide a reference specification that only mentions industry standards and building codes. They also tend to rely on calling out the standards without providing detailed execution instructions, thereby deferring responsibility to the installer. Reference standards do not provide the detailed installation methods an installer needs to know. The installer is a craftsman with the skills to do the work, but they need the architect to specify the method. In this author’s experience, the best way forward would be the use of the Tile Council of North America (TCNA) Handbook for Ceramic, Glass, and Stone Tile Installation that will help specifiers select and reference in the documents the appropriate installation method. The TCNA installation methods also apply to adhered thin brick applications.
It is important to note labor and material warranties are not like ‘no-fault insurance’ policies. Products have to be installed per manufacturers’ directions and industry standards for the warranty to be valid, and therein is the challenge. As mentioned earlier, installers of thin bricks are not fully aware of industry standards or manufacturers’ directions and rely on their on-the-job training experience. This at times may result in subpar installations. Therefore, it is important to have a QA process and QC plan to ensure tradespersons are knowledgeable and the products are being stored and installed correctly.
Installation systems always require the exterior veneer substrates to be structurally sound and meet industry and local building code requirements such as:
- deflection must not be more than L/600 along framing and between framing spans;
- adequate movement (control) joint design and placement as per ASTM C1063, Standard Specification for Installation of Lathing and Furring to Receive Interior and Exterior Portland Cement-Based Plaster; and
- transitions and penetrations must be properly flashed and waterproofed.
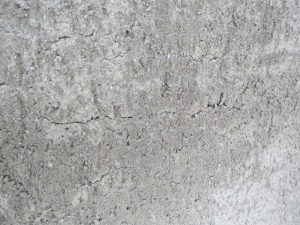
The liquid-applied waterproof/crack isolation membrane employed in the Brickyard Campus project was not mandated by building standards, but provides additional levels of protection as plaster finishes tend to have shrinkage cracks. ANSI A108, American National Specifications for the installation of Ceramic Tile, does not allow the installation of tiles over cracked substrates. The waterproof membrane mitigates shrinkage cracks, so they do not telegraph through the thin brick. It also provides an additional layer of waterproofing to prevent the plaster substrate from absorbing and retaining moisture, thereby avoiding efflorescence staining, spalling, and potential water intrusion problems with thin bricks. Additionally, it is important to flash at all membrane transitions and penetrations to make it watertight. Breathable liquid-applied membranes are recommended as they are more user friendly, provide high bond strength between the substrate and the thin brick adhesive, and practical for installers to apply (Figure 3).
 [5]
[5]For the Brickyard Campus project, the TCNA Handbook on installation method W231/W241 for exterior walls with a waterproof membrane over a plaster substrate (scratch coat and mortar bed) as well as metal studs was specified. The handbook explains the tile assembly configuration, product types, methods, requirements, and standards for completing the installation. The method described in the handbook is an effective means for the architect
to provide thin briks installers with unambiguous instructions.
Quality assurance
QA is a useful tool to ensure appropriate products and methods are vetted in advance, thereby avoiding project delays. It can also be used to verify the application performs as intended during the installation process.
Much like other finish materials, thin brick has certain physical properties and tolerances. According to ASTM C1088, Standard Specification for Thin Veneer Brick Units Made From Clay or Shale, the maximum saturation coefficient (i.e. the ratio of absorption by 24-hour submersion in cold water followed by a five-hour submersion in boiling water) is an average of 0.78 for exterior grade thin veneer brick or maximum permissible warpage for maximum face dimension of 203 mm (8 in.) is 1.6 mm (1/16 in.) for Type TBX thin veneer brick.
The thin brick specified on the Brickyard project had to meet ASTM C1088. The thin brick veneer was specified to be tested per ASTM C67, Standard Test Methods for Sampling and Testing Brick and Structural Clay Tile. In particular, the project team wanted to ensure the 92 x 297 x 20-mm (3 5/8 x 11 5/8 x ¾-in.) thin brick met the sizing and warpage tolerances. This was important because of the different-sized windows and the design. The thin brick had to be within the allowable tolerances that is anticipated for the specified layout, such as:
- ground short edge dimensional tolerance of + 0 mm (0 in.);
- 2.4 mm (3/32 in.) for the 297-mm (11 5/8-in.) side;
- +/– 1.6 mm (1/16 in.) tolerance on the 92-mm
(3 5/8-in.) side; - thickness tolerance maximum of +/– 3.2 mm (1/8 in.);
- out of square tolerance maximum of +/– 1.6 mm (1/16 in.); and
- warpage maximum of +/– 1.6 mm (1/16 in.).
 [6]
[6]Thin bricks, considering their size, have a greater degree of allowable warpage than tile. Warpage contributes to tile lippage where one edge between two adjacent edges of a thin brick is higher or lower than the other. This creates a shadowing condition making a façade appear to be irregular under certain lighting conditions, which in this case, means relative to the position and exposure to the sun. So, excessive thin brick warpage not only makes for a more difficult installation, but also affects the appearance of the finished work. It was also specified to verify how the ceramic engobe coating covering the face of the thin brick would hold up over time.
Lesson learned
The QA process included visiting the thin brick manufacturer to inspect the plant, manufacturing process, and end product. The inspection team (without the thin brick consultant) visited the plant and was impressed with the manufacturer. As a result, the client did not perform the specified QA testing of the thin brick. Unfortunately, all 10,219 m2 (110,000 sf) of thin brick had to be returned post-delivery because they were out of tolerance in size and warpage. This caused disputes, delays, inconvenience, and loss of time. Implementation of a proper QA plan would have helped prevent this situation. Therefore, it is advisable to not assume anything and verify everything. The added cost for QA is cheap insurance.
Bond strength tests in the laboratory per ASTM C482, Standard Test Method for Bond Strength of Ceramic Tile to Portland Cement Paste, were also specified. This is not only a code requirement, but also important when considering the liability if a thin brick falls off a five-story building. It is a health and safety concern and due diligence should be employed to ensure the thin brick is properly attached to the structure. The California Building Code (CBC) 1405.10 Adhered Masonry Veneer, and 1411.2.1, Bond Strength and Tests, references ASTM C482 by requiring compliance with sections 12.1 and 12.3 of The Masonry Society (TMS) 402, Building Code Requirements for Masonry Structures/American Concrete Institute (ACI) 530, Building Code Requirements and Specification for Masonry Structures and Companion Commentaries/American Society of Civil Engineers (ASCE) 5, Building Code Requirements and Specification for Masonry Structures. Section 12.3.2.4 says adhesion developed between adhered veneer units and backing shall have a shear strength of at least 345 kPa (50 psi) based on gross unit surface area when tested in accordance with ASTM C482.
 [7]
[7]ASTM C482 uses a cement paste as an adhesive over a mortar block. The test can be modified in the laboratory and used with the specified adhesive and substrate material. However, it is not an in-situ test.
There is no formal test protocol for a field shear bond test for any type of tile, let alone a thin brick. More than 10 years ago, this author developed a shear bond test apparatus and protocol for tile and stone with the help of an engineering firm. The ASTM C18 Stone Committee is currently in the process of voting on this protocol.
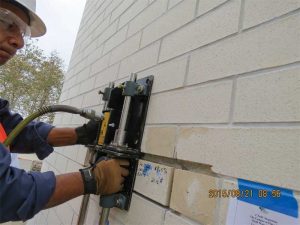
This shear bond strength test protocol was employed on the Brickyard project. There are often concerns on whether bonding to a membrane is the weak
link of the thin brick assembly, so by performing the shear bond test, the project team was able to confirm the results met the building code requirement. It also met the specified performance requirement of 689 kPa (100 psi) minimum shear bond strength value. The thin brick on the mockup and on the two buildings exceeded the specification requirements for the thin brick bond strength to the assembly. The average shear bond strength on the two buildings was 1393 kPa (202 psi) and 1020 kPa (148 psi) with a high of 1878 kPa (268 psi). The point of failure was mostly a combination of cohesive failure within the plaster substrate and the thin brick. Rarely was it cohesive in the membrane. Thus, the bond strength of the thin-set adhesive to the thin brick was actually higher than those values to some degree (Figure 4).
Another QA requirement in the specification was to verify that the tile installers had adequate supervision and understood industry standards. The installation company was to provide at least one full-time, non-working laborer and a qualified supervisor per building during the installation process. All the 80-plus union tile setters and finishers had to take the five-hour Tile Installer Thin-set Standards (ITS) Verification online course produced by the University of Ceramic Tile and Stone (U of CTS). This course is available in English and Spanish. A highlight of this process was installers talked about what they learned and were enthusiastic and cooperative during the QC process. It created a culture of quality within the company as everyone ensured that the installation process was implemented according to industry standards.
Quality control
 [8]
[8]In this author’s experience, the QC section of the specification in Part 3–Execution is often left out. Even though QC is an added cost, it is cheap insurance when one considers the cost of failure and potential liability claims.
Some of the key steps requiring QC at the installation stage are:
- inspecting substrates prior to the application of the waterproof/crack isolation membrane to ensure it meets the respective requirements;
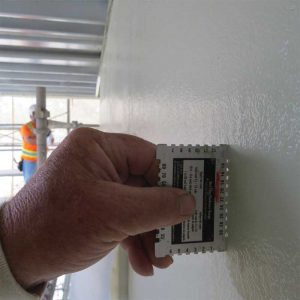
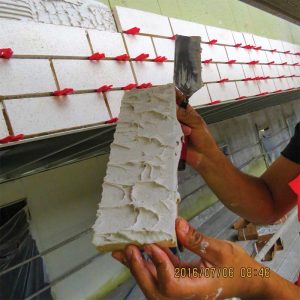
- verifying the membrane is being installed correctly and at the required thickness (Figure 5);
- verifying there is adequate adhesive contact and coverage and it is being used according to the manufacturer’s directions; and
- ensuring installation products are being stored properly and used under the manufacturer’s required conditions for temperature and other climatic conditions.
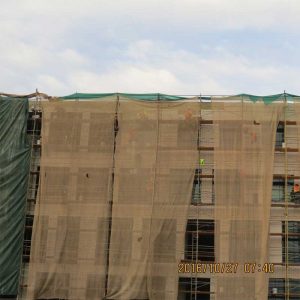
When temperatures are higher or lower than usual, provisions must be made to perform the installation within the manufacturer’s requirements. A shading barrier must be erected on the scaffolding in order to mitigate the impact of sunny and windy conditions (Figure 6). During the cold and/or wet seasons, there must be some sort of tenting and heating to control temperature. Stored and newly installed products must be kept out of the rain and other harsh, problematic weather conditions (Figure 7).
The QC process can also confirm adequate adhesive contact is achieved. Section 1404.10, “Adhered Masonry Veneer,” of the International Building Code (IBC) requires each unit to be fully bonded. The tile and stone industry require 95 percent contact with voids no larger than 1290 mm2 (2 si » size of golf ball). Voids must be minimized for the following two reasons:
- more voids result in weaker attachment; and
- voids collect moisture from rain or condensation, thereby leading to efflorescence staining on the surface of the thin brick or spalling from moisture freezing and expanding during freeze/thaw weather conditions.
 [9]
[9]The QC requirement for the Brickyard Project was 95 percent thin-set contact had to be achieved with voids no larger than 1290 mm2. Further, three random and recently installed thin bricks out of 150 had to be removed and documented by the QC inspector. If any of the bricks did not meet the requirement, three more had to be removed and checked. If any of these bricks failed to meet the requirement then the entire group of 150 thin bricks had to be replaced at the installer’s expense. This QC provision is consistent with ANSI A108.5, Installation of Ceramic Tile with Dry-Set Portland Cement Mortar or Latex-Portland Cement Mortar. Installers should be pulling tiles here and there to verify they are getting adequate adhesive coverage. It is easy for them to remove and replace recently installed tiles. Thin-set can be added to tiles lacking in coverage and they can be promptly reinstalled (Figure 8).
Another key step of the QC process is to inspect and acoustically sound the completed installation after it has cured for seven or more days. On a large project like the Brickyard Campus with small tiles it is more of a systematic random process to sound the thin bricks to detect hollow sounding conditions. Various sounding devices, such as a delamination detection tool (DDT), a 25-mm (1-in.) steel ball bearing, or a metal tool, can be used for this purpose. A hollow sound in itself is not a flaw, but it can be a symptom of a defect such as excessive voids. During this process, the QC inspector is also looking to identify any type of visual imperfection for correction (Figure 9).
Conclusion
 [10]
[10]Architects should fully utilize the MasterFormat standard for specifications. It will lead them through a process to properly and thoroughly specify the respective product and its application. Of course, they still need to do the due diligence to vet the application, products, and installation methods. This can be achieved through a QA/QC plan. In this author’s experience, architects and GCs have often said they cannot afford QA/QC services. This responsibility is often transferred to the installation contractor, who, in this author’s opinion, is the least qualified and beyond the scope of their work. The architect and GC are doing a disservice to their client, the owner, if they do not at least specify and recommend QA/QC provisions.
It does not matter who is at fault when there is a problem—everyone ends up paying either in time to defend themselves, money to fix the issue, or with reputation. Therefore, it is in everyone’s best interest to ensure installation specifications are thorough, clear, and unambiguous.
This author has never investigated a tile, brick, or stone failure where all the industry standards and manufacturers’ instructions were followed. The problem is never due to a single deficiency but is always a case of compounding problems. Simply put, the key to a successful thin brick installation is to follow industry standards and to write good specifications. MasterFormat and SectionFormat provide the structure for quality specifications that when used correctly and thoroughly can limit both the designer’s (and the client’s) risk and liability when thin brick, tile, and stone applications are specified.
Donato Pompo, CTC, CSI, CDT, MBA, ITS, is the founder of Ceramic Tile and Stone Consultants (CTaSC) and the University of Ceramic Tile and Stone (U of CTS). He has more than 35 years of experience in the ceramic tile and stone industry from installation and distribution to manufacturing of many installation products. Pompo provides services in forensic investigations, quality control (QC) for products and installation methods, training programs, testing, and onsite inspection. He received the 2012 The Construction Specifier Article of the Year. Pompo can be reached at donato@ctasc.com[11].
- [Image]: https://www.constructionspecifier.com/wp-content/uploads/2019/04/Playa-Vista-5.jpg
- [Image]: https://www.constructionspecifier.com/wp-content/uploads/2019/04/BrickYardBuilding1-03.jpg
- [Image]: https://www.constructionspecifier.com/wp-content/uploads/2019/04/BrickYardBuildingMovementJoints-02.jpg
- [Image]: https://www.constructionspecifier.com/wp-content/uploads/2019/04/BrickYardPlasterCracks-03.jpg
- [Image]: https://www.constructionspecifier.com/wp-content/uploads/2019/04/BrickYardShearBondStrengthTest02.jpg
- [Image]: https://www.constructionspecifier.com/wp-content/uploads/2019/04/BrickYardMembraneCheckThickness01.jpg
- [Image]: https://www.constructionspecifier.com/wp-content/uploads/2019/04/BrickYardShadeBarrier03.jpg
- [Image]: https://www.constructionspecifier.com/wp-content/uploads/2019/04/BrickYardBuilding2-07.jpg
- [Image]: https://www.constructionspecifier.com/wp-content/uploads/2019/04/BrickYardAdhesiveCoverageCheck02.jpg
- [Image]: https://www.constructionspecifier.com/wp-content/uploads/2019/04/BrickYardThinBrickSoundingQC01.jpg
- donato@ctasc.com: mailto:donato@ctasc.com
Source URL: https://www.constructionspecifier.com/ensuring-the-quality-of-thin-brick-veneer-installations/