Evolution of moisture mitigation in concrete flooring
Testing methods and their shortcomings
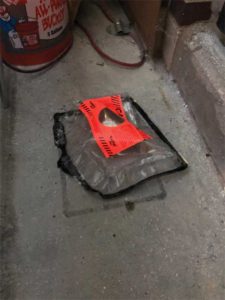
The original method used to test for moisture vapor emissions was ASTM F1869, Standard Test Method for Measuring Moisture Vapor Emission Rate of Concrete Subfloor Using Anhydrous Calcium Chloride (CaCl). The CaCl test was performed on a mechanically prepared, porous surface. A petri dish containing CaCl salt crystals would be weighed and recorded, then placed on the prepared floor and sealed with a 609 x 609 mm (18 x 18 in.) housing unit. After 72 hours (newer versions of the test have reduced the waiting time to 24 to 72 hours), the petri dish was weighed again, and the moisture vapor emissions rate (MVER) was calculated using the change in mass for a given area over 72 hours. The resulting MVER was reported in pounds per 93 m2 (1000 sf) for a 24-hour period. It was this test that all flooring manufacturers initially adopted into their literature; the typical standard with a reading in excess of 1.4 kg (3 lbs) to 2.3 kg (5 lbs) per 93 m2 per 24 hours would require a moisture mitigation system.
As flooring contractors started realizing testing was the only way to prevent floor failures from coming back to haunt them, testing began to ramp up. The problem was the test was rarely performed to the standard, falsely signaling moisture emissions as being less of a problem than they were. Early testing, dependent on the project, was performed by flooring installers and general contractors, well-intentioned but untrained in the technical nuance of moisture vapor emissions and the method. ASTM F1869 required the units be placed at a frequency of three units in the first 93 m2 area and one additional unit placed in every subsequent 93 m2 area. Once in place, the units were to be left undisturbed for the duration of the test. Rarely was an adequate number of units placed, and in many cases, there were grossly fewer than required, i.e. four units in a 4645.2 m2 (50,000-sf) project instead of the required 52 units. On many early projects, the housing units were tampered with, damaged, or ignored, and were subject to construction traffic e.g. rolled over with scissor lifts, etc., which also lead to inaccurate results. The resulting failures highlighted the importance of strict adherence to the testing method and led to the growth of third-party certified testing consultants, which has greatly improved confidence in results.
Then, something new happened. Floors that tested below the flooring manufacturers specified emission rate were still experiencing failures that appeared to be related to moisture. How could this be? ASTM F1869 only revealed moisture issues in the top 6.35 mm (0.25 in.) of the concrete slab and did not account for local temperatures and humidity. It also told nothing about what was happening inside the slab. A vapor retarder helps for on grade, if penetrated it could be a source of slab water, but moisture issues happen above grade, as well.
What’s occurring inside the slab?
The need to understand what was happening deeper in the slab drove the creation of ASTM F2170, Standard Test Method for Determining Relative Humidity in Concrete Floor Slabs Using In Situ Probes. ASTM F2170 measures the relative humidity (RH) of a slab by drilling a hole to either 20 or 40 percent of the concrete slab depth, sealing the hole for 72 hours to allow moisture equilibrium to be achieved, and then inserting a probe to measure the RH as a percentage. Most flooring manufacturers have adopted this method as an accepted alternative to ASTM F1869 and will require a moisture mitigation system for slabs with greater than 80 percent RH. Using either method before flooring installation still did nothing to prevent changes in slab moisture from impacting the flooring.
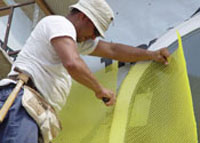
A reliable method for mitigating moisture emissions became widely adopted in the early 2000s. A membrane-forming two-part epoxy installed over the concrete was installed to block moisture vapor emissions. The process required the concrete slab be shotblast to a concrete surface profile (CSP) of three to five, depending on the epoxy manufacturer’s guidelines. The opened slab would be left for 24 hours to allow off-gassing or pH changes to occur. The two parts of the epoxy were then blended, initiating the rolled in one or two coats. Following the epoxy installation, either sand was broadcast into the wet epoxy or a primer was installed over the hardened epoxy to facilitate bonding with the underlayment cap or flooring material. The original cost of these systems was $9 to $12 per square foot. Today, this system is installed for about $4 to $7 per square foot, which is still a costly prospect when many flooring finishes are $1 to $2 per square foot.
Sign up for our weekly newsletter
Architectural materials and methods delivered right to your inbox
- CSI News and Notes: CSI Foundation’s construction camp; CSI spring exam; and more
- CSI News and Notes: CSI’s credentials; CSI conference theme; and more
- To be specific – CSI supports young AECO professionals
- CSI News and Notes: CSI’s foundation scholarships, national conference, and Crosswalk
- CSI News and Notes: AI’s impact; CSI 2024 conference, and more
Related Products

Read the Latest Issue