How to avoid floor coating failures
by arslan_ahmed | March 10, 2023 6:03 pm
 [1]
[1]By Mark Merrifield
Any contractor hired to apply a floor coating wants to ensure a few important characteristics about the concrete substrate which will support the flooring. This includes confirming the concrete is structurally sound, free of contaminants, and properly prepared for the applied flooring system to bond to it securely for the long-term. Any deficiency remaining or developing in the concrete can telegraph upward to the floor coating over time and cause it to fail. The flooring itself must be able to withstand any foreseeable impacts, spills, and heavy traffic. All these factors are important to consider for a space before selecting the right floor coating.
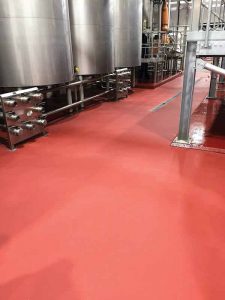 [2]
[2]Specifiers often recommend a monolithic resinous floor coating surface because it offers a seamless appearance appropriate for most spaces (Figure 1). Monolithic resinous floors eliminate grout lines and seams and are easy to sanitize and keep clean, especially in corners and other obscure places—making it hard for bacteria to harbor and grow there. However, even when pouring a monolithic floor, failures are possible. When floor coatings fail to live up to their intended use, the fault most often lies at the beginning, with improper surface preparation.
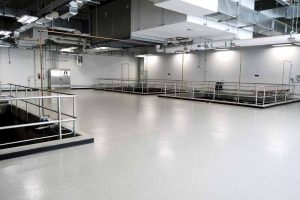
Monolithic floor coatings and concrete
Monolithic floor coatings are versatile options used in numerous industries, including food and beverage (Figure 2), pharmaceutical, industrial (Figure 3), commercial, retail, and hospitality. Such coatings are long-lasting and offer aesthetics in part because the floors have no grout joints or seams in which water, contaminants, or chemicals can penetrate and work their way under the flooring, which would cause it to lift from the concrete substrate. Seamless monolithic floors are also durable; resistant to impact, abrasion, and chemicals; and easy to sanitize, which further enhances facility cleanliness.
 [3]
[3]Concrete is extremely dynamic and rarely the same in every project. The reasons for this vary depending on the cement content, angularity of the aggregate components, and use of different admixtures, such as air entrainers and water reducers. It is important for contractors to understand how these factors affect the condition of concrete, so they can handle the most important step of any resinous floor coating system installation, which is proper surface preparation.
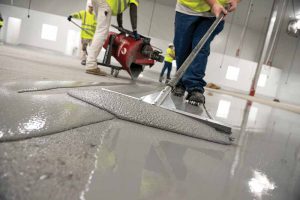
 [4]
[4]While most floor coatings are applied directly to concrete (Figure 4, page 2), they may also be applied over existing tile or dairy brick, provided those substrates are tightly adhered to the concrete, with no hollow spots underneath. Regardless of the substrate, it is imperative to properly prepare the surface before installing a resinous floor coating on top. Unfortunately, improper surface preparation remains the most common reason for coating failures. Sometimes it results from faulty workmanship, inexperience, or an installer not following specifications. Most often, the only way to fix these failures is to completely remove the floor coatings and start over.
 [5]
[5]Inspecting the concrete
Before beginning a resinous floor coating project, installers should conduct a visual inspection of the concrete substrate to identify all contaminants, such as oil, grease, grime, silicone, and/or existing sealers. Misting the surface with water can help identify bond inhibitors. If the water beads up and does not wet out the concrete or change its color, it indicates something within the concrete—perhaps a contaminant oil or silicone—is creating a barrier.
While a visual inspection is important, installers should also check for surface soundness. Dragging a chain or tapping the surface with a hammer, metal pipe, or other hard object will reveal different sounds over hollow areas. Tapping the surface is a popular and accurate technique, especially if concrete is lifted or not lying flat on the substrate. Installers should also look for excessive cracking and determine if the concrete is structurally adequate to support a topping. They should also identify spalls or pop-outs and determine if they occurred due to an impact or as a result of previously bolted-down equipment being removed from the floor. If installers cannot establish what caused the damage, they should try to attain more information before proceeding.
Developing a concrete surface profile (CSP)
If concrete is deficient during initial inspections, it needs to be repaired or replaced. In rare cases, this might mean tearing out complete sections and pouring new concrete. In other cases, smaller repairs can sometimes be made using standard concrete. However, most often, repairs can be made using materials designed for concrete restoration such as acrylic cement, urethane concrete, or epoxy mortar. The type of restorative material depends on the condition of the concrete. Is it contaminated? Was there a freeze-thaw which removed the top surface? Again, installers should identify the cause for the deficient concrete before proceeding.
Although concrete is the least expensive method for repairing small areas, it extends repair timelines, as installers may have to wait over a week to apply a coating on top. For a faster repair turnaround, an epoxy or urethane concrete material will be best.
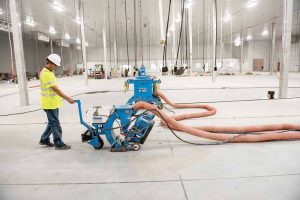
To initiate surface preparation, installers must remove any bond-inhibiting substances by degreasing, grinding off, or in severe cases, shotblasting the concrete (Figure 5), depending on the depth of the contamination. For example, they will degrease a floor using a floor machine or buffer with an aggressive brush, perhaps adding hot water and/or steam. If contamination is from silicone, mechanical grinding might be necessary, followed by a water test. If the contamination is oil-based, which is common, it can be emulsified and removed.
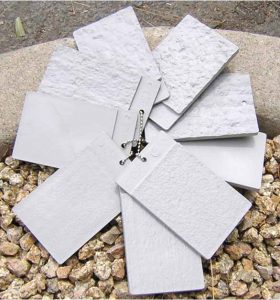 [6]
[6]Once all concerns have been identified, it is important to develop a proper CSP in the substrate before coating it (Figure 6). A CSP increases the amount of surface area in the same square meter (square foot) of area by creating divots and peaks in the concrete’s substrate. This additional surface area provides more contact points for coating materials to bond with, providing greater adhesion and durability potential in the flooring. The CSP should be appropriate for the specified coating system. All holes, spalls, pop-outs, and other surface flaws should be pre-filled, so they do not appear through the finish coat. This step is more important for thinner coating applications.
In general, the thicker the coating system used for applications, the more daily abuse the floor can be expected to support. Such floors must be able to withstand the impact of dropped pots and pans, tools falling from above, or the pressure of forklifts transporting loads across them (Figure 7). In such cases, a greater CSP is required to give the flooring material more bonding area, thereby increasing its bonding strength.
 [7]
[7]By contrast, an aircraft hangar might feature a thin-mil, chemical-resistant coating because the floor is not expected to withstand as much stress (Figure 8). A tow motor might pull an airplane across the floor, but it is all on wheels. The area may be designated for only light-duty work, so heavy impact would be unlikely, and the aviation fuel-and fluid-resistant finish would allow spills to be easily wiped up. This type of floor will not require as great a CSP for those reasons. In addition, a 10- to 30-mil coating will not hide surface imperfections and a greater CSP would show through in the finished floor. Such telegraphing of concrete surface imperfections through the final coating finish is undesirable. Therefore, the thinner the coating system, the more important it is to fill in any imperfections to ensure an aesthetically pleasing finish.
 [8]
[8]The misunderstood role of moisture
Moisture is probably the most misunderstood reason for coating failures. Too much moisture in a concrete substrate may cause the resinous flooring system to bubble and blister, weakening it and making it susceptible to disbonding. However, moisture alone is not the culprit of those failures because it does not generate enough pressure to break a well-bonded coating from a concrete substrate.
Moisture in concrete, when condensed into a liquid, will emulsify the hygroscopic elements within the concrete itself. These emulsified elements or sulfate salts are carried to the surface, and as the water dissipates, crystals form and expand, which may eventually fracture the bond between the coating and concrete. The formation of salt crystals right at the bond line are what fracture the bond, not the moisture. Once the bond is fractured, liquid continues to accumulate, and the hydraulic movement will lead to failure. The liquid contains water, salts, and a hint of uncured resinous components leached out of the coating. Such sulfate salts create bonding problems for many floor finishes beyond resinous systems, including carpet and vinyl composition tile (VCT).
The best way to address moisture-related issues is through testing and using a moisture mitigation system.
Moisture testing is typically completed when project specifications require it. The ASTM D4263 Concrete Moisture Test using a plastic sheet is one of the oldest methods for testing moisture in concrete. Typically conducted on unprepared concrete, this test is highly flawed by today’s standards and provides only qualitative results which are subjected to inspector interpretation. ASTM F1869, Standard Test Method for Measuring Moisture Vapor Emission Rate of Concrete Subfloor Using Anhydrous Calcium Chloride, is a better option if protocols are followed. Contractors must prepare about 0.09 m² (1 sf) of the surface, exactly how the floor will be prepped for the coating application. Then, they will adhere a dome-covered petri dish of calcium chloride onto the floor, leaving it there for up to three days undisturbed to determine the rate of moisture vapor emitted from the concrete. Finally, relative humidity (RH) testing is the preferred method, as it measures the amount of RH remaining in the concrete. It is generally accurate, but it is important to remember all concrete contains moisture, and RH testing does not address how much moisture is actually coming to the concrete’s surface. More importantly, it does not reveal the concentrations of hygroscopic elements such as calcium hydroxide and sodium hydroxide. These concentrations are not identified by either RH or ASTM F1869.
For many jobs, moisture testing is not performed. Therefore, what should installers do if they suspect moisture, or if they encounter a problem through moisture testing? They need to mitigate the moisture, and this must take place before the concrete is coated. Otherwise, it is too late to stop the moisture from affecting the flooring.
The three most common types of moisture mitigation systems are barrier, breathable, and reservoir systems.
A barrier system blocks the rate of moisture transmission by providing a low-permeation, high-density base for either penetrating or topping. These systems feature very dense resins and will help to tie up the free salts that form as moisture moves from the concrete to the flooring bond line. A non-breathable floor coating can then be applied on top of the barrier system with confidence.
Both breathable and reservoir systems allow moisture in vapor form to pass through their films at a controlled rate and then dissipate, rather than condensing into a liquid. They are appropriate for use with a thin-mil coating which does not require non-breathable properties and will be applied over concrete which has a low CSP. With a reservoir system, however, a contractor can have a greater CSP and apply thicker, non-breathable flooring systems on top, as one might do when trying to achieve elevated chemical resistance for the floor.
Potential floor failures
There is a wide array of causes for flooring failures, several of which are described below.
One of the most important functions of resinous flooring is to withstand a certain amount of abuse, particularly from chemicals breaking down an insufficiently chemical-resistant coating. Building a coating system to resist chemical abuse can be challenging. Some questions to consider include:
- What is the highest concentration of each chemical likely to spill onto the floor surface?
- At what temperature will the chemical be applied to the floor?
- How long will the chemical remain on the floor before it is cleaned off (its “dwell time”), or will it be washed off at all?
These questions are important to address, since the longer a concentrated chemical remains on a floor, the more any added water evaporates, leaving a higher concentration level of the solution behind. This higher concentration may exceed the chemical resistance capabilities of the coating, making it critical for specifiers to understand every potential chemical exposure and duration before deciding on the floor coating.
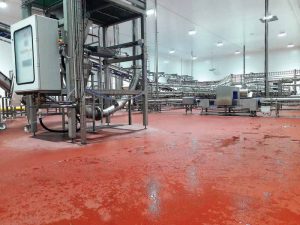 [9]
[9]Thermal shock
Being wary of thermal shock situations is also critical, as different coating resin chemistries have varying resistance to high temperatures. With thermal shock, ambient-temperature or cold floors may encounter sudden exposure to high heat from hot water wash downs (Figure 9), open bottom ovens, or drips from a kitchen fry line. The high temperatures can cause flooring materials to expand rapidly, creating extreme stress at the concrete/coating bond line. If the flooring system is not resistant to thermal shock, the stress may be too great for the bond to hold, causing it to fail. Choosing a flooring system that mirrors the thermal expansion and contraction characteristics of the concrete, such as urethane concrete, is crucial.
Dew point moisture
Some floor failures are caused by dew point moisture, which occurs when water vapor in the air condenses. When poured, this moisture may become trapped under the coating system, causing potential problems. For example, urethanes, polyaspartics, and polyureas can react with the trapped moisture, resulting in the coating film trapping carbon dioxide (CO2) gas and foaming. This can produce microbubbles in the coating’s surface and lower its gloss and chemical resistance. To avoid these issues, applicators must install flooring when environmental conditions are acceptable. This means closely monitoring surface temperature, air temperature, and humidity levels. Sometimes using a fan can help by creating enough air movement to assist with evaporating the moisture.
Dew point moisture can also affect epoxies by making them cloudy or milky, altering their aesthetic, especially with clear finishes. In high humidity, epoxies can exude an amine blush which leaves an oily residue. If not removed, the residue will prohibit the chemical bonding of the next coat.
Intercoat delamination
Intercoat delamination is another possible failure. It happens between different coating layers within a system and is usually caused by either missing a coating’s recoat window or surface contamination. A recoat window is the period in which one coating can be applied to another and still achieve a chemical bond. Since coatings are typically dense and glossy, it is tough for one coating to stick to another if the recoat window has passed. If the window has expired, then installers must sand the previous coat to help establish a surface which will enable a mechanical bond between the coating layers. A published recoat window may indicate a specific time frame based on the environment’s ambient temperature and RH. Both environmental variables can change the cure times of the resins, and other factors may also affect the recoat window. For example, an area exposed to heat or sun may cure faster, reducing the prescribed recoat window. A visual sign of missing a recoat window is when both surfaces—the bottom of the peeling topcoat and the top of the lower layer—are glossy, suggesting there was never a chemical bond.
Contamination
Contamination is another primary reason for a floor coating to experience delamination. For example, shoe residue deposited via foot traffic,
as well as wind blowing debris and dust into the building, can contaminate the floor. This can happen before, during, or after application, producing undesirable results. Following proper surface preparation protocols and meeting coating recoat windows can help minimize the risk of failures related to contamination.
Cracks and control joints
Potential floor coating failures might also be attributed to concrete cracks and control joints, whether there is controlled cracking (via control joints) or random stress cracking. Since cracks can appear anywhere, installers should use fillers and reinforcements to bridge over them. Installers have several options, one of which includes routing out cracks by 31.7 mm (1.25 in.) and filling the voids with a flexible resin. The movement from the crack will be spread out over the filled area, reducing stress on the surrounding concrete. Even better, installers could add a 304.8-mm (12-in.)-wide flexible membrane to spread the crack movement over a wider area—152.4 mm (6 in.) on either side of the crack. Finally, the best option is to install a membrane over the entire flooring surface using
a fiberglass scrim. Going to this length will help mitigate any unidentified cracks at the time of installation, provide the best crack suppression, and deliver the added benefit of waterproofing.
 [10]
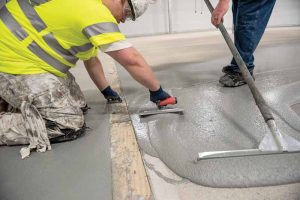
[10]Avoiding application mistakes
Successful resinous flooring installations are also dependent on correct jobsite mixing of coating components prior to application (Figure 10). Mixing issues are possible, but installers can save time and cost if they can pinpoint the mistake
and correct it.
Common mixing mistakes include:
- Forgetting to add the Part B side of the coating, so it never sets up. Part A is the resin and Part B is the catalyst which causes a reaction with Part A. The combined materials cure and harden.
- Reversing the ratio of Part A to Part B. This causes an epoxy to remain sticky, and urethanes and polyaspartics to become more like moisture-cured coatings.
- Mixing the wrong ratio. This may still enable a coating to become hard, but it will never meet its advertised physical properties or chemical resistance. Such improperly mixed coatings will also attract dirt and are prone to staining.
- Accidentally mixing the wrong ingredients, such as applying a urethane or polyaspartic over a wet epoxy. This will rob the amine from the epoxy and it will never cure, leading to a potential bond break and delamination of the coatings.
Conclusion
Improper surface preparation is the primary cause of failures when installing a monolithic resinous floor. If surface preparation is done incorrectly, installers must completely remove the flooring and start over. Other potential failure modes such as moisture, cracked cement, and application mistakes can typically be addressed as the project progresses. Working with a knowledgeable representative from a quality supplier along with a qualified contractor can help facilities thwart problems before they happen. Further, if issues arise, these experts can provide valuable insight to help keep projects on schedule.
 Author
Mark Merrifield is a business development manager for Sherwin-Williams High Performance Flooring. His responsibilities include delivering specification and technical support to customers and the company’s salesforce. Additionally, he is responsible for market opportunity and market development within the resinous flooring and wall coatings business. Merrifield has more than 35 years of resinous coatings experience, including 20 years with the Sherwin-Williams Company, previously serving as a sales representative and a technical service manager, during which he assisted on numerous projects and conducted national and international training sessions. He can be reached at mark.merrifield@sherwin.com.
- [Image]: https://www.constructionspecifier.com/wp-content/uploads/2023/03/PG10_OpenerFlooring.jpg
- [Image]: https://www.constructionspecifier.com/wp-content/uploads/2023/03/PG12_Figure1_Flooring_Brewery_FasTopMultiSystems1.jpg
- [Image]: https://www.constructionspecifier.com/wp-content/uploads/2023/03/PG12_Figure2_Flooring_BIXProduce1_FinishedFloor.jpg
- [Image]: https://www.constructionspecifier.com/wp-content/uploads/2023/03/PG12_Figure3_Flooring_GrandForksNDWTP_Flooring1.jpg
- [Image]: https://www.constructionspecifier.com/wp-content/uploads/2023/03/PG12_Figure4_Flooring_BIXProduce5_FloorInstallation.jpg
- [Image]: https://www.constructionspecifier.com/wp-content/uploads/2023/03/PG16_Figure6_CSPChips.jpg
- [Image]: https://www.constructionspecifier.com/wp-content/uploads/2023/03/PG16_Figure7_Flooring_BIXProduce4_FloorInstallation.jpg
- [Image]: https://www.constructionspecifier.com/wp-content/uploads/2023/03/PG16-Figure8_Flooring_HangarFloor_BestJets_Plane1.jpg
- [Image]: https://www.constructionspecifier.com/wp-content/uploads/2023/03/PG18_Figure9_Flooring_MeatProduction_FasTopMultiSystems.jpg
- [Image]: https://www.constructionspecifier.com/wp-content/uploads/2023/03/PG20_Figure10_Flooring_BIXProduce11_MixingProduct.jpg
Source URL: https://www.constructionspecifier.com/how-to-avoid-floor-coating-failures/