

There are some cases where a floor or embed frame is necessary to act as a transition between different types of finished flooring and/or as support for glass sidewalls in all-glass revolving door types. An embed frame is circular in shape and constructed of square tube stainless steel 25 mm (1 in.) in diameter. The tube is then rolled to the circumference of the revolving door. The frame is then set into a recess in the flooring and at the height of the finished floor. A variety of flooring types can be used inside the frame, such as carpet, terrazzo, stone, etc. The flooring is poured or set in and around the frame, and then the revolving door is placed on top of the frame.
The use of a type of different flooring inside the circular footprint of the door visually signifies to pedestrians the actual path of the moving door wings and serves as an additional cue to avoid contact with the door wings when stepping into and, especially, exiting the door. Additionally, the installation of entrance mats at the exterior and interior will help avoid slips and falls. Many buildings also use stainless steel floor grates on either the exterior or interior side of the door or even under the entire door to collect dirt and debris before entry to decrease maintenance costs. Grating or matting continuing 3 m (10 ft) or more into the interior space can also help qualify for Leadership in Energy and Environmental Design (LEED) indoor environmental quality (IEQ) 5 (indoor chemical and pollutant source control) credit.
The opening must be ready
As with flooring, the surrounding wall and opening structure should be fixed prior to the installation of the revolving door. These doors are not intended to bear weight, and what may also surprise people is that, even though they are cylindrical in shape, they are not intended to be a free-standing unit—each door must be tied into an adjacent structure for lateral support. If this is not done, the door will shake and sway during rotation, causing undue stress, damage, or failure. While the assembly steps for each door are different, depending on the manufacturer’s instructions, they all require the door’s canopy is tied-in at the sides and top and the sidewalls are anchored down into the finished floor.
When doing a site inspection, the door installer should have a set of approved shop drawings as well as the architectural detailing showing elevation and plan view. They need to confirm the opening width and height are correct and are level and plumb. If the opening is incorrect or not ready, they should inform the GC and possibly reschedule the installation.
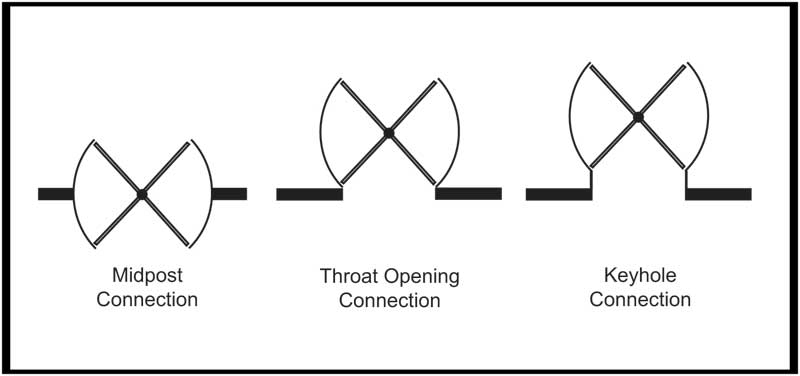
There are a variety of ways to connect a revolving door to its surroundings. Connections are a tool enabling the architect to optimize a building’s space utilization, create a dramatic statement, or even provide additional shelter for people and the door from outside elements. Connections can create unique entrances meeting a wide range of design expressions and needs. For example, an interior keyhole connection will place the entire door inside of the building with storefront materials or glass extending and joining the exterior wall. This creates a small ‘awning effect’ that protects pedestrians from inclement weather as they come in from the outside while also highlighting the door’s complete cylindrical shape as a special feature inside the lobby.
Revolving doors can be connected to buildings at the mid-post, throat opening, and in several ‘keyhole’ configurations including standard, double-bent glass, and angled. Curved glass has also been used. Architects must weigh the pros and cons of each connection type and consider how each will affect the client’s day-to-day operations.
The most common connection used by architects and building owners is the mid-post connection. Half of the door resides inside the building, while the other half protrudes beyond the building envelope (one must ensure there is room for pedestrians and it is advisable to consider an awning or overhang to protect the door). The mid-post connection is the least complex to install as one can simply use sealant to seal between the door and the opening (typically 9.5 mm [3/8 in.] tolerance).
For all connections other than the simple mid-post type, there may be additional extensions and/or trim pieces to finish the connection point to the door, sometimes at novel angles. For example, when the envelope is connected at the throat opening or if curved glass is used, it is advisable to contact the revolving door manufacturer to discuss available options. Typically, the glazing contractor will be responsible for finishing the opening to the door, and not the door installer.
Electrical matters
Power, access control, fire alarm, and flooring/conduit requirements must be properly addressed to ensure a smooth and cost-effective installation, as they are often located above the door in the ceiling or, in some cases, below the door in the flooring. These items should all be stubbed-in prior to installation. This eliminates unnecessary delays in the installation of the door (waiting for other trades to complete the work) and reduces the possibility of damage to the equipment on an active construction site.
All automatic revolving door power requirements include 110-240 V ac, single phase, 20-amp, and three-wire circuit with ground. Specifiers should refer to the manufacturer’s submittal/electrical drawings for incoming voltage requirements and the connection. The power must be roughed into the area (and preferably functional to make it easy to test and commission the door) at the time of install.
Optional lighting requirements include 110-120 V as w/ground, 50/60 Hz, 15-amp breaker. It is recommended to always use a dedicated circuit for the interior lighting in a revolving door.

