Installation tips for revolving doors
by sadia_badhon | June 12, 2019 11:09 am
by Kevin Blaine
 [1]
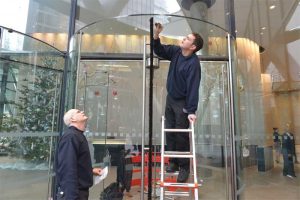
[1]Revolving doors are now becoming more integrated with a building’s emergency and security systems than ever before, and this means installers at the very least have to know more about how these systems tie into the door.
Revolving doors are a suitable solution for commercial buildings due to their appealing aesthetic appearance at the entry and their ability to minimize the influx of unconditioned outdoor air and unwanted noise and debris.
These doors are beneficial in all types of climates, even warmer areas. They keep conditioned indoor air within a building no matter how many people enter or exit the facility. In fact, the more pedestrian traffic there is, the greater the benefit compared to swinging and sliding doors.
In 2006, a team of graduate students at the Massachusetts Institute of Technology (MIT) published a study entitled, “Modifying Habits Towards Sustainability: A Study of Revolving Doors Usage on the MIT Campus.” The students focused their research on one particular building on campus with revolving and swing doors. By calculating the energy lost through the swing doors versus the revolving type, they concluded the latter was eight times more energy-efficient than the former because a large hole is created in the building envelope when the swinging door opens compared to the slight leak of air from a revolving one. The more a swinging door is used by pedestrians, the longer the hole stays open, resulting in energy loss.
One can maximize the use of premium indoor space, reduce loads on the HVAC system, save energy, and reduce operational costs by employing revolving doors.
The most important decision to make is which type of revolving door to use on a specific project. There is more variety than ever before, such as all-glass and metal-framed construction, and a choice of manual or automatic operation. Unlike yesteryear options, today’s manual revolving doors use electricity to provide power assistance, rotation control, positioning, and automatic security locking or integration with access control systems. There are also automatic security revolving doors to prevent tailgating and piggybacking into secure areas.
The best door type and features for an application would be the subject of a different article. This article will focus on ensuring a smooth installation. The author has witnessed hundreds of door installations over the past 30 years, and there has been many a time when the site was not ready for a revolving door installation. When this is the case, the installation team will charge the responsible party for a day of lost work (the opportunity cost of not working productively elsewhere), which can get expensive and is unnecessary. In the author’s experience, coordination is everything.
 [2]
[2]Door installer’s scope of work
It is important to understand the scope of work of a door installer. An installer’s main responsibilities include:
- erecting the revolving door properly within the awaiting opening structure;
- tying the door into the opening/building structure and floor using approved anchorage;
- sealing the door to the opening using approved sealant;
- commissioning the door, which includes testing its functions and performance to meet everyday use and building inspections (e.g. fire and access control systems); and
- communicating with the manufacturer when the door is commissioned and activating the product warranty period.
To accomplish these objectives, the site must be ready. Often a general contractor (GC) wants to install a revolving door to ‘seal’ the building envelope for security reasons and does exactly that. Further, the installation is often performed at an early stage when heavy equipment and ladders are still going in and out of the building and exposing the door to damage not covered by the manufacturer. In the author’s experience, the best approach is to have a temporary ‘door’ to close/secure the opening (plywood works) and wait until all the drywall is finished and painted.
The installer should inspect the site one to two weeks prior to the scheduled date, but it is important to understand that each type of door would have slight differences.
Flooring conditions matter
For a long product life, it is essential to install a revolving door on top of a completely leveled and finished floor, including carpet, tile, etc. If the floor is uneven, shims may be required to level the door. However, by doing so, there will be a gap in the seal underneath the door wing where the floor is lowest, which will allow unwanted air infiltration. Also, the uneven floor can cause undue stress on the bottom bearing of the center shaft, which will be rotating out of plumb. This can lead to premature failure over an extended period of time. If the floor is out of level by more than 3 mm (1/8 in.), it should be repaired prior to installation of the door.
It is recommended to use felt/rubber or a combination of horsehair and rubber under the door wings as weather stripping because they are always in contact with the floor. These flexible materials would not damage the surface and also ensure the door closes and seals properly without causing excess wear and tear on the door wings. If the floor is out of level, these materials will wear out or break down faster due to excessive contact and scraping.
 [3]
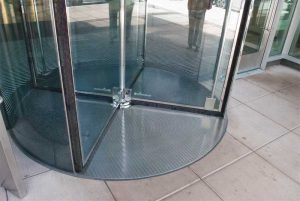
[3]There are some cases where a floor or embed frame is necessary to act as a transition between different types of finished flooring and/or as support for glass sidewalls in all-glass revolving door types. An embed frame is circular in shape and constructed of square tube stainless steel 25 mm (1 in.) in diameter. The tube is then rolled to the circumference of the revolving door. The frame is then set into a recess in the flooring and at the height of the finished floor. A variety of flooring types can be used inside the frame, such as carpet, terrazzo, stone, etc. The flooring is poured or set in and around the frame, and then the revolving door is placed on top of the frame.
The use of a type of different flooring inside the circular footprint of the door visually signifies to pedestrians the actual path of the moving door wings and serves as an additional cue to avoid contact with the door wings when stepping into and, especially, exiting the door. Additionally, the installation of entrance mats at the exterior and interior will help avoid slips and falls. Many buildings also use stainless steel floor grates on either the exterior or interior side of the door or even under the entire door to collect dirt and debris before entry to decrease maintenance costs. Grating or matting continuing 3 m (10 ft) or more into the interior space can also help qualify for Leadership in Energy and Environmental Design (LEED) indoor environmental quality (IEQ) 5 (indoor chemical and pollutant source control) credit.
The opening must be ready
As with flooring, the surrounding wall and opening structure should be fixed prior to the installation of the revolving door. These doors are not intended to bear weight, and what may also surprise people is that, even though they are cylindrical in shape, they are not intended to be a free-standing unit—each door must be tied into an adjacent structure for lateral support. If this is not done, the door will shake and sway during rotation, causing undue stress, damage, or failure. While the assembly steps for each door are different, depending on the manufacturer’s instructions, they all require the door’s canopy is tied-in at the sides and top and the sidewalls are anchored down into the finished floor.
When doing a site inspection, the door installer should have a set of approved shop drawings as well as the architectural detailing showing elevation and plan view. They need to confirm the opening width and height are correct and are level and plumb. If the opening is incorrect or not ready, they should inform the GC and possibly reschedule the installation.
 [4]
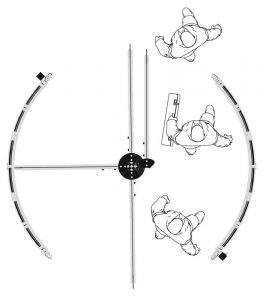
[4]There are a variety of ways to connect a revolving door to its surroundings. Connections are a tool enabling the architect to optimize a building’s space utilization, create a dramatic statement, or even provide additional shelter for people and the door from outside elements. Connections can create unique entrances meeting a wide range of design expressions and needs. For example, an interior keyhole connection will place the entire door inside of the building with storefront materials or glass extending and joining the exterior wall. This creates a small ‘awning effect’ that protects pedestrians from inclement weather as they come in from the outside while also highlighting the door’s complete cylindrical shape as a special feature inside the lobby.
Revolving doors can be connected to buildings at the mid-post, throat opening, and in several ‘keyhole’ configurations including standard, double-bent glass, and angled. Curved glass has also been used. Architects must weigh the pros and cons of each connection type and consider how each will affect the client’s day-to-day operations.
The most common connection used by architects and building owners is the mid-post connection. Half of the door resides inside the building, while the other half protrudes beyond the building envelope (one must ensure there is room for pedestrians and it is advisable to consider an awning or overhang to protect the door). The mid-post connection is the least complex to install as one can simply use sealant to seal between the door and the opening (typically 9.5 mm [3/8 in.] tolerance).
For all connections other than the simple mid-post type, there may be additional extensions and/or trim pieces to finish the connection point to the door, sometimes at novel angles. For example, when the envelope is connected at the throat opening or if curved glass is used, it is advisable to contact the revolving door manufacturer to discuss available options. Typically, the glazing contractor will be responsible for finishing the opening to the door, and not the door installer.
Electrical matters
Power, access control, fire alarm, and flooring/conduit requirements must be properly addressed to ensure a smooth and cost-effective installation, as they are often located above the door in the ceiling or, in some cases, below the door in the flooring. These items should all be stubbed-in prior to installation. This eliminates unnecessary delays in the installation of the door (waiting for other trades to complete the work) and reduces the possibility of damage to the equipment on an active construction site.
All automatic revolving door power requirements include 110-240 V ac, single phase, 20-amp, and three-wire circuit with ground. Specifiers should refer to the manufacturer’s submittal/electrical drawings for incoming voltage requirements and the connection. The power must be roughed into the area (and preferably functional to make it easy to test and commission the door) at the time of install.
Optional lighting requirements include 110-120 V as w/ground, 50/60 Hz, 15-amp breaker. It is recommended to always use a dedicated circuit for the interior lighting in a revolving door.
 [5]
[5]Building codes and inspections
Architects and specifiers refer to the International Building Code (IBC) to determine the size and number of revolving doors, the type of door (automatic or manual), and the location of the nearest stairs and emergency egress doors. The local fire marshal will inspect a revolving door according to section 7.2.1.10, “Revolving Door Assemblies,” of the National Fire Protection Associate (NFPA) 101, Life Safety Code. Both IBC and NFPA either refer to or generally follow the standards of the American National Standards Institute/Builders Hardware Manufacturers Association (ANSI/BHMA) A156.27, Power and Manual Operated Revolving Pedestrian Doors.
Once a door is installed, it is time for inspection. Installers must ensure the revolving door meets the functional and operational codes and requirements of IBC, ANSI/BHMA, and NFPA. ANSI/BHMA A156.27 is a detailed and thorough guideline for addressing safety and proper door operation. Installers meeting ANSI/BHMA A156.27 will end up complying with NFPA standards (which, in turn, are generally aligned with IBC). The following requirements from ANSI/BHMA A156.27 will steer the installer to comply with all three standards.
Breakout force requirements
As per section 10.2, “Breakout Force Requirements,” each revolving door wing should be capable of collapsing when a force of 59 kg (130 lbf) is applied at 76 mm (3 in.) from the outer edge of the outer wing stile and 1016 mm (40 in.) above the floor.
Acceptable door speed
Sections 4.2, 5.2, 6.2, 7.2, 8.2, “Acceptable Door Speed,” (for each type of revolving door in the industry) provide tables dictating the maximum speed of the revolving door in terms of revolutions per minute (RPMs) by specific diameter and type of revolving door. The installer must also reference the manufacturer’s manual for the maximum speed limitations of the product.
Automatic door signage
Section 11.1, “Automatic Door Sign,” states automatic revolving doors shall be marked with signage visible from both sides of each wing. The sign shall include the words “Automatic Door,” in minimum 25-mm (1-in.) tall black letters placed at 1270 +/- 305 mm (50 +/- 12 in.) from the floor to the centerline of the sign. Additional information may be included.
Section 11.2, “Slow Speed Activation Sign,” mandates the sign shall have one of the following:
- activate to slow;
- push to slow; or
- press to slow.
The letters shall be at least 16 mm (5/8 in.) tall and located within 305 mm (12 in.) of the device. As per to section 11.3, “Emergency Stop Sign,” the sign shall read “Emergency Stop.” The letters shall be at least 16 mm tall and located within 305 mm of the emergency stop switch.
Automatic door sensors
It is recommended to refer to sections 16 to 22 of ANSI/BHMA A156.27 for detailed requirements regarding the proper operation of all automatic revolving door sensor systems (wing sensors, end wall and bottom rail sensors, and entry point sensor).
Again, ANSI/BHMA A156.27 is very specific and detailed for all possible revolving door types and the installer will benefit by complying with NFPA and IBC operational standards all at once. Installers who have been approved by the American Association of Automatic Door Manufacturers (AAADM) can provide certification that the door has been set according to ANSI/BHMA A156.27.
Final door installation tips
One of the most important steps with the door installation is the drawings provided to the estimator must reflect the exact information that is included in the specification.
Pre-installation drawings should include key metrics, opening size, radius, and all related specs. The complete set of drawings should be provided in the owner’s manual that is shipped to the customer. A drawing packet containing both mechanical and electrical drawings will be shipped with the door.
While there are many door manufacturers, it is important to work with one who will take the time to ensure all questions have been answered. Some manufacturers offer informational webinars that can be viewed on demand and multiple times before the installation to ensure there are no surprises when installing or servicing a door. Another helpful tool is a video the manufacturer can send to the installation team, while they are onsite, to address any questions during the installation process.
Specifiers should require the presence of the door installer at a GC meeting related to door openings of the building. It is also important that the door manufacturer pre-emptively holds a pre-installation meeting with the installer prior to the GC one to ensure the installer is prepared on the logistics of handling the crates at the site, scheduling and pre-requisites, specific building tie-ins, and so forth. This will ensure the meeting with the GC and other subcontractors is as informative and productive as possible.
These steps and tips can help protect a revolving door from unintended damage, and ensure it functions properly and also ties-in well with the surrounding building. Core needs will be addressed and misunderstandings leading to wasted time and money can be eliminated.
- [Image]: https://www.constructionspecifier.com/wp-content/uploads/2019/06/Boon-Edam_Cover-Photo_Installers.jpg
- [Image]: https://www.constructionspecifier.com/wp-content/uploads/2019/06/Boon-Edam_Matwell-Ring.jpg
- [Image]: https://www.constructionspecifier.com/wp-content/uploads/2019/06/Boon-Edam_Building-Connections.jpg
- [Image]: https://www.constructionspecifier.com/wp-content/uploads/2019/06/Boon-Edam_Revolving-Door-Wings-Must-Break-Out.jpg
- [Image]: https://www.constructionspecifier.com/wp-content/uploads/2019/06/Boon-Edam_Technical-Instruction-Videos.jpg
- kevin.blaine@boonedam.com: mailto:kevin.blaine@boonedam.com
Source URL: https://www.constructionspecifier.com/installation-tips-for-revolving-doors/