

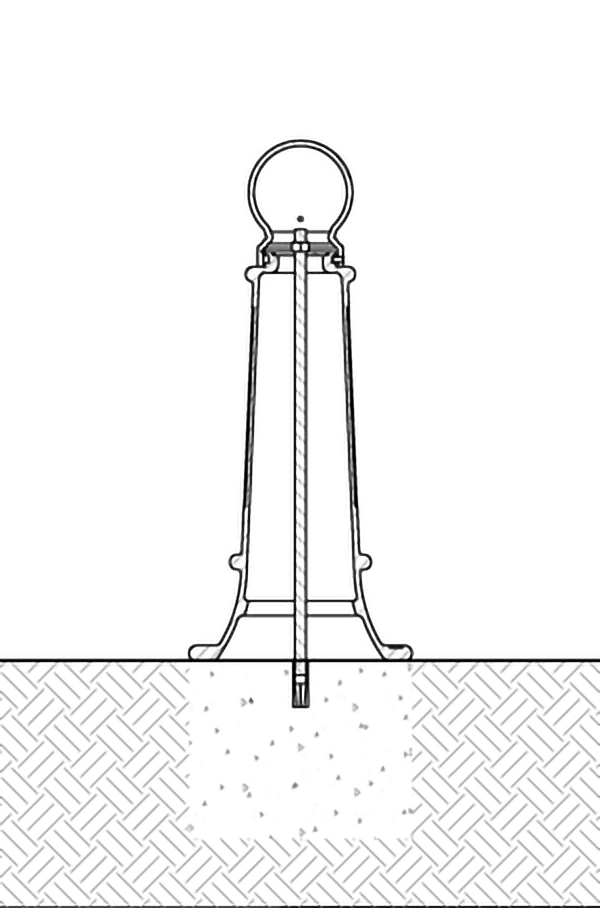
This solution can be ideal for locations that may see extensive concrete rework in the future. Use an adhesive anchoring system rated or approved for use in structural concrete with ASTM E488, Standard Test Methods for Strength of Anchors in Concrete Elements; ASTM C881, Standard Specification for Epoxy-Resin-Base Bonding Systems for Concrete; and other applicable standards for location. Make sure to check the relevant transportation authorities to confirm the adhesive meets hazardous materials requirements for location.
The procedure to install with adhesive is:
- examine the bollard spacing plan and mark the precise center point of each bollard;
- adhesive anchoring systems recommend a minimum radius (often 127 mm [5 in.]) of solid concrete around the drill site;
- the solid concrete should also be equal to or greater than the diameter of the bollard;
- tap a pilot divot hole in the center of each mark to prevent the drill from drifting during boring;
- set depth control on hammer drill or rotary hammer, or mark depth on the masonry bit (usually 102 mm [4 in.] is sufficient for good adhesion, however, it is advisable to check the manufacturer’s recommendations. It is also advisable to check length of threaded rod as it must be longer than depth plus the bollard body length so it can be secured in the bollard);
- drill a hole of 3 mm (1/8 in.) greater diameter than the threaded rod;
- vacuum or blow debris from the hole;
- fill with adhesive, moving slowly from bottom to top, to prevent air pockets;
- set bollard over hole and make sure it is completely plumb;
- lower rod through the bollard center frame, then twist it into the adhesive to achieve maximum grip strength; and
- let cure for at least 45 minutes before finishing installation.
Installing bollards with drop-in inserts
Drop-in concrete inserts require slightly more time to install than adhesive anchors, but they are easier to handle on removal. The drop-in insert is threaded on the inside to match the threaded rod. Should the bollard be removed, the rod can be unscrewed from the insert simply, rather than needing to be dug out. Concrete patching solution can be applied over the insert. (If the anchor must be removed, a bolt breaker or grinder is used to remove the drop-in insert before patching, making the procedure as time consuming as adhesive removal.)
A concrete insert works like a wall anchor to provide grip. When installed using a setting tool or flat-end punch, they expand inside the concrete hole to create strong, loadbearing mountings. A common application for these inserts is in ceilings in order to bear the weight of hanging hardware.
Plated steel inserts are a good choice for outdoor applications.
To install bollards with concrete inserts:
- examine the bollard spacing plan then mark the precise center point of each bollard;
- concrete anchoring systems often recommend a minimum radius of solid concrete around the drill site and between anchor points (check specifications for the inserts being used, they are often 178 to 229 mm [7 to 9 in.] apart);
- for optimal strength, the concrete should be at least 152 mm (6 in.) deep;
- the bollard base should rest completely on the concrete;
- tap a pilot divot hole in the center of each mark to prevent the drill from drifting during boring;
- the concrete insert used will depend on the size of the threaded rod (a 19-mm [3/4-in.] rod will require a 19-mm insert, and most 19-mm inserts need a 25-mm masonry bit, so it is best to check the manufacturer’s directions for the necessary hole diameter.);
- set control on hammer drill or rotary hammer to proper depth (check drop-in insert manufacturer’s recommendation and ensure that the depth plus the length of the bollard body is less than the length of the rod);
- vacuum or blow debris from the hole;
- drop the concrete insert in and ensure it is flush with the concrete surface and completely level;
- hammer the insert into place using the setting tool or a flat end punch;
- set bollard over hole and make sure it is completely plumb;
- lower rod through the bollard center frame then twist it into the insert; and
- finish installation.
Flanged base bolt-down bollards
Another way to install bollards into existing concrete is to purchase bollards with a metal plate or flange at the base. Flanged bollards generally come with square or circular base plates with two or three bolt holes.
Bolts, rather than threaded rods, affix these models of bollards. As with the threaded rod models, drop-in inserts are needed to securely bolt the bollards to the floor.
To bolt down bollards:
- use 13-mm [½-in.] head bolts, 13-mm washers, and 13-mm drop-in inserts;
- examine the bollard spacing plan then mark the precise center point of each bollard;
- concrete anchoring systems often recommend a minimum radius of solid concrete around the drill site, between anchor points (check specifications for the inserts being used: the holes in the flange may be closer than this minimum radius, but individual bollards should be spaced farther apart);
- for optimal strength, the concrete should be at least 152-mm deep;
- the bollard base should rest completely on the concrete;
- keep the bollard in its packaging for as long as possible;
- place the bollard over the center point, then adjust the orientation of the bollard or flange to the preferred position (once the bollard has been bolted down, it will be immovable);
- mark the bolt holes with chalk to create drill markings;
- tap a pilot divot hole in the center of each mark to prevent the drill from drifting during boring;
- drill holes (for 13 mm hardware, drill 16-mm [5/8-in.] diameter and 50-mm [2-in.] depth, and mark masonry bit at 50 mm or use depth control);
- vacuum or blow debris from the hole;
- drop the concrete inserts in and ensure they are flush with the concrete surface and completely level;
- hammer the inserts into place using the setting tool or a flat end punch;
- set bollard over holes and make sure it is completely plumb;
- place washers over the holes in the bollard and set bolts into place then tighten evenly, in a cycle; and
- finish installation.

