Light and Large: Considerations for commercial thin-tile installations
The proper mortar for the installation depends on several variables. Thin tile manufacturers and importers maintain lists of compatible mortars for their tiles that should be available in technical brochures and on request. For tiles with mesh backings, the backings and adhesive must be compatible with the mortar. Less-experienced installers will want to consider an extended open-time mortar and allow extra time for the mortar to set before grouting. These extended open-time mortars meet the material specifications for:
- ANSI A118.4E, Modified Dry-set Cement Mortar, extended open time;
- ANSI A118.11, Exterior Grade Plywood (EGP) Latex Portland Cement Mortar; or
- ISO 13007-1:2010, Ceramic Tiles: Grouts and Adhesives, designation C2ES2P2 (i.e. classification for improved cementitious mortar with extended open time, improved deformability, and improved plywood adhesion).
Experienced crews will benefit from rapid-setting mortars meeting ANSI A118.4F (modified dry-set cement mortar with fast setting time), and ANSI A118.15F (improved modified dry-set cement mortar with fast setting time) or the ISO designation C2FS2P2 (classification for improved cementitious mortar with fast drying time, improved deformability, and improved plywood adhesion). Exterior applications may require epoxy mortars meeting ANSI A118.3 (chemical-resistant, water-cleanable, tile-setting and grouting epoxy and water-cleanable, tile-setting epoxy adhesive) or the ISO designation R2 for reactive resin adhesive or two-part cementitious mortars with extra deformability to adapt to thermal changes in the tile. All mortars used should be easy to trowel and, typically, mixed to the loose side of the recommended water range. The key is to check with the tile manufacturer and setting materials supplier before installation to ensure the correct mortar is on hand.
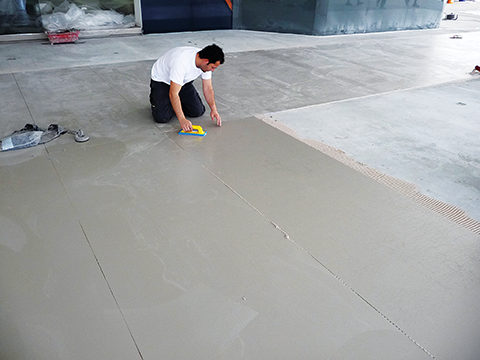
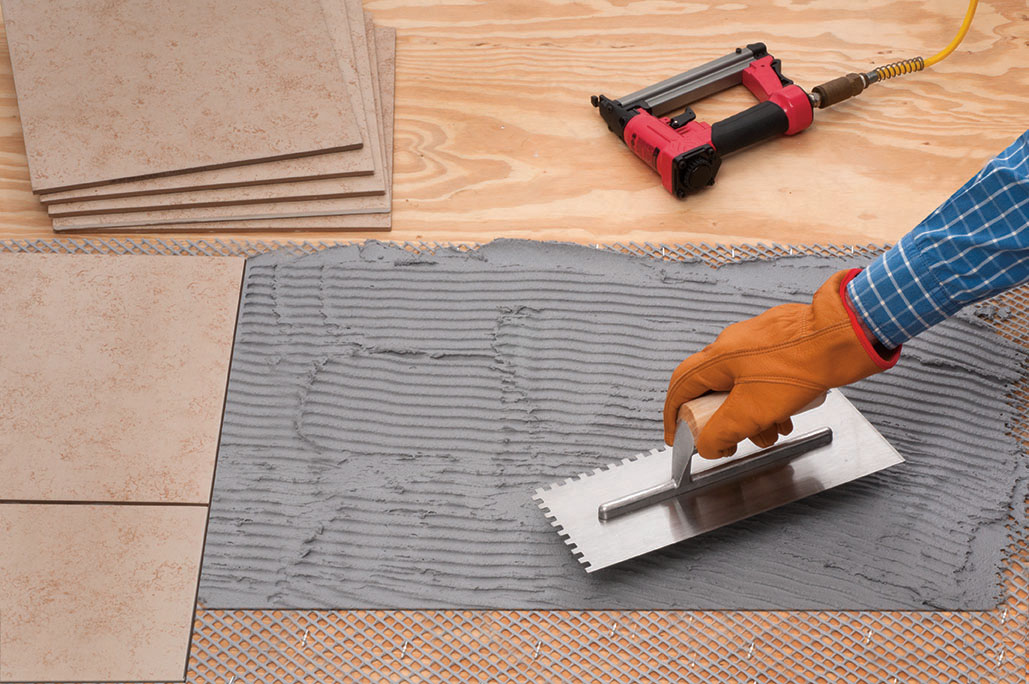
Once the substrate is prepared, the mortar is selected, and the tile has been pre-cut, it is time to apply the mortar. The key to fully supporting thin tiles is to remove as much of the air as possible from beneath the tile when it is being installed and to ensure there is enough mortar present to evenly fill all gaps. Special trowels have been developed that allow the trowel ridges to collapse more readily and ‘interlock’ between the back of the tile and the substrate.
The tiles should be back-buttered in a direction parallel to the shortest dimension of the tile to give air the shortest route for escape. The substrate should be trowelled in the same direction to create a ‘zipper’ effect when the two are placed together. Any trapped air should be removed in the manner recommended by the tile manufacturer. These methods include walking the air out, vibration, tamping, and other methods.

Grouting
A grout joint is necessary for thin tiles. It must be a minimum of 1.5 mm (1⁄16 in.), but whatever the width, it must be enough to compensate for growth and shrinkage of the tile if it is exposed to temperature swings and direct sunlight.
Following the EJ171 movement joint recommendations from the TCNA Handbook for Ceramic, Glass, and Stone Tile Installation will ensure proper width and number of movement joints to compensate for this movement. Failure to allow for movement will result in the tile becoming de-bonded from the substrate.
Typically, grouts for thin tiles should be either epoxy grouts or high-end cementitious grouts that will not effloresce. Some of the new ready-to-use grouts can also provide benefits for this type of system, provided they are recommended for the service environment where the tile is being installed.
Conclusion
While this article is not a substitute for training and experience working with the product, it should allow specifiers and designers to understand some of the considerations for the new thin-tile panels. While they do have some specific challenges, they also allow for exciting new applications and designs. Working together with the tile and setting materials manufacturer ahead of time will flatten the learning curve and produce a beautiful, long-lasting installation.
Dan Marvin is the director of technical services for MAPEI Corporation. He has more than 20 years of technical expertise in the tile industry and sits on technical committees for Tile Council of North America (TCNA), International Organization for Standardization (ISO), Materials and Methods Standards Association (MMSA), ASTM, American National Standards Institute (ANSI), and the Handbook for Tile and Stone Installation. Marvin works closely with these committees to improve existing standards, create new ones, and communicate the changes to the public. He can be reached at dmarvin@mapei.com.
Sign up for our weekly newsletter
Architectural materials and methods delivered right to your inbox
- CSI News and Notes: CSI Foundation’s construction camp; CSI spring exam; and more
- CSI News and Notes: CSI’s credentials; CSI conference theme; and more
- To be specific – CSI supports young AECO professionals
- CSI News and Notes: CSI’s foundation scholarships, national conference, and Crosswalk
- CSI News and Notes: AI’s impact; CSI 2024 conference, and more
Read the Latest Issue