Light and Large: Considerations for commercial thin-tile installations
by Katie Daniel | May 28, 2015 2:05 pm
 [1]
[1]by Dan Marvin
The newest innovation in tile is thin units that marry reduced thickness with large size. Whereas traditional thickness tiles are 9 mm (3⁄8 in.) or thicker, these new-generation thin tiles are 3 to 6 mm (1⁄8 to 1⁄4 in.) thick, and can come in dimensions up to 1 x 3 m (3 x 10 ft). This is not a typo—one thin tile panel can cover 3 m2 (30 sf) or more.
While thin tile provides an exciting array of design possibilities, it also poses potential challenges for installers and general contractors. This article outlines the important considerations for specifying this new product technology.
As background, it is important to know tile continues to build in popularity as a surface covering for floors and walls, both residentially and commercially. The trend for tile continues to be larger sizes and less grout joints. Traditional large-format tiles are heavy due to their thickness, which makes them expensive to transport. Heavier tiles also require more energy (usually natural gas) to fire them to the 0.5 percent porosity or less required to be considered porcelain.
In the early 2000s, Italian tile-equipment manufacturers began exploring the potential for producing large, thin tile. Decreasing the mass of tile by making it thinner would solve both these issues, allowing the tile to be transported less expensively and require less energy to manufacture.
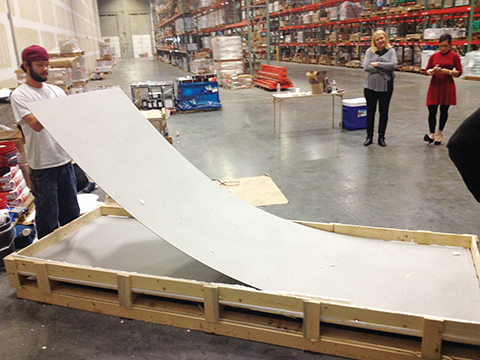
While the tiles were getting thinner, they were also getting larger. Traditional units are constrained by the size of the steel molds used to press them. As thin tiles are usually pressed on a belt, they are constrained only by the width of it and the handling equipment. This led to wider and longer formats. Thin tiles can be cut efficiently using a ‘score and snap’ system that allows for easy production of various sizes from one sheet. The thinnest tiles are also somewhat flexible and have reinforcing mesh adhered to the back to allow for installation in areas like curved walls where traditional tiles would be too rigid.
The processes were developed in Europe and started finding distribution in the United States around 2010. Since then, there have been various efforts launched to develop standards, optimize installation, and educate design/construction professionals (and the tile-buying public) on the product’s strengths and weaknesses.
The current state of large tiles
The challenge is the lack of product and installation standards. American National Standards Institute (ANSI) A137.1, American National Standard Specifications for Ceramic Tile, currently covers traditional size and thickness tiles, but does not address mesh-backed tiles, flexible tiles, or extremely large formats. Likewise, ANSI A108, American National Standard for Installation of Ceramic Tile, does not adequately address tiles that may be as tall as the room.
 [2]
[2]To fill this void, most importers offer classes on how to handle and install the product. Classes are also offered by installation product providers, and an advanced certification of tile installers is being developed by six industry groups:
- Ceramic Tile Education Foundation (CTEF);
- International Masonry Institute (IMI);
- International Union of Bricklayers and Allied Craftworkers (IUBAC);
- National Tile Contractors Association (NTCA);
- Tile Contractors’ Association of America (TCAA); and
- Tile Council of North America (TCNA).
Additional support is available through technical guides, videos, and trade show demonstrations.
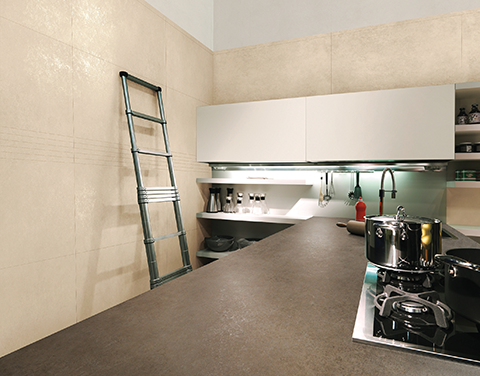
The main functional drawback to thin tile is that there is no longer a margin of error in installation or service environment for which the tile’s strength can compensate. Applications such as rolling loads (e.g. suitcase wheels) and point loads (e.g. chair legs or ladders) can quickly overcome a thin tile installation if the tile is not well supported and installed with minimal lippage.
Based on early results, the U.S. tile industry has published a statement suggesting only products 5.5 mm (1⁄4 in.) or thicker should be used for floors. This runs contrary to the recommendations of some individual producers that allow thickness of 3.5 mm (1⁄8 in.) with a mesh backing to be used for horizontal applications.
While standards efforts are underway both at the U.S. (i.e. ANSI) and global (i.e. International Organization for Standardization [ISO]) levels, the current answer is to follow the best practices developed for handling and installation of these products. Although not every manufacturer of tile and setting materials endorses all these recommendations, this article provides a general list of thin tile considerations and some best practices for addressing them.
 [3]
[3]Specifying
Since thin tiles do not yet have an ANSI or ISO designation, they are typically specified using an open proprietary specification method that lists the manufacturer, product line, style, color, facial dimensions, and thickness. In the current market, there are enough importers to have an open specification that provides more choices and a competitive specification.
The 5.5-mm (1⁄4-in.) tiles—and thicker—are best for floor applications. While all the tiles can be for walls, the 3-mm (1⁄8-in.) and mesh-reinforced 3.5-mm (1⁄8-in.) thin tiles are generally only used vertically. Most interior installations can be successfully completed with sizes up to the full panel. Direct-bonded exterior installations can be constrained by building codes and the practicality of installation of large panels in high temperatures, wind, and other environmental conditions that can impact the setting materials. Generally, exterior façades are recommended at 1 x 1 m (3 x 3 ft) and smaller sizes.
Increasingly, thin tiles are being specified in places where tile has not historically been found. These locations include:
- monolithic countertops;
- furniture facing;
- stair risers;
- elevator cabs;
- recreational vehicles;
- boats; and
- other places where weight and thickness are limiting factors for the finished surface.
It is important to check with the tile manufacturer to ensure the correct product is being specified for the service environment.
Handling
When full thin-tile panels are being used on a jobsite, accommodations for moving and handling them will be required. For example, standard-length forks on fork trucks will not reach far enough beneath the crates—they will bend, which can crack or break the tiles. Since the tiles are reinforced with mesh, the cracks may not be recognized until the tile is in place. Freight elevators may also not be large enough to handle the crates or individual tiles.
Sufficient room to move and store the tiles must be factored in at the jobsite. Aisles must be clear and staging areas ready before unloading. Removing the tile from the crates safely requires use of special suction-cup frames, which also helps with back-buttering the tiles and positioning them on the wall or floor.
 [4]
[4]Photos courtesy MAPEI
Numerous labor-saving tools for large, thin tiles—such as corner protectors and rolling frames—are also available from tool manufacturers. It is important to remember a typical tile-installer will not know about, or have, these tools unless they are familiar with the thin tile products and have received some training.
Cutting
Most thin tiles can be cut with ‘score-and-snap’ type of cutters. Successful cutting requires having the correct cutters on hand and practice using them. Other cuts can be made with diamond drills, diamond-tipped hole saws, and angle grinders. Cuts should be made before mortar application and the tile ‘dry fit’ for accuracy. Once mortar is applied, it is not easy to move a tile for adjustment.
It is important to wear the proper personal protective equipment (PPE) to work with the tile. The tile supplier should have documentation spelling out what is required but, at a minimum, an installer will want gloves that can protect the hands from the irritation of fiberglass particles from the backing and sharp edges from the cuts. Once cuts have been made, one of a number of diamond-impregnated sponge sanding blocks can be used to remove the sharp edges.
Bonding
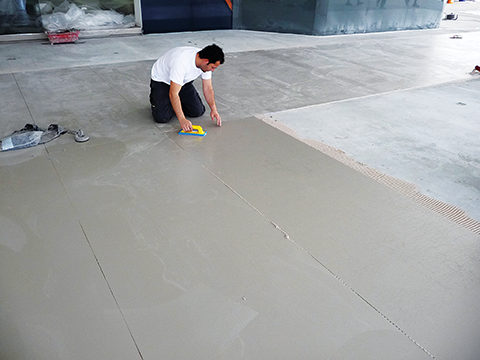
The most challenging application for thin tiles is as a high-traffic floor covering. For floors, the key is support in the form of maximum contact between the tile and the substrate. Thin body tiles will not compensate as well as thicker tiles for voids and gaps below the installation, especially at the edges. A recommended substrate flatness of 3 mm in 3.05 m (1⁄8 in. in 10 ft), and no more than 2 mm (1⁄16 in.) in any 600-mm (24-in.) span is best for this material.
For concrete substrates, that typically means a self-levelling underlayment will be required to flatten the floor. For installations over backer boards, plywood, and other tile-manufacturer approved substrates, the same flatness requirements should be observed, and a loaded deflection of L/720 is recommended.
 [5]
[5]The proper mortar for the installation depends on several variables. Thin tile manufacturers and importers maintain lists of compatible mortars for their tiles that should be available in technical brochures and on request. For tiles with mesh backings, the backings and adhesive must be compatible with the mortar. Less-experienced installers will want to consider an extended open-time mortar and allow extra time for the mortar to set before grouting. These extended open-time mortars meet the material specifications for:
- ANSI A118.4E, Modified Dry-set Cement Mortar, extended open time;
- ANSI A118.11, Exterior Grade Plywood (EGP) Latex Portland Cement Mortar; or
- ISO 13007-1:2010, Ceramic Tiles: Grouts and Adhesives, designation C2ES2P2 (i.e. classification for improved cementitious mortar with extended open time, improved deformability, and improved plywood adhesion).
Experienced crews will benefit from rapid-setting mortars meeting ANSI A118.4F (modified dry-set cement mortar with fast setting time), and ANSI A118.15F (improved modified dry-set cement mortar with fast setting time) or the ISO designation C2FS2P2 (classification for improved cementitious mortar with fast drying time, improved deformability, and improved plywood adhesion). Exterior applications may require epoxy mortars meeting ANSI A118.3 (chemical-resistant, water-cleanable, tile-setting and grouting epoxy and water-cleanable, tile-setting epoxy adhesive) or the ISO designation R2 for reactive resin adhesive or two-part cementitious mortars with extra deformability to adapt to thermal changes in the tile. All mortars used should be easy to trowel and, typically, mixed to the loose side of the recommended water range. The key is to check with the tile manufacturer and setting materials supplier before installation to ensure the correct mortar is on hand.
Once the substrate is prepared, the mortar is selected, and the tile has been pre-cut, it is time to apply the mortar. The key to fully supporting thin tiles is to remove as much of the air as possible from beneath the tile when it is being installed and to ensure there is enough mortar present to evenly fill all gaps. Special trowels have been developed that allow the trowel ridges to collapse more readily and ‘interlock’ between the back of the tile and the substrate.
The tiles should be back-buttered in a direction parallel to the shortest dimension of the tile to give air the shortest route for escape. The substrate should be trowelled in the same direction to create a ‘zipper’ effect when the two are placed together. Any trapped air should be removed in the manner recommended by the tile manufacturer. These methods include walking the air out, vibration, tamping, and other methods.
 [6]
[6]Grouting
A grout joint is necessary for thin tiles. It must be a minimum of 1.5 mm (1⁄16 in.), but whatever the width, it must be enough to compensate for growth and shrinkage of the tile if it is exposed to temperature swings and direct sunlight.
Following the EJ171 movement joint recommendations from the TCNA Handbook for Ceramic, Glass, and Stone Tile Installation will ensure proper width and number of movement joints to compensate for this movement. Failure to allow for movement will result in the tile becoming de-bonded from the substrate.
Typically, grouts for thin tiles should be either epoxy grouts or high-end cementitious grouts that will not effloresce. Some of the new ready-to-use grouts can also provide benefits for this type of system, provided they are recommended for the service environment where the tile is being installed.
Conclusion
While this article is not a substitute for training and experience working with the product, it should allow specifiers and designers to understand some of the considerations for the new thin-tile panels. While they do have some specific challenges, they also allow for exciting new applications and designs. Working together with the tile and setting materials manufacturer ahead of time will flatten the learning curve and produce a beautiful, long-lasting installation.
Dan Marvin is the director of technical services for MAPEI Corporation. He has more than 20 years of technical expertise in the tile industry and sits on technical committees for Tile Council of North America (TCNA), International Organization for Standardization (ISO), Materials and Methods Standards Association (MMSA), ASTM, American National Standards Institute (ANSI), and the Handbook for Tile and Stone Installation. Marvin works closely with these committees to improve existing standards, create new ones, and communicate the changes to the public. He can be reached at dmarvin@mapei.com.
- [Image]: http://www.constructionspecifier.com/wp-content/uploads/2015/05/tile_IBC-HQ-Lobby-Crossville1.png
- [Image]: http://www.constructionspecifier.com/wp-content/uploads/2015/05/tile_Aventis-Cotton-Ask-2014-Kitchen.png
- [Image]: http://www.constructionspecifier.com/wp-content/uploads/2015/05/tile_Aventis-Thinner_Velvet_exterior-2014.png
- [Image]: http://www.constructionspecifier.com/wp-content/uploads/2015/05/tile_Legends-Honda-Training-1.png
- [Image]: http://www.constructionspecifier.com/wp-content/uploads/2015/05/tile_Ferrari-P1020485.png
- [Image]: http://www.constructionspecifier.com/wp-content/uploads/2015/05/tile_Legends-Honda-8.png
Source URL: https://www.constructionspecifier.com/light-and-large-considerations-for-commercial-thin-tile-installations/