

How to work with STPE-based products
It is important to contact manufacturers for product- and application-specific requirements, recommendations, and precautions. Nevertheless, below is a general overview of the steps to follow in working with a single-component, moisture-cured STPE elastomeric, liquid-applied waterproofing material.
Surface preparation
Always begin with proper surface preparation. Once the concrete forms are removed and the wall or structure is determined to be safe and self-supporting, substrate preparation can begin. The surface must be cleaned of all contaminants that can interfere with bonding. Even though this is a moisture-cured product, surfaces must be dry to the touch and free of obvious moisture before product application begins.
Adhesion testing
Perform adhesion testing on all substrates, especially with applications over existing or in-situ materials. Adhesion peel tests are typically performed in accordance with ASTM C794, Standard Test Method for Adhesion-in-Peel of Elastomeric Joint Sealants. Adequate resistance to peel adhesion is normally demonstrated by cohesive failure, where most of the waterproofing material remains on the substrate. Any failure should be evaluated to determine suitability and the degree of surface preparation needed. One must not use asphalt-based primers as they deter adhesion of most STPE-based materials.
Transition detailing
Once the substrate preparation is complete, transition detailing can ensue. Installers should pay special attention to corners, cracks, and other areas requiring extra application of the STPE-based liquid product along with polyester reinforcement. Apply flashing-grade, STPE elastomeric, liquid-applied waterproofing material to create a smooth surface for membrane application anywhere voids exist. Wall penetrations, such as pipes, should also be flashed using normal roofing/waterproofing flashing procedures with reinforcement and STPE liquid material.
Field membrane installation
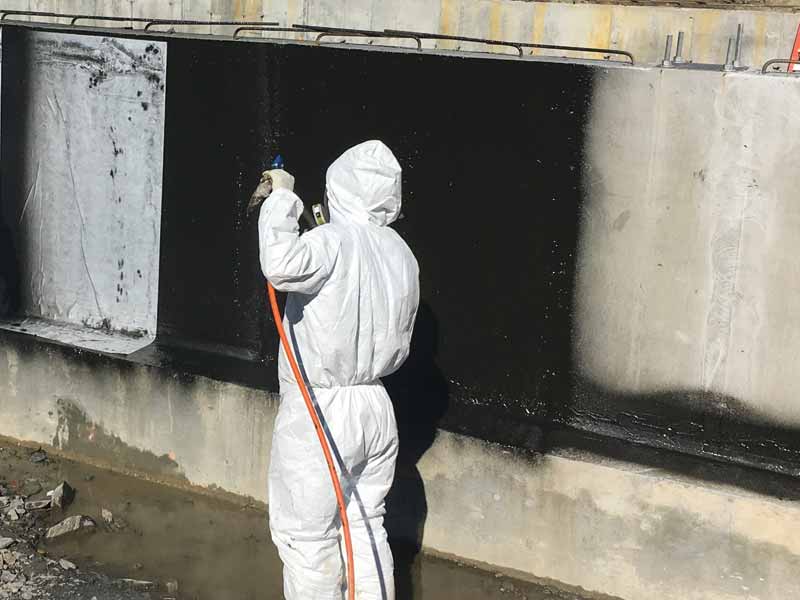
Once the surface preparatory and detail work are complete, field membrane installation can begin. The material can be installed reinforced or non-reinforced. Although the STPE elastomeric, liquid-applied waterproofing material can be installed with a brush or roller, the fastest and most economical application method is spray application. With any liquid-applied membrane it is important the finished material be installed in a continuous, uniform application of the appropriate thickness free of voids and pinholes. On rough, porous substrates, additional material will be required to achieve the desired thickness and consistency.
Protection course
Once the STPE elastomeric, liquid-applied waterproofing material is cured, a protection course can be installed. The protection course can be any moisture-resistant substantial material with the ability to provide adequate protection to the waterproofing membrane. After installation of the protection course, a drainage panel could be installed to allow for free movement of the groundwater to a drainage tile or other water-removal provision. One must be careful when backfilling to protect the waterproofing components already in place.
Tips for installation success
The installation of a positive-side, single-component, moisture-cured STPE elastomeric, liquid-applied waterproofing material can provide a very cost-effective, functional system for a building or structure. As with any field-installed material, however, specific installation prompts are warranted and can make all the difference to the longevity of the material.
Consistency
It is important to maintain a uniform consistency of the product throughout application. This is accomplished by initial and periodic mixing when using drums or totes.
Product temperature
The product should be stored and maintained above room temperature, 20 to 22 C (68 to 72 F) before application. This may take several hours when employing drums or totes.
Substrate temperature
The product should not be installed when ambient or surface temperatures are below 1.6 C (35 F). Although the ambient temperature may be above the 1.6 C limit, the cold mass of concrete may be well below this acceptable parameter.
Substrate preparation
The substrate should be free of all dirt, oil, loose paint, water, frost, form-release agent residue, lime, and other contaminants that can interfere with bonding.
Detailing
Cold joints, cracks, inside and outside corners, footing/wall intersections, penetrations, concrete spalls, holidays, honeycombs, and voids must be detailed and reinforced as necessary.
Product adhesion
Membrane adhesion can generally be improved by the application of a “kiss” or primer coat of material to the substrate.
Uniform continuous coverage
The spray gun should be perpendicular to the substrate with overlap spray patterns. Application using “cross patterns” helps to ensure uniform, full coverage with minimal pinholes.
Membrane thickness
All coating thicknesses should be verified using a wet-film mil gauge.
Intercoat delamination
In multicoat applications and with repairs, one must apply additional coats as soon as the first coat is firm but within 72 hours of the initial application.
Reinforcement
Penetration, transition, and detailing reinforcement should be fully embedded and coated with material. In no case should dry reinforcement touch each other.
Reinforcement wrinkles
Consider employing flashing-grade material to embed and hold the reinforcement prior to installing the topcoat.
Protection-board placement
The protection course should be adhered to the membrane and never be mechanically attached to the wall.
Penetration damage
Prior to installing the protection board, flashing grade fillets should be installed around all penetrations to prevent lateral movement of the protection course that could damage the penetration flashing.
Drainage panels
The drainage panel should be constructed and installed in such a manner to prevent plugging the drainage channels with backfill material.
Backfill damage
The backfilling operation should be accomplished with care to protect the waterproofing components in place.
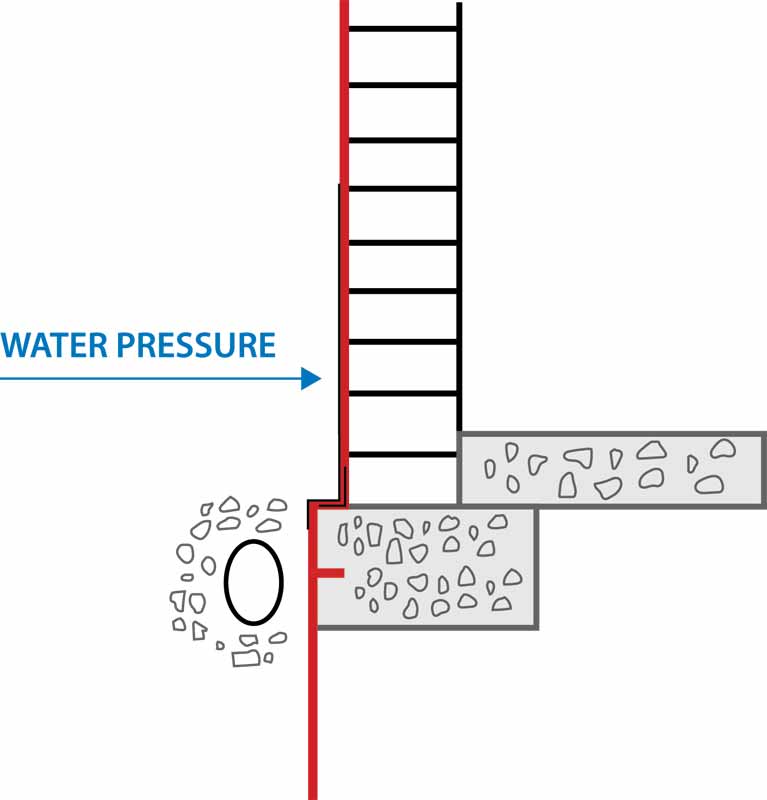
While a variety of product and application methods are available for a positive-side, below-grade waterproofing job, a single-component, moisture-cured STPE elastomeric, liquid-applied system—especially one which is spray-applied—is an economical method of restricting the ingress of hydrostatic water pressure for waterproofing a building or structure. In addition to ease of application, the moisture-cured attribute allows for an accelerated application schedule, thereby reducing the overall waterproofing schedule.
Curt Liscum is the technical services manager for Soprema USA and is responsible for field technical, warranty evaluations, and warranty claims. Liscum has worked in the roof/waterproofing consulting industry for more than 30 years, performing design, evaluation, construction management, and forensic analysis services. He can be reached at cliscum@soprema.us.

