The air barrier pre-installation meeting
by maz_atta | June 1, 2021 12:00 pm
by Corey Zussman
 [1]
[1]The air barrier installing contractor has sent in their submittal package for review, the building envelope coordination meeting has been held, and installation will begin in a few short weeks. Now, it is time for the air barrier pre-installation meeting where the installation of the specified product is discussed with all contractors associated. It provides the broader team an opportunity for open discussion regarding the air barrier and its complexities to ensure a successful installation.
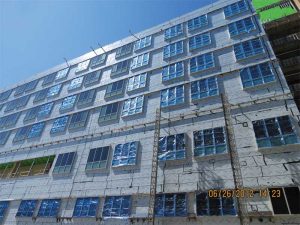
The air barrier is one of the most significant items on any building exterior. The installation and process should reflect the importance of the system and its intricate installation and integration of non-air barrier system components, such as waterproofing, structural elements, windows, and roofing systems.
The air barrier pre-installation meeting should be designed to:
- review and confirm job-specific product data, shop drawings, and the job-specific quality plan (JSQP);
- review building envelope meeting minutes and contract document details and specifications;
- review and confirm product warranty, testing requirements, and protocols;
- provide a clear understanding of expectations from the installer and adjacent trades;
- review and verify installation sequencing, equipment to be used/logistics, and compatibility of the air barrier and adjacent trades;
- discuss weather concerns, exposure limits, and installation constraints;
- discuss lessons learned from previous projects and experience;
- mockup a description and timetable with building envelope trades;
- provide first work in-place review guidelines; and
- review and verify on-going job site quality control (QC) procedures.
 [2]
[2]It is essential to review shop drawings and other relevant submittals at this meeting, ensuring that all the product data is submitted and the details are coordinated with the final building plans, taking into account any modifications that might have come with the building envelope coordination meeting and final shop drawings of the adjacent areas. A team should prepare to allocate two to three hours for this meeting depending on the complexity of the project.
The team for this meeting should consist of:
- architect/architect’s on-site observer;
- general contractor–project manager, superintendent/foreperson, and quality team member;
- subcontractor foreperson (a must) as well as the project manager;
- manufacturer representative;
- owner/owner’s testing team;
- optional participants depending on complexity of the project; and
- substrate, waterproofing, window, exterior cladding, and roofing contractor(s).
Crucial moments to consider for cross-contractor communication
The author had a project where the air barrier contractor only submitted the main air barrier components. They did not submit the sealant and primer, which turned out were incompatible with the masonry flashing, resulting in a failure with the systems installed. So, even though some architects do not require the contractor to provide documentation on all components of the air barrier system, it is good practice to submit all items being installed to adequately review the system. Without having each component with updated installation instructions, latest manufacturer technical bulletins, and weather procedures, the air barrier system could be installed incorrectly or have a compatibility issue with adjacent materials.
 [3]
[3]When going into the air barrier pre-installation meeting, the team must be open to hearing the requirements of installation, which are sometimes new to the installer, for the exact product and procedure that is being installed or installed adjacent to the air barrier. Having an open mind is imperative for a successful meeting. Treat each meeting like it is the first time these products and adjacent components are being installed. Adopt the mindset that materials change over time; installation instructions will be modified periodically by the manufacturer to include updated concerns and information from the field on other projects. As well, adjacent materials are typically different on every project.
Even if this is a Phase II installation, having a new pre-installation meeting with the same intense scrutiny as the first meeting, the team will learn from Phase I lessons learned and make sure the manufacturer, architect, and other subcontractors have not changed materials or procedures. The author recently had a project where the discussion revolved around installing the liquid air barrier with rollers; even the mock-up was installed with a roller. When it was installed on the building, spray equipment was used, creating issues with the installation that were never addressed. Therefore, always make sure the specific installation procedures are discussed and agreed upon. An installer having no experience with a new product happens often and so it is important to identify this early before installation mistakes occur. One of the first questions to review is ensuring the installers have installation experience with the specified product or system on the same type of construction and weather conditions. The air barrier contractor could have a great deal of experience with the manufacturer and similar products, but not this specific installation. Also, getting ‘lessons learned’ from the entire team and identifying top concerns for the installation will help set the agenda and make sure all questions get identified and answered during the meeting.
Devil in the details
 [4]
[4]It is critical to review and verify contract documents and building envelope notes to the job-specific details provided by the air barrier subcontractor. Reviewing these details with adjacent contractors will confirm installation and sequencing; keeping a guide sheet of typical details to review and how connections of the air barrier are made will be an excellent resource for the meeting.
Typical job-specific details that should be reviewed are:
- base of wall(s);
- parapet or top of wall(s);
- openings (head, sill, and jamb) for each of the opening systems;
- penetrations, both before air barrier installation and after air barrier installation;
- soffits and overhangs;
- building and wall movement joints, including horizontal floor movement joints; and
- transitions to other building components.
Once shop drawings and other applicable submittals have been reviewed, the project complexities and building component clearances should be discussed along with the initial sequencing of the building components. Discussions on what will happen before and after air barrier installation and what, if any, additional instructions are needed for those installations are critical. For example, the cladding system might require additional flashing or detailing due to the installation procedures of that trade into or adjacent to the air barrier. Certain cladding components might need to be modified to accommodate the air barrier’s limitations, such as joints in the sheathing or even the type of anchor being used or its procedure of installation.
 [5]
[5]
Penetration requirements
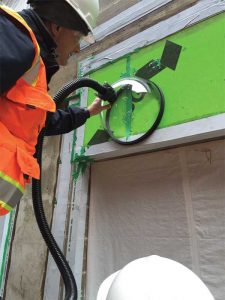
Penetrations are important to discuss; mechanical, electrical, plumbing, fire protection (MEP/FP) contractors should be aware of the requirements for their penetrations. Should a sleeve be installed and how is that sleeve detailed? What if there is not enough room on the exterior to install a sleeve that meets the air barrier manufacturer requirements for distance off the wall, such as detailing on to the sleeve a few inches? Is it possible to reverse the detailing of the sleeve, installing the membrane into the sleeve a few inches rather than on the exterior of the sleeve material?
Making sure the team understands compatible material to use as the sleeve is important to discuss early. The MEP-FP trades needs to know the penetrating material must be restrained from moving once detailed with the air barrier. How the penetrating object is installed on the interior is critical to the overall success of the installation. Additionally, the location of multiple penetrations must be discussed. The clear distance the penetrating object needs to be from other penetrating objects will depend on the type of air barrier and is different with each product and even installer.
Damaged substrate, what is considered damaged and the following procedure to correct the condition, should be defined. The air barrier might not be applicable under certain damaged conditions, such as damage to the facer or gypsum core material. The concrete might have too much honeycombing to be able to apply the air barrier, and the use of certain patch materials might not be ideal.
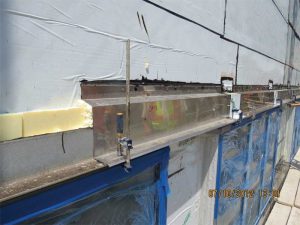
Building movement joints should be reviewed and understood. There should be an understanding about the air barrier plane versus the expansion joint material location. Typically, if there is a building movement joint, the joint will go through several different building components and involve many different trades and materials. Understanding where the air barrier plane is in relation to the materials being installed will take the entire team. For example, the air barrier will likely have a movement joint behind the veneer that will need to connect to the roofing movement joint. In this scenario, there must be a compatible transition membrane or compatible roofing component with the air barrier to the roofing membrane, and ample room for the installation of the cladding movement joint material in front of the air barrier joint. This detail will determine if the air barrier movement joint could be a compressible joint or must go into the movement joint to accommodate the cladding movement joint material.
Identify and review typical installation processes for the air barrier, such as span-ability of the material being installed, or how the peel and stick need to be applied. Most manufacturers have common installation practices for the air barrier type being installed. Having a list of updated procedures for the meeting will ensure the process or requirement does not get missed during this review. Typical overhead peel and stick type air barrier installation requirements, for example, are critical and might not have been detailed per manufacturer requirements.
Reviewing for compatibility and adhesion
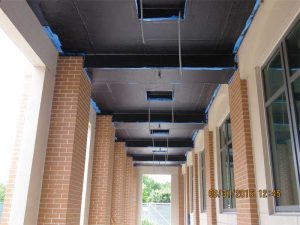
Compatibility and potential adhesion concerns of adjacent non-system products should always be reviewed and confirmed. Having a chart of compatibility at the meeting, as well as the manufacturer’s technical bulletins on compatibility, will provide the team with a good understanding and give direction on what needs to be verified before the start of installation or the sequence of installation of materials. One item to review for compatibility and adhesion is fireproofing. In some cases, one may see fireproofed beams, and floor deck extends out as a soffit. Typically, air barrier cannot be applied over fireproofing, which creates a condition where one might need to add a soffit to apply the air barrier. Fireproofing is rarely discussed in the air barrier manufacturer’s manuals and often missed during the initial review of construction, which is why it is important to assess all the architectural details, including the plans identifying such installations.
 [7]
[7]When reviewing for compatibility, the team should consider the substrate to which the products are being applied, including the sheathing product, requirement for the concrete finishing, and the masonry mortar joints. These items should be reviewed to make sure the corresponding contractor is aware of the finish expectations as soon as possible.
Protecting the air barrier is important. Define how many days of exposure are acceptable for the air barrier material. It is also useful to understand the project size and what cladding material will be installed in front of the air barrier system. There will likely be some lag between a masonry 10-story building if the entire building is installed with air barrier. Sequencing the timing of the air barrier to better correlate with the masonry installation would reduce the exposure time of the system. Protection should also include substrate before the installation of the air barrier. Some questions to consider include:
- how is the team going to keep the masonry dry on the backside before the installation of the air barrier;
- what procedures will be taken at the top of the parapet at the backside of the roofline to prevent moisture from getting into the system; and
- who is going to maintain the protection after rain or snow.
 [8]
[8]Finally, once the building envelope is complete, there are still a few items to be reviewed to maintain air barrier integrity. Signage installation, which typically follows the completion of the building envelope, should be identified. Notes and procedures should be documented and given to the final trades, such as the signage contractor and the owner so they understand the system installed behind the cladding and how to accommodate their installation without compromising the integrity of the air barrier system installed.
During the meeting, notes and details will be taken and will need to be followed up on by different parties. A responsibility matrix should be made to make sure all items are properly addressed over the coming weeks.
Among the most significant challenges installers see today is the use of different materials with uncertain compatibility to form a durable and continuous air barrier. It takes a team to properly review and confirm installation of an air barrier system. Having the opportunity and taking the proper amount of time ahead of initial installation to discuss these and other cladding challenges are key to a successful air barrier installation.
 [9]A forensic architect registered in several states, including Wisconsin, Corey Zussman has been practicing in the construction industry for more than 30 years. He specializes in building envelope, restoration, preservation, life safety and interior finishes. While working on an average of 50-75 projects a year, Zussman conducts constructability reviews, pre-installation meetings, comprehensive envelope meetings and construction observations. He has also become known for providing educational opportunities in the industry and has produced more than 150 “lessons learned” papers. Topics include building envelope and life safety concerns, enabling Zussman to proactively address issues during design review, pre-construction and construction.
- [Image]: https://www.constructionspecifier.com/wp-content/uploads/2021/07/Overall.jpg
- [Image]: https://www.constructionspecifier.com/wp-content/uploads/2021/06/AVB-Testing.jpg
- [Image]: https://www.constructionspecifier.com/wp-content/uploads/2021/06/Coordination.jpg
- [Image]: https://www.constructionspecifier.com/wp-content/uploads/2021/06/Pre-install-meeting.jpg
- [Image]: https://www.constructionspecifier.com/wp-content/uploads/2021/06/Joint-preperation.jpg
- [Image]: https://www.constructionspecifier.com/wp-content/uploads/2021/06/Window-Roof-Transition.jpg
- [Image]: https://www.constructionspecifier.com/wp-content/uploads/2021/06/Proper-end-of-day-seal.jpg
- [Image]: https://www.constructionspecifier.com/wp-content/uploads/2021/06/Soffit-below-fire-proofing.jpg
- [Image]: https://www.constructionspecifier.com/wp-content/uploads/2021/06/Zussman-Corey-fullcrop.jpg
Source URL: https://www.constructionspecifier.com/the-air-barrier-pre-installation-meeting/