Understanding challenges with adhered masonry veneer
by Katie Daniel | July 6, 2016 10:54 am
by Pat Conway, CSI, AIA
Adhered masonry veneer assemblies are gaining a greater share of the building enclosure market because architects and building owners like their appearance, thin profile, lightweight features, and potential for cost savings. However, designing and constructing these exterior wall systems is becoming more complex with a wider array of cladding product choices, dry-stack configurations, greater expanse of material being used on exterior building elevations, continuous insulation (ci) challenges, drainage mat debates, durability concerns, and conflicting installation recommendations.
Adhered masonry veneer code requirements are indicated in both Chapter 14 of the International Building Code (IBC) and Section 6.3 of the referenced national masonry model code and specification, Building Code Requirements and Specification for Masonry Structures (i.e. The Masonry Society [TMS] 402/American Concrete Institute [ACI] 530/American Society for Civil Engineers [ASCE] 5 and TMS 602/ACI 530.1/ASCE 6). In addition to formally referencing the national masonry model code, IBC also mandates designers to follow manufacturer installation recommendations (Figure 1).
Some of these manufacturers have customized installation instructions for their products, while other suppliers simply point designers to ‘typical industry standards’ or guides written by masonry trade associations. Other companies refer to their own proprietary third-party installation recommendations such as their respective International Code Council’s Evaluation Service Reports (ICC-ESR). When using thin manufactured masonry units, such reports serve as reputable sources of objective and definitive information regarding unit properties and installation recommendations. In fact, ICC-ESR, Section 5.1 states:
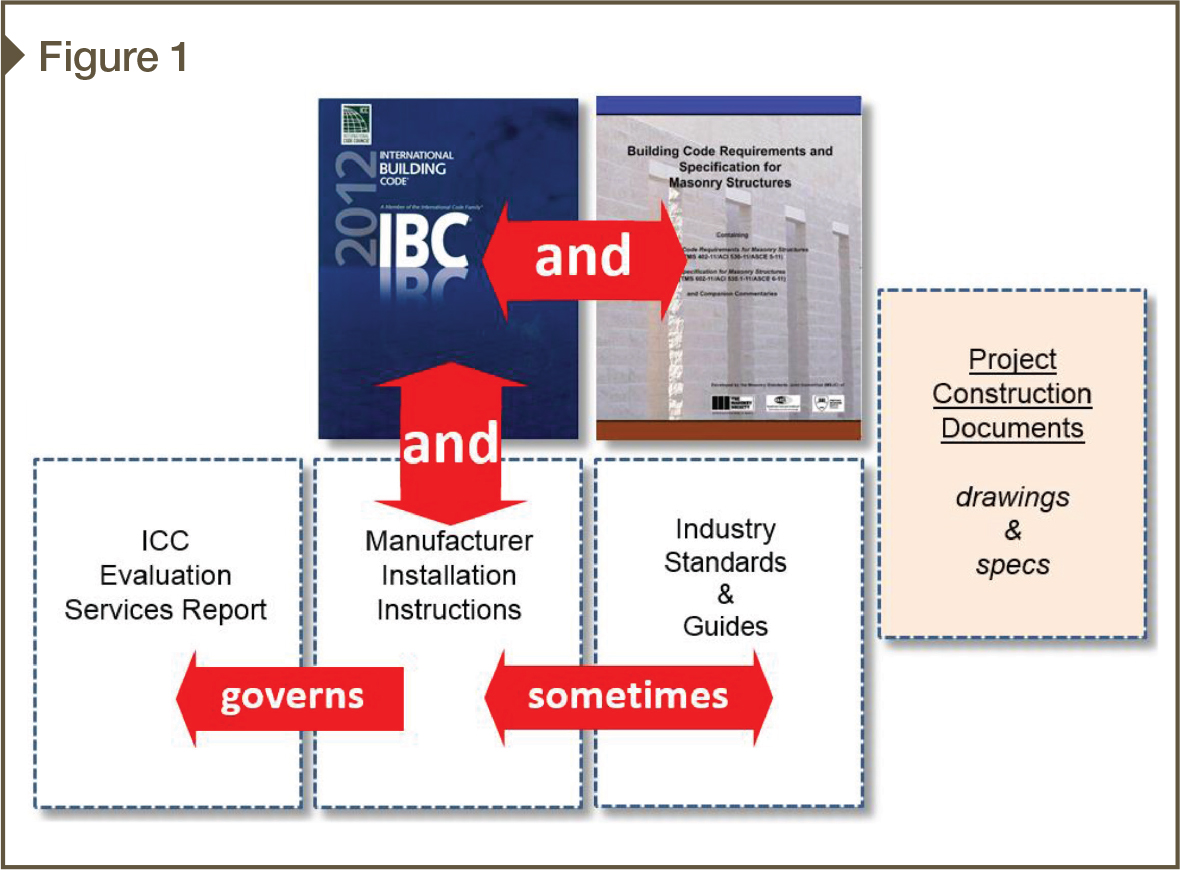
In the event of a conflict between manufacturer’s published installation instructions and this report, this report governs.
When it comes to both natural and manufactured adhered masonry systems, recently published ASTM standards support both the units and their installation. Thin manufactured stone units are now covered by ASTM C1670-14, Standard Specification for Adhered Manufactured Stone Masonry Veneer Units, while installation of manufactured stone veneer units is addressed by ASTM C1780-15, Standard Practice for Installation Methods for Adhered Manufactured Stone Masonry Veneer. Natural thin stone veneer, on the other hand, is supported by ASTM C1242-15, Standard Guide for Selecting, Design, and Installation of Dimension Stone Attachment Systems, under Section 6.7. (In addition to these new ASTM standards for thin natural stone products, two helpful supplier-authored guides include Indiana Limestone Company[1]’s Thin Veneer Installation Guide, and Natural Stone Veneers International[2]’s Installation Guide & Helpful Tips).
For manufactured thin veneer units, common industry guides include the Masonry Veneer Manufacturers Association’s (MVMA’s) Installation Guide and Detailing Options for Compliance with ASTM C1780 for Adhered Manufactured Stone Veneer and the National Concrete Masonry Association’s (NCMA’s) TEK 20-1 (2014), Key Installation Checkpoints for Manufactured Stone Veneer. In addition to these design and installation resources, the International Masonry Institute (IMI) has an informative seminar titled, “Adhered Masonry Veneer Systems,” reviewing pertinent building codes, industry literature, different adhered masonry veneer assembly options, and installation photos.
Since there are multiple design and installation resources available, designers should be careful to compare the various documents for possible conflicts. In addition to potentially contradictory design and installation resources, some designers and specifiers take it upon themselves to create unique design and installation parameters with sometimes incomplete or unclear construction documents that can result in inaccurate bids, multiple RFIs, change orders, confusion during the installation process, and schedule delays. This lack of clarity can yield wall performance issues for building owners, hardships for builders, and unexpected project management hours for designers.
When designing adhered masonry veneer systems, it is also important to consider local codes. For example, 10-mm (0.4-in.) drainage mats are required behind adhered veneer claddings in Canada, and California has its own code citations for adhered masonry veneers applied to schools and healthcare facilities.
Basic exterior wall design concepts
The fact adhered masonry veneer systems differ from typical masonry cavity walls does not mean ignoring basic and proven building science concepts and required building codes of moisture management, energy control, and durability. When using adhered masonry veneers, designers still need to understand:
- how the exterior wall drains and dries when it gets wet;
- ways the exterior wall system controls air, vapor, and associated condensation and energy implications;
- methods to incorporate continuous insulation;
- how the thin cladding products and wall accessories react close to grade or when exposed to de-icing solutions;
- strategies for accommodating material and differential building movement; and
- approaches to selecting durable wall components to create resilient exterior assemblies.
Type of adhered masonry veneers
As adhered masonry veneer systems come with many different types and configurations, along with veneer and internal wall component choices, they should be selected carefully to perform in their respective climate zone. Exterior thin veneer systems can be clad with natural or manufactured brick, natural stone, manufactured stone, ceramic or porcelain tile, fiber-cement products, or other materials. Veneer units can be adhered with traditional mortar, modified mortar, or synthetic materials. Cladding units can be installed as individual units or panelized systems. In more severe climates, the thin veneers industry has learned that polymer-modified mortars or proprietary premium mortars perform better than traditional mortar.
Further, adhered masonry veneer wall systems can be designed either as a barrier or drainage wall, each with its own considerations.
Barrier walls
There are two types of barrier walls: ‘mass walls’ or ‘skin walls.’ Design strategies employing the former with historic masonry walls generally worked well with sufficient thickness and multiple layers of masonry to absorb and release moisture to prevent it from getting to the interior surfaces. However, because of the thin profiles of adhered masonry veneers, these systems have diminutive moisture storage capacity. Therefore, mass wall design strategies with adhered masonry veneer systems are risky and only appropriate in dry climates or if a robust and tested air and moisture barrier is applied to the support wall, before the adhered cladding, and metal lath fastener penetrations are eliminated or sealed.
A ‘skin wall’ is a type of mass wall assembly that depends on a seal at the exterior surface of the cladding to keep moisture out—rather than having any drainage components within the assembly. Skin wall strategies are only as good as the seal; they are generally not recommended for adhered masonry veneer because the surface seal can be easily compromised by building movement, material movement, penetrations, or ultraviolet (UV) degradation that leaves the system vulnerable to moisture damage.
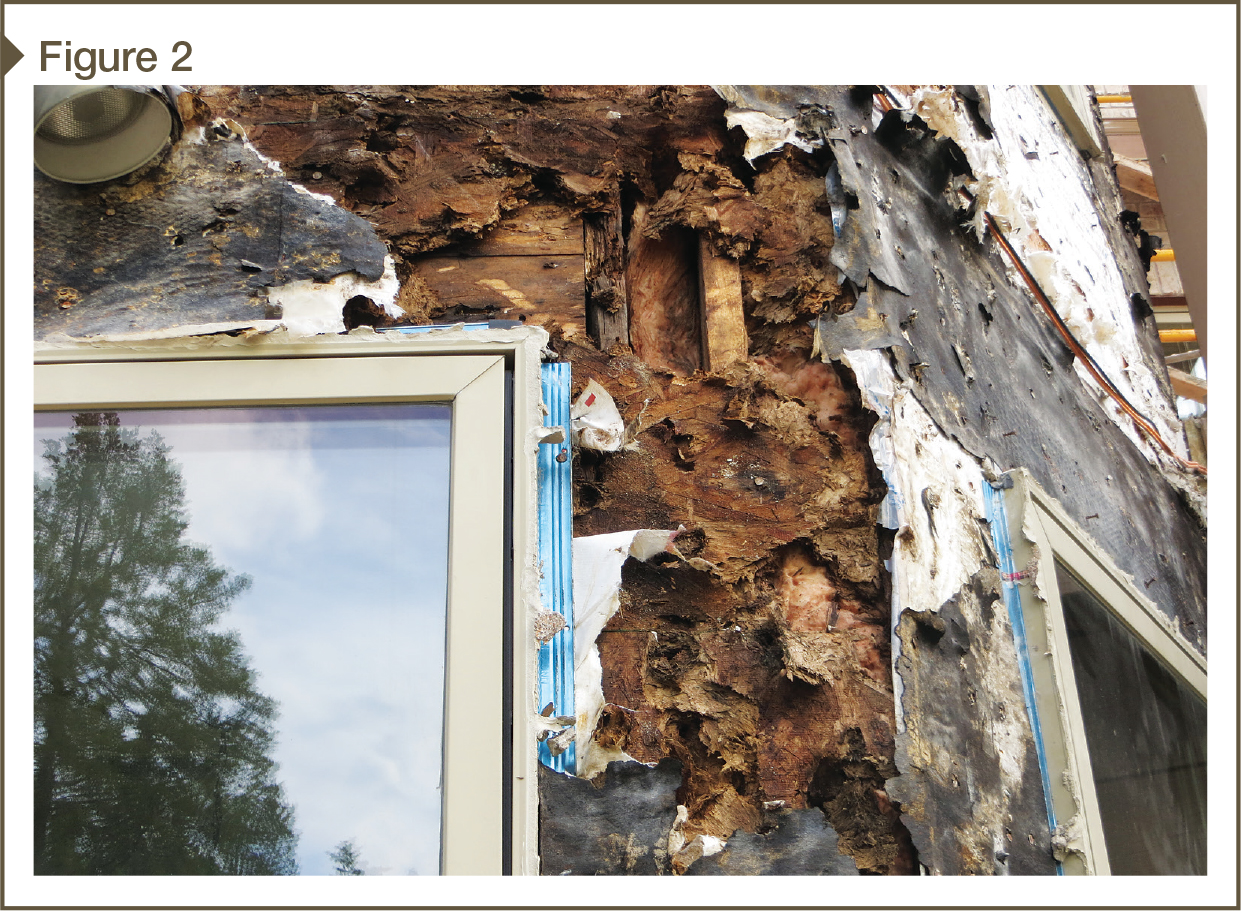
Many recently investigated premature adhered veneer failures have occurred with assemblies utilizing mass wall strategies—especially when the support wall comprises moisture-sensitive materials such as wood framing and wood-based sheathing. In a few recent Upper Midwest cases involving adhered masonry veneer over wood walls, there has been:
- cracked or debonded units;
- deteriorated or swollen wood sheathing and framing members;
- deteriorated assembly components (e.g. corroded metal lath and fasteners);
- window damage; and
- mold.
These issues have been seen in walls as ‘young’ as one to six years (Figure 2). Most of these failures can be traced back to faulty design and material choices, while others can be attributed to poor workmanship.
Drainage walls
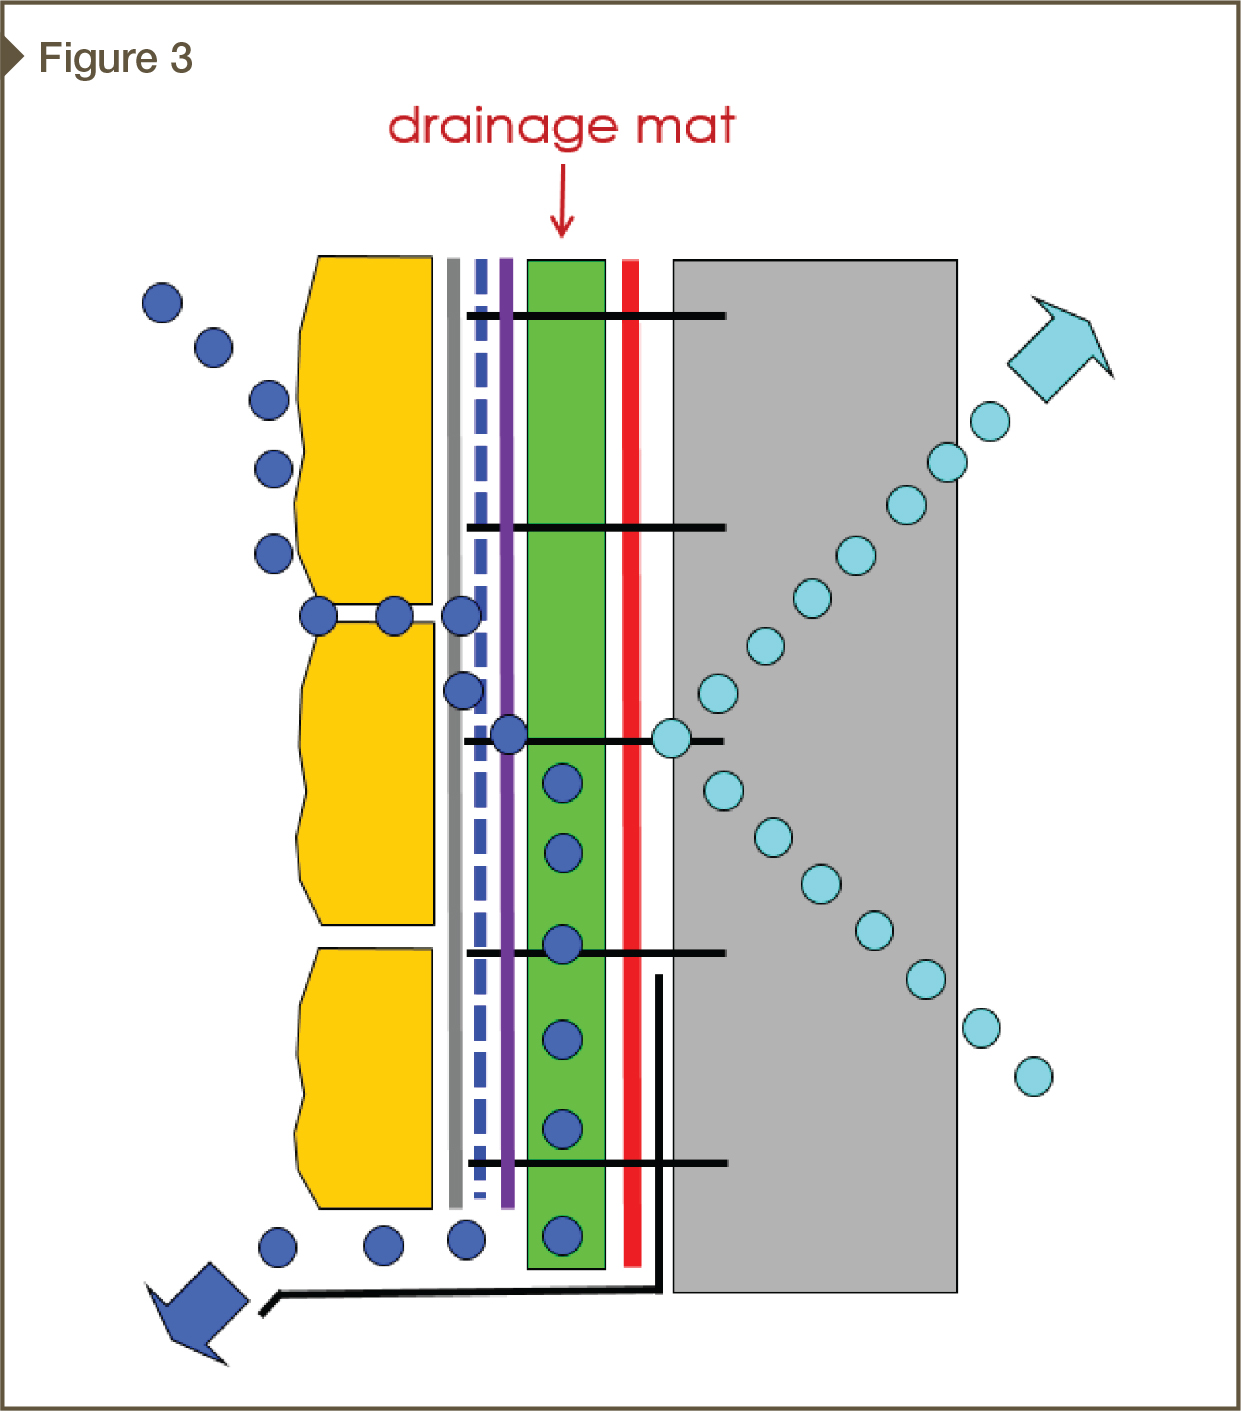
Drainage wall design strategies are the most common and effective type of adhered masonry veneer system. This approach works well in all climate zones provided there are proper water and air control layers behind the cladding. In wet climates or harsh freeze/thaw environments, it is appropriate to use a drainage wall concept with adhered masonry veneer systems that includes drainage mats or other tactics for moisture to escape the veneer system (Figure 3).
A means for drainage is a code requirement in the 2012 IBC. Some drainage walls can be upgraded to be ventilated, or even as rainscreen wall systems with weep vents low and high in wall panels.
Note 14 in the new ASTM C1780-15 states:
For optimum performance, the drainage gap shall be drained at all terminations and penetrations and ventilated at top of wall section.


Movement joints
In the early years of the adhered masonry veneer market, these thin wallcoverings were primarily used for small-scale wainscot or other exterior accents on residential building types, or for interior elements such as fireplace surrounds or feature walls. Today, the adhered masonry veneer market has expanded to include whole building elevations on multi-story commercial facilities and other large buildings with increased exposure, greater loads, complex design, and high serviceability expectations. When using adhered masonry veneer systems on large-scale projects, it is critical to accommodate material and differential movement in both horizontal and vertical directions (Figure 4).
Movement joints in adhered masonry veneer systems should align with any points of expected movement in the support wall, such as:
- at or near inside and outside building corners;
- at variations of mass or height in the support wall;
- where the support wall changes material or abuts structural columns or beams;
- at sheathing expansion joints;
- where the adhered masonry veneer adjoins a dissimilar wallcovering product;
- horizontally to panelize tall elevations;
- at the perimeter of window and door openings (Figure 5); and
- at penetrations.
Movement joints in adhered masonry veneers are formed by using corrosion-resistant casing beads so the joint extends at least through the mortar setting bed, scratch coat, and meth lath (Figure 6). In most scenarios, the respective aligned movement joint in the support wall is made water- and airtight with an adhesive transition strip. If there is a flexible drainage mat as part of the detail, it can be continuous through the movement joint.
Like all cladding products, long vertical or horizontal expanses of masonry veneer should be panelized with movement joints to accommodate building and material movement. These joints should be spaced closer in walls with openings and in wall systems with less stiff support walls like wood or metal framed walls. Movement joints can be spaced further apart when applied over masonry support walls or in walls with no openings.
In the national masonry model code, TMS 402/ACI 530/ASCE 5, Section 6.1.6.3 requires building designers to “Design and detail the veneer to accommodate differential movement.” Additionally, the specifications component of the national masonry model code, TMS 602/ACI 530.1/ASCE 6, provides a “Mandatory Requirements Checklist,” for designers, stating in Part 3-Execution, 3.3, D.6: “Indicate type and location of movement joints on the project drawings.” In other words, it is not the mason’s responsibility to locate movement joints.
Continuous insulation
With energy codes often resulting in continuous insulation requirements on the exterior side of support walls in most climates, adhered masonry veneer systems become more complex when installed more than 13 mm (½ in.) away from the support wall. In this situation, the structural engineer-of-record needs to calculate fastener type and spacing to carry the adhered masonry veneer ‘system’ dead load back to the support wall, and account for live loads such as wind pressures. The weight of the adhered veneer system can include:
- an extra layer of sheathing on the exterior side of the insulation;
- moisture barrier;
- drainage mat;
- metal lath;
- scratch coat;
- setting mortar;
- pointing mortar; and
- veneer units.
There are design guides to help designers calculate connection methods to transfer adhered veneer system loads back to the support wall. Fasteners used to secure metal lath to the building shall be fabricated in accordance with ASTM C1063-12C, Standard Specification for Installation of Lathing and Furring to Receive Interior and Exterior Portland Cement-based Plaster. One oft-overlooked requirement of this specification is the need to have fasteners with at least a 10-mm (7⁄16-in.) diameter pan wafer head to ensure proper engagement with metal lath (Figure 7).
When designing adhered masonry veneer systems over continuous insulation, some of the more challenging fastener designs are when adhered veneer system loads are over insulation that is 36-mm (1 1⁄2-in.) thick or greater and the veneer system dead load is in the range of 1.2 kPa (25 psf). In these scenarios, connections back to the support wall may need to be upgraded from closely spaced heavy-gauge fasteners to continuous metal or fiberglass Z-furring channels to carry the load (Figure 8). Of course, a structural engineer should be involved to factor in all the many variables.
When Z-furring channels are mounted perpendicular to the wall framing, it is generally considered a ‘clear field anomaly’ for an acceptable ci strategy as interpreted by some energy consultants. As of the writing of this article, the impact of a wide variety of building enclosures’ thermal bridging continues to be evaluated in many exterior wall types and special conditions.


Drainage mats
Drainage mats work well to prescriptively create code-compliant adhered masonry veneer systems that have the ability to drain and dry. This is especially critical when designing with absorptive cladding products over wood frame walls with wood-based sheathing.
When using drainage mats, some designers prefer to have a layer of sheathing over the drainage mat, such as exterior-rated cement board to provide a more rigid substrate for the cladding and a solid surface on which the protrusions of the self-furring metal lath sit. Self-furring lath is important, as it creates a 6-mm (¼-in.) space behind the lath so the scratch coat can properly encapsulate the metal lath for adequate bond strength and to protect the metal lath from premature corrosion.
When sheathing is not installed over drainage mats, a rigid or semi-rigid drainage mat with a fabric filter facing the scratch coat should be used to keep mortar from encroaching the drainage plane while also increasing chances for the mortar scratch coat to get behind the metal lath. Many installers have reported positive experience with 9.5-mm (3⁄8-in.) thick, fluted polymer sheeting drainage mats with bonded filter fabric.
Drainage mat sheets should be installed tight to one another, with filter fabric lapped, so the mortar scratch coat cannot squeeze between the sheets and form an obstruction to the downward flow of moisture and the movement of air. To complete the drainage wall concept, a moisture and air barrier, corrosion-resistant flashing (especially above openings and at top-of-wall details), and weep screeds should be installed before the drainage mat (Figure 9).
Dry-stack veneer applications
One of the attributes of adhered masonry veneer systems is the ability to achieve a dry-stack masonry aesthetic. This installation type should be carefully considered in wet and harsh climates with many freeze-thaw cycles. When using dry-stack cladding applications, it is crucial to create stout water and air management layers behind the cladding and use mortar additives or proprietary setting material that can resist the stresses associated with direct exposure.
When using dry-stack applications in wet climates, other tips include:
- specifying durable cladding products that can withstand exposure at unit edges;
- inspecting the installation process for complete mortar coverage on the back of veneer units so moisture cannot congregate behind the cladding (Figure 10); and
- instructing the masons to install extra setting material around the perimeter of the veneer units so mortar can squeeze out between them (Figure 11).
In all adhered masonry veneer systems, it is important to fully cover the back side of cladding units with mortar to ensure bond strength and not allow water to get trapped behind the cladding. This is especially critical when installing dry-stack adhered veneers. The new ASTM C1242-15, Section 6.7, includes a definition of acceptable full-mortar coverage on the back of cladding units. It is a good standard to use for all types of adhered veneer.
Cost, speed, and other issues
While adhered masonry veneer systems are commonly thought of as being faster and less costly to install than traditional anchored veneers, the inverse is actually the more common experience. This is particularly true on larger projects in challenging climates.
Adhered and anchored masonry veneer systems have many of the same wall components, except there are often more layers and installation steps involved with the former. For example, there may be special Z-furring channels to support thin veneers over thick rigid insulation with an additional layer of exterior sheathing and heavy-gauge or stainless steel metal lath behind the stone. There may also be a drainage mat with adhered assemblies that may be unnecessary with anchored veneer. Further, with adhered veneers, the mortar joints between stones are often installed after the veneer units—an extra step for masons not needed with anchored systems.
For these reasons, the installation of properly designed adhered veneer systems on some recently documented commercial building projects has been reported to take approximately 10 percent more time to install with about that same percentage more cost—even after factoring in the cost of a brick ledge for an anchored veneer system. Of course, there are many variables to compare for each specific project, such as overall building enclosure support wall design and foundation thickness. One of the attributes of adhered masonry veneer systems is a thinner exterior wall profile that affects other wall transition detail costs. In this regard, structural 150-mm (6-in.) concrete masonry unit (CMU) support walls offer value-added options.
Conclusion
Since adhered masonry veneer began being used in the 1950s on small-scale accents, the use of these systems has increased dramatically in the past few years, and so has their scope and complexity. While designers generally understand basic building science for durable and energy-efficient anchored masonry veneer systems, they are sometimes given conflicting design information or misdirection by others to skip or minimize critical control layers in exterior adhered assemblies.
To achieve properly designed and installed adhered masonry veneer systems, designers and builders must resolve building code, industry standards, and evolving manufacturer recommendations to create complete wall assemblies that can be durable in any climate. Adhered masonry veneer systems may not be faster and less costly than anchored masonry veneer, but, in many cases, they can be used quite successfully. The key is for the assemblies to be designed properly and installed by educated designers and trained masons who know better than to just do it the way they used to on small residential projects.
Pat Conway, CSI, AIA, is the International Masonry Institute’s (IMI’s) director of education. He is a registered architect, with expertise in masonry rainscreen walls, air barriers, movement joints, flashing, jobsite troubleshooting, and contemporary masonry wall detailing. Conway has a degree in architecture from the University of Minnesota, and is an active member of both CSI and the American Institute of Architects (AIA). He can be reached at pconway@imiweb.org[3].
- Indiana Limestone Company: http://indianalimestonecompany.com
- Natural Stone Veneers International: http://nsvi.com
- pconway@imiweb.org: mailto:pconway@imiweb.org
Source URL: https://www.constructionspecifier.com/understanding-challenges-with-adhered-masonry-veneer/