Understanding heat, air, and moisture control
Codes and performance
Despite meeting all the provisions discussed in this article, compliance may not guarantee performance, and subsequently creates ‘gaps’ between design and the built world. However, many tools and upfront services are available to the project team to better understand and help anticipate performance prior to construction.
Continuous insulation
Continuous insulation (ci) is often required to meet prescriptive code requirements. However, current codes and standards recognize insulation penetrated by fasteners as ‘continuous.’ ASHRAE 90.1 identifies continuous insulation as:
Insulation that is uncompressed and continuous across all structural members without thermal bridges other than fasteners (i.e. screws and nails) and service openings.
Therefore, it may be important for the project team to understand any potential overall or localized effects fasteners or service openings may have on the overall thermal performance of an assembly.
One method of upfront analysis is to utilize various computer simulations to estimate thermal transfer. It is important to note two- and three-dimensional thermal models exist and may yield varying results. Utilizing a two-dimensional analysis, Figure 4 depicts a thermal model of a roof assembly where the insulation is continuous per the code and the fasteners are not included. The surface of the metal decking is well above dewpoint for most typical interior operating conditions, and the U-factor of the assembly meets code.
However, once metal fasteners that penetrate the decking are modeled, the temperature of the metal decking is altered locally at the fasteners, as well as the assembly’s overall U-factor.
The fasteners direct heat away from the metal decking as they bridge to cold exterior conditions. This increases the risk for localized condensation on the metal deck, depending on interior operating conditions. Therefore, the designer may wish to evaluate the impact of thermal bridging in the early stages of the design process to understand whether or not changes or specific detailing to eliminate thermal bridging is warranted.
Air barrier placement
According to the 2015 IECC, the air barrier can be placed at the interior, exterior, or within the wall/roof assembly. However, the mechanical pressurization can significantly complicate air control strategies and should have an impact on the barrier’s placement for optimal performance.
In this example, a typical low-slope roof assembly was designed to include (from exterior to interior) medium-weight ballast, fully adhered roofing membrane, and polyisocyanurate (polyiso) insulation over metal decking. The building was located in a heating climate, and the interior space was to be humidified to approximately 30 percent, with positive pressurization at the interior spaces (Figure 5, page 36). The metal decking was specified to function as the vapor retarder, and the fully adhered roofing membrane (toward the exterior) was identified as the air barrier. The splices, joints, and ends of the metal decking were not detailed for continuity.
A computer simulation evaluated the proposed roofing assembly’s hygrothermal performance with only heat and moisture considered. An additional evaluation was then undertaken to include the effects of an air change source. By comparing the two models, the project team could grasp the potential effects of uncontrolled airflow within the roofing assembly.
In this instance, the applied air change source was from the interior to mimic the positive pressurization specified for the mechanical system. Simulating the assembly without air transfer (Figure 6), the model indicated the roof assembly would not accumulate moisture or result in a sustained relative humidity (RH) above 80 percent—the lower boundary for organic growth—for extended periods. However, once the air change source was applied to simulate the building mechanicals pushing air into the enclosure, the model output indicated the assembly’s moisture content increased in comparison to the model without the air change. The surface temperature reached the dewpoint at the underside of the roofing membrane (Figure 7), and the RH was maintained above 80 percent for longer than 30 days during the heating months.
Therefore, conditions in the model with air changes were conducive to organic growth and other potential damage to materials and components. As a result, the designer revised the project criteria to include a continuous air barrier at the interior and developed specific termination details to ensure continuity with adjacent assemblies.
Microclimates
The 2015 IECC stipulates interior design conditions used for calculations to be a maximum of 22 C (72 F) for heating. Therefore, whenever thermal simulations are undertaken for the exterior enclosure, a temperature of approximately 22 C is often applied as the interior boundary condition. However, does this temperature correlate with conditions adjacent to the exterior wall? The authors’ research and experience has yielded interesting findings regarding microclimates in operation versus design criteria.
Thermal simulations can provide valuable information prior to construction, but data collection after construction can also be an important tool for validation. In this study, a thermal simulation, as shown in Figure 8, was performed with an interior temperature in concert with 2015 IECC. Given the proposed interior operating conditions of 22 C and 25 percent RH, the surface temperatures were above the dewpoint of 1 C (34 F).
However, instrumentation was also enlisted to monitor the conditions following substantial completion. The frame surface temperatures from the instrumented data were compared to thermal simulations and found to be considerably lower than those predicted, prompting a closer look at the adjacent microclimate. The results indicated the temperature at the exterior wall can be significantly different (i.e. 5.5 to 8 C [10 to 15 F]) than the adjacent room temperature, as shown in Figure 9, and sometimes greater depending on the project details.
Once the temperature of the microclimate was applied as the interior boundary condition in
the thermal simulation, the frame temperatures were indicative of the instrumented data. Further study indicated the microclimate’s behavior could be impacted by the placement of the window, air leakage, and adjacent materials. Therefore, these may be important considerations for the project team when trying to estimate built behavior during the design phase.
Parapets
Parapets are another source of envelope moisture issues. The code does not define the parapet as part of the roofing or of the exterior wall, therefore the designer is left without clear direction. Consequently, the parapet is often overlooked when it comes to code-compliance and is not fully detailed as a part of either. The parapet is located where two envelope systems meet, often with dissimilar materials, structural interference, and construction sequence challenges. Failure to maintain continuity of air and thermal control planes can lead to moisture issues.
Parapets are often supported on projecting or upturned structural slab elements. These structures commonly define the edge of the thermal barrier of either the wall or the roofing. A thermal discontinuity between the roof and wall can be readily noted in Figure 10. However, this connection is easily overlooked during the design process. Peer review by various building system specialists can bring new perspective and expertise to assist with identification and resolution.
Air barrier continuity can be equally challenging at parapets where dissimilar materials, competing manufacturers, and different construction trades meet and attempt to integrate. Therefore, material compatibility must be considered where walls and roofs meet. While many common roofing materials have been in use for decades, new products are continually developed and proprietary air barrier systems are being marketed to keep pace with the new code mandates. The chemical compatibility between varying materials can be identified sooner with manufacturer involvement during design and resolved through additional specified testing or detailed language for warranties.
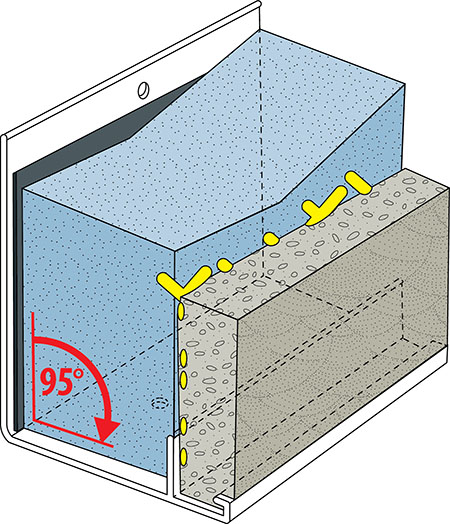
Even when continuity is specifically checked during design and dissimilar materials are resolved, geometries where vertical and horizontal elements meet can create hidden locations for moisture issues to propagate. As seen in Figure 11, a quick three-dimensional model of a simple parapet in two dimensions can highlight the need to further evaluate in-plane detailing. The typical building section detail is inadequate to show the special consideration needed at joints between parapet panels. Given this, the project team may wish to consider peer review and three-dimensional modeling early in the design process to assist with identifying and resolving performance gaps before they are constructed.
Conclusion
As codes advance and higher performance is expected from building assemblies, the control of moisture within and through the exterior envelope is critical to the success of any project. Good design anticipates the transfer of air, vapor, and heat under various conditions. However, understanding the fundamental nature of these properties is frequently insufficient to achieve success when considering the code-required performance or construction practices. To complicate matters, even when the code is satisfied, optimal performance may not always be achieved.
It is important to consider options and activities that can be done early in the design process to better understand and estimate the potential performance issues. Due diligence can also continue beyond the design process and provide a benefit to the overall project performance. In other words, every effort to identify potential performance risks or issues prior to completion is a benefit to project success.


Sarah K. Flock, CDT, AIA, is a consulting architect with Raths, Raths, and Johnson (RRJ). Specializing in building component diagnostics and repair design, she has participated in projects involving various types of building materials and systems. Flock is a graduate of advanced WUFI and ASHRAE training courses, a certified simulator through the National Fenestration Rating Council (NFRC), and an accredited commissioning authority + building enclosure (CxA+BE). She can be contacted at skflock@rrj.com.
Carole M Ceja, NCARB, RRC, is an architect II with RRJ. Her practice areas include roofing and waterproofing, fasade and curtain wall, water leakage and condensation, and structural components of buildings. She develops repair designs and construction documents to correct building deficiencies and performs construction observation services of these projects to help ensure repairs comply with plans and specifications. Ceja is a Registered Roof Consultant certified by RCI. She can be contacted at cmceja@rrj.com.
Sign up for our weekly newsletter
Architectural materials and methods delivered right to your inbox
- CSI News and Notes: CSI Foundation’s construction camp; CSI spring exam; and more
- CSI News and Notes: CSI’s credentials; CSI conference theme; and more
- To be specific – CSI supports young AECO professionals
- CSI News and Notes: CSI’s foundation scholarships, national conference, and Crosswalk
- CSI News and Notes: AI’s impact; CSI 2024 conference, and more
Products

Read the Latest Issue